
Unleash Your Creativity: Crafting Stunning Reclaimed Wood Wall Art with the Silhouette Cameo
Hello fellow DIY enthusiasts and creative minds! I am absolutely thrilled to share my latest crafting adventure with you, centered around an incredible tool that has quickly become a cornerstone of my workshop: the new Silhouette Cameo! This cutting-edge machine is truly a game-changer for anyone passionate about personalized home decor and intricate crafting projects. Its precision and versatility open up a world of possibilities, making even ambitious projects feel approachable and fun.
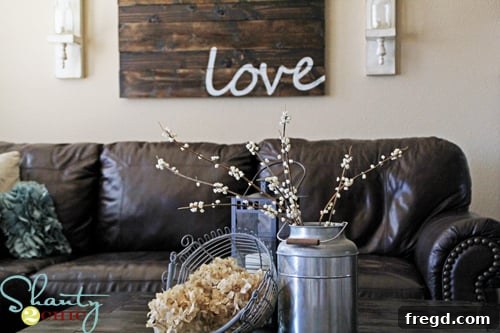
Today, I’m excited to walk you through the very first project I created using my Silhouette Cameo – a beautiful piece of reclaimed wood wall art that now proudly hangs above my couch. Not only does it add a touch of rustic elegance to my living space, but it also stands as a testament to the power of combining simple materials with intelligent crafting technology. The best part? This entire striking piece cost me a mere $25 to make! If you’re looking for an affordable yet impactful way to elevate your home decor, or if you’re curious about what the Silhouette Cameo can do, you’ve come to the right place. Let’s dive into how you can create your own custom masterpiece.
Yes, that eye-catching piece of wall art gracing the space above my couch is the very project we’re discussing today! Its unique character and handmade charm instantly drew attention and became a focal point in the room. Achieving this custom look for just $25 was incredibly rewarding, and it truly showcases the potential of DIY when you have the right tools. Here’s a detailed breakdown of how I brought this vision to life with the invaluable help of my new Silhouette Cameo!
Gathering Your Materials: The Foundation of Your Rustic Masterpiece
Before embarking on any DIY project, a well-organized workspace and a clear list of materials are essential. For this reclaimed wood wall art project, the beauty lies in its simplicity and the use of readily available items, many of which you might even have lying around or can source affordably.
For the Wood Base:
The heart of this project is the reclaimed wood itself. I opted for a combination of 1x6s and 1x4s. Alternating these widths creates visual interest and a subtle texture that enhances the rustic appeal. You can find reclaimed wood at salvage yards, lumber mills, or even repurpose old fence posts or pallets. The key is to look for pieces with character – old nail holes, weathered grain, and natural imperfections all contribute to the charm. For this specific piece, I cut my planks down to a uniform length of 40 inches. This size proved ideal for a prominent display without being overly cumbersome.
- Reclaimed Wood Planks: A mix of 1x6s and 1x4s (or similar widths) to create varied texture. Ensure they are straight enough for assembly.
- Backing Planks: Three 1×3 planks, cut to a suitable length to span across your main art planks for structural support.
- Wood Glue: A strong adhesive is crucial for a durable bond between the planks.
- Nails or Screws: To further secure the backing planks.
- Measuring Tape & Saw: For precise cuts (many hardware stores offer cutting services if you don’t have a saw).
- Minwax Dark Walnut Stain: Or a stain of your choice to achieve the desired finish.
- Brushes or Rags: For applying the stain.
- Protective Gear: Gloves and a drop cloth are recommended for staining.
- Sandpaper (Optional): For light sanding if needed to remove splinters or rough edges, while still preserving the reclaimed look.
For the Stencil Design:
This is where the magic of the Silhouette Cameo truly shines, allowing for custom, professional-looking designs.
- Silhouette Cameo Machine: The star of the show for precision cutting.
- Cutting Mat: For loading your material into the Cameo.
- Contact Paper: An inexpensive and effective material for stencils. Its adhesive backing makes it perfect for temporary application.
- Weeding Tool (Optional but Recommended): For easily removing unwanted parts of your cut design.
- Cream-colored Acrylic Paint: For the stenciled design. Any color that contrasts well with your stained wood will work.
- Dry Brush: An old, stiff brush works best for dry brushing techniques, helping prevent paint bleed under the stencil.
For Hanging:
Given the weight of multiple wood planks, a secure hanging mechanism is vital.
- Heavy-Duty Picture Hanging Kit: Includes D-rings or wire for secure installation.
- Screwdriver or Drill: For attaching the hanging hardware.
Step-by-Step Guide: Building Your Reclaimed Wood Art
Step 1: Constructing the Reclaimed Wood Base
This initial stage focuses on assembling the physical structure of your wall art.
Once you have your reclaimed planks, begin by laying them out on a flat surface. Arrange them in your desired pattern, alternating the 1x6s with the 1x4s. This variation in width creates a visually appealing rhythm and adds depth to the piece. Ensure the ends are aligned as neatly as possible.
To hold these planks firmly in place and create a sturdy base, I used three 1×3 planks as horizontal supports on the backside. Apply a generous amount of wood glue along the contact points where the 1x3s will meet the main planks. Position the 1x3s perpendicular to your main planks – one near the top, one in the middle, and one near the bottom. Secure them further by nailing or screwing them into each main plank. This cross-bracing provides excellent stability and prevents warping. Allow the wood glue ample time to cure according to the manufacturer’s instructions.
After the base is securely assembled, it’s time to enhance its natural beauty with a stain. I applied one coat of Minwax Dark Walnut stain. This deep, rich color beautifully highlights the wood grain and imperfections, giving it a truly antique and sophisticated look. When staining, apply the stain evenly with a brush or rag, then wipe off any excess to prevent a patchy finish. Always work in a well-ventilated area and allow the stain to dry completely before moving on to the next step. This curing process is vital for proper adhesion and to prevent any stickiness or smudging when applying your stencil.
Step 2: Unleashing the Magic of the Silhouette Cameo
Now for the part where the Silhouette Cameo truly gets to do its magic (oooooo…ahhhhhhh)! This remarkable desktop cutting machine is engineered to cut a vast array of materials with incredible precision. Its capabilities extend far beyond simple paper crafts; it can effortlessly slice through fabric, vinyl, cardstock, heat transfer material, sticker paper, and, crucially for this project, contact paper. What truly sets it apart is its impressive cutting area – it can handle materials up to 12 inches wide and an astonishing 10 feet long! That’s right, 10 FEET of continuous cutting, making it perfect for large-scale projects like this wall art.
For this specific project, I chose contact paper for my stencil material. Its advantages are numerous: it’s affordable, widely available, and its adhesive backing creates a clean edge for stenciling while being easy to remove without damaging the stained wood. The temporary stickiness is perfect for preventing paint bleed.
Using the Silhouette Studio software (which comes with the machine), I selected a beautiful script font from my computer’s extensive font library. The software allows for easy sizing, placement, and manipulation of your design. I carefully arranged the text to fit the dimensions of my reclaimed wood panel. Once my design was finalized, I loaded a piece of contact paper onto the Silhouette cutting mat, adjusted the cut settings for “contact paper” (or a similar thin, adhesive material), and watched in awe as the Cameo’s blade precisely cut out my chosen script. The process is incredibly satisfying, watching a blank sheet transform into a perfectly intricate stencil in minutes.
After the cutting was complete, I carefully “weeded” the stencil. Weeding involves removing the excess contact paper from around and within the letters – in this case, removing the parts where I wanted the paint to go. A Silhouette weeding tool or even a sharp craft knife can be helpful for this delicate task, ensuring all the tiny interior pieces of letters like ‘o’ or ‘a’ are removed. The result is a perfect, ready-to-apply stencil that will define your wall art.
Step 3: Stenciling the Design onto the Wood
With your wood base stained and dried, and your Silhouette Cameo-cut stencil ready, it’s time to bring your design to life.
Carefully peel the backing off your contact paper stencil and position it centrally and straight onto your stained wood panel. Take your time with this step, as proper placement is key. Once positioned, firmly press down on all parts of the stencil, especially around the edges of your letters, to ensure a tight seal. This prevents any paint from bleeding underneath, resulting in crisp lines.
Next, grab your cream-colored acrylic paint and a dry brush. The “dry brush” technique is crucial for stenciling on textured surfaces like wood. Dip your brush lightly into the paint, then offload most of it onto a paper towel until the brush is almost dry. With minimal paint on your brush, lightly dab or brush over the stencil, using an up-and-down motion or very short, gentle strokes. Building up thin layers of paint ensures clean lines and prevents oversaturation, which can lead to bleed. The cream paint beautifully contrasts with the dark walnut stain, making the script pop.
Once you’re satisfied with the opacity of your painted design, and before the paint is completely dry, carefully peel off the contact paper stencil. This immediate removal helps prevent the paint from adhering to the stencil as it dries, which could cause chipping. The reveal is always the most exciting part – watching your custom design appear cleanly and perfectly on the reclaimed wood! My job was essentially done here, transforming raw materials into a personalized piece of art.
Step 4: The Finishing Touch – Secure Hanging
Well… after attaching this heavy-duty picture hanging kit on the back. While this reclaimed wood piece isn’t super heavy, it’s always better to be safe than sorry, especially when hanging art above furniture or in high-traffic areas. A robust hanging kit ensures your beautiful creation stays securely on the wall for years to come. I opted for D-rings and picture wire, which are excellent for distributing weight evenly. Once the hardware was attached, centered, and level, mission complete! My first Silhouette Cameo project was officially ready for its place of honor.
Reflections on a Rewarding DIY Journey
This reclaimed wood wall art project has quickly become one of my absolute favorite pieces I have made for my house. There’s an unmatched satisfaction that comes from creating something beautiful and functional with your own hands, especially when it adds such character and warmth to your home. The rustic charm of the reclaimed wood, combined with the elegant script stencil, creates a harmonious blend of styles that perfectly complements my decor.
The Silhouette Cameo truly makes personalized decor accessible. Whether you want to stencil a favorite quote, a meaningful date, or a custom design, this machine streamlines the process, allowing for professional results even for beginners. The ability to choose any font from my computer and have it cut flawlessly transformed what could have been a tedious hand-stenciling task into an enjoyable and efficient creative endeavor.
Consider experimenting with different stain colors for the wood, or perhaps even a dry-brushed whitewash for a farmhouse-chic look. The stencil design itself is entirely customizable – think about using geometric patterns, silhouettes of animals, or even monograms to personalize your piece further. The possibilities are truly endless when you have a tool like the Cameo at your disposal.
Thank you so much for stopping by and joining me on this creative journey! I hope this detailed guide inspires you to pick up some reclaimed wood, fire up your Silhouette Cameo (or consider getting one!), and embark on your own personalized home decor projects. The joy of DIY is not just in the finished product, but in every step of the creative process. Happy crafting!
~Ashley