
Hey there, fellow decor enthusiasts! As the crisp autumn air begins to settle in, bringing with it a vibrant palette of reds, oranges, and golds, our homes naturally beckon for a touch of seasonal warmth and charm. I’m thrilled to share another delightful fall decorating project that’s not only incredibly easy but also incredibly budget-friendly. This week, my creative journey led me and my trusty sidekick, Whit, to the enchanting aisles of Hobby Lobby. My mission was clear: to uncover the perfect elements for a captivating fall arrangement that would effortlessly blend elegance with autumn’s rustic beauty. The goal was to craft a stunning centerpiece that felt both sophisticated and welcoming, without breaking the bank.
The beauty of DIY projects, especially for seasonal decor, lies in the ability to personalize every detail and create something truly unique that reflects your style. Instead of settling for mass-produced items, diving into a craft store allows for serendipitous discoveries and incredible savings. This particular fall arrangement embodies that spirit perfectly. I was looking for something timeless, that could grace a variety of spaces within my home, from the dining table to an entryway console. The inspiration was to create a cozy yet chic focal point, incorporating classic fall elements with a modern twist.
My treasure hunt began, and I was delighted to find several essential items on sale, proving that stunning seasonal decor doesn’t have to come with a hefty price tag. The first score was a generous bag of mixed pine cones and acorns, a quintessential fall element, for an unbelievable $3. These natural textures are paramount for infusing an autumnal feel into any space, offering an organic foundation for the arrangement. Next, I snagged a few faux pumpkins. Choosing artificial pumpkins over real ones offers numerous advantages: they last indefinitely, can be reused year after year, and provide a consistent aesthetic without the worry of spoilage or decay. For this particular project, I envisioned a clean, elegant look, making white pumpkins the ideal choice to create a sophisticated, modern farmhouse vibe.
The next gem I uncovered was a glass vase, a true steal at just $3. The secret to its incredibly low price? A tiny chip near the top rim. For a DIY project like this, where the focus is on filling the vase and elevating its base, such a minor imperfection is entirely negligible and easily concealed. This exemplifies smart shopping; often, slightly imperfect items can be repurposed beautifully, offering significant savings for the crafty decorator. A clear glass vase provides a versatile foundation, allowing the internal elements of the arrangement to shine, while its transparency adds a touch of lightness and modernity to the overall design. Its simple form allows for endless creative possibilities, serving as a blank canvas for seasonal expressions.
To give the vase an elevated, more substantial look, I also picked up an unfinished wood candlestick and a coordinating base. These raw wood pieces are a dream for DIY enthusiasts, as they offer complete creative freedom. The idea was to transform a simple vase into a charming pedestal apothecary jar, adding height and visual interest to the arrangement. This elevation not only makes the centerpiece more prominent but also gives it a more refined and intentional appearance, turning ordinary elements into something extraordinary. The natural wood, though soon to be painted, added to the rustic appeal of the initial components, promising a beautiful transformation.
The transformation phase began with a few simple yet impactful steps. To achieve a cohesive and elegant look, I spray painted the unfinished wood candlestick, its base, and the faux pumpkins with a creamy, off-white spray paint. This choice of color was deliberate; cream offers a softer, more subtle alternative to stark white, lending a sophisticated warmth that perfectly complements fall decor without being overtly bright. It provides a beautiful contrast against the natural textures of the pine cones and the eventual fall stems. When spray painting, always ensure you’re in a well-ventilated area and apply multiple thin coats for a smooth, even finish, allowing adequate drying time between each coat to prevent drips and ensure durability.
Once the painted pieces were thoroughly dry, the next step was to securely attach the candlestick to the base of the glass vase using a strong adhesive. This critical step elevates the entire arrangement, transforming a simple vase into a stylish pedestal. For those interested in a more detailed guide on crafting these elegant pedestal candle holders, you can find a comprehensive tutorial by clicking HERE. This technique is versatile and can be adapted for various vase shapes and sizes, allowing for endless creative iterations. The robust bond between the candlestick and the vase is essential for stability, ensuring your beautiful fall centerpiece remains secure and upright wherever you choose to display it.
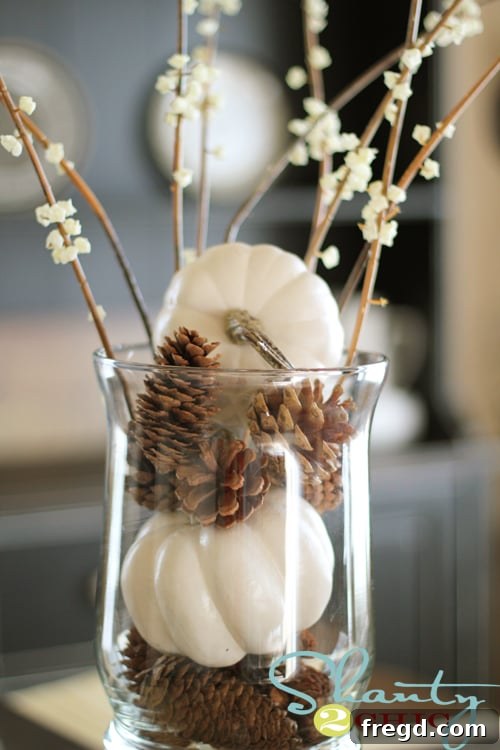
With the structure complete, it was time for the final, most satisfying step: arranging the elements. Into the newly created pedestal vase, I gently dropped two of the cream-colored pumpkins, letting them settle at the bottom. Around and between them, I carefully placed handfuls of the pine cones and acorns, allowing them to fill the voids and add natural texture. To complete the look and add a touch of lushness, I incorporated a few faux fall stems, which I had conveniently picked up during a quick trip to Michael’s. These stems, with their rich autumnal hues, provided the perfect pop of color and organic movement, bringing the entire arrangement to life. The beauty of this part of the process is its simplicity; there’s no right or wrong way to arrange them, just whatever feels aesthetically pleasing to you.
The result was a truly captivating and elegant fall centerpiece, brimming with seasonal charm. The combination of the smooth, painted pumpkins, the rustic texture of the pine cones, and the vibrant hints of fall foliage creates a harmonious blend that is both inviting and sophisticated. This DIY fall decor project exemplifies how simple, affordable elements can be transformed into a show-stopping display with just a little creativity and effort. It’s a testament to the power of crafting, allowing you to curate a home environment that perfectly embodies the spirit of autumn.
One of the most rewarding aspects of creating your own home decor is the incredible sense of accomplishment and the ability to tailor every detail to your personal taste. This particular white pumpkin arrangement not only looks stunning but also tells a story of creative thriftiness and ingenuity. It’s a project that anyone, regardless of their crafting experience, can undertake and achieve beautiful results. Moreover, the reusability of the faux elements means this beautiful fall centerpiece can be enjoyed season after season, making it an excellent investment in your seasonal home decor collection.
Beyond its aesthetic appeal, crafting provides a wonderful opportunity to slow down and engage in a mindful activity. There’s a certain joy in the process of transforming raw materials into something beautiful and functional. It’s a moment to unwind, tap into your creative spirit, and bring a personal touch to your living space. This easy autumn craft is perfect for a cozy afternoon project, yielding instant gratification and a stunning visual reward that enriches your home’s ambiance.
Perhaps the biggest testament to the success of this project is its incredible cost-effectiveness and speed. I spent a grand total of $10 on all the components for this arrangement, excluding the fall stems which were an optional addition. And the assembly? A mere 10 minutes from start to finish! This makes it the ultimate “my kind of project” – high impact, low effort, and incredibly affordable. The hardest part, honestly, was deciding where to proudly display this beautiful creation, as it looked fantastic in multiple spots around the house. Whether on a dining room table, an entryway console, or nestled on a mantelpiece, it instantly elevates the space with its sophisticated autumn charm.
This DIY fall arrangement is more than just a decoration; it’s a celebration of the season, a testament to clever crafting, and a beacon of cozy elegance for your home. It proves that with a keen eye for bargains and a dash of creativity, anyone can create stunning, personalized seasonal decor that rivals high-end store-bought alternatives. So, as the days shorten and the air grows crisp, I encourage you to embark on your own DIY adventure and infuse your home with the enchanting spirit of fall. Happy crafting, and most importantly, Happy Fall!
~Ashley