
Transform Your Dining Room: A Beginner-Friendly Guide to DIY Lined Window Panels
Hello, fellow home decorators and DIY enthusiasts! Are you looking to elevate the aesthetic of your dining room or any space in your home with custom window treatments without breaking the bank? You’re in the right place! Today, I’m thrilled to share my tried-and-true method for crafting beautiful, lined window panels. While my instructions might be delightfully straightforward, perhaps even a bit “wonky” as I like to say, this is truly my absolute favorite way to make drapery panels, and it yields stunning, professional-looking results every time. Even if you’re a beginner with just basic sewing machine skills, you’ll be amazed at what you can create!
Custom drapery adds an unparalleled touch of elegance, warmth, and personality to any room. Store-bought panels often fall short in terms of unique fabric choices, perfect sizing, or the quality you desire. By making your own, you gain complete creative control, ensuring your window treatments perfectly complement your home’s decor and your personal style. Not to mention, the satisfaction of a handmade project that truly transforms a space is incredibly rewarding. Let’s dive into creating these gorgeous panels that will make your dining room shine!
Selecting Your Perfect Fabric: The Foundation of Your Custom Drapery
The journey to stunning window panels begins with the perfect fabric. For this project, I discovered a captivating Waverly print called “Bedazzle” at Joann’s. It was love at first sight! Yes, it cost a pretty penny, but considering these panels would grace my dining room windows for years to come, I considered it a worthwhile splurge. Investing in a fabric you truly adore ensures long-term satisfaction and a high-end look that elevates your entire space.
When choosing your fabric, think about its weight, drape, and durability, especially for areas with direct sunlight. A medium-weight home decor fabric is ideal, offering both structure and a beautiful flow. Consider the pattern and color palette of your room. Do you want a bold statement piece or something subtle that blends seamlessly? Don’t forget the lining fabric! While often overlooked, the lining plays a crucial role in the overall look and longevity of your panels. It protects your main fabric from sun damage, provides privacy, offers insulation, and adds a professional finish, giving your panels a luxurious fullness and drape.
Gathering Your Essential Tools and Materials
Before we begin cutting and sewing, ensure you have all your supplies ready. This meticulous preparation will make the entire process smoother and more enjoyable:
- Main Drapery Fabric: Choose a fabric you love that complements your decor.
- Lining Fabric: A standard drapery lining fabric (often white or ivory) works perfectly.
- Sewing Machine: Any basic model capable of a straight stitch will suffice.
- Serger (Optional): If you own one, it’s great for finishing raw edges quickly and professionally, but a simple zigzag stitch on your sewing machine works too.
- Fabric Scissors: Sharp scissors are a must for clean, precise cuts.
- Measuring Tape or Yardstick: For accurate measurements.
- Iron and Ironing Board: Essential for crisp seams and a polished finish.
- Pins: To hold fabric layers in place.
- Thread: Matching the dominant color of your drapery fabric.
- Fabric Clips or Curtain Rings: For hanging your finished panels.
Step-by-Step Guide to Crafting Your Lined Window Panels
This method simplifies the process, making it accessible for sewers of all skill levels. Pay close attention to the measurements and pressing steps, as they are key to achieving a high-quality finish.
Step 1: Precise Cutting – Setting the Foundation for Success
Accurate cutting is the first crucial step in any sewing project. First, determine the desired finished length of your window panels. Do you want them to just kiss the floor, puddle elegantly, or sit just above the sill? Once you have your desired length, add 3.5 inches to this measurement. This extra length accounts for the top and bottom hems, ensuring you have enough fabric to create a polished finish.
Cut both your main drapery fabric and your lining fabric to this calculated length. Now, for the width: I cut my lining fabric so that my main drapery fabric was 2 inches wider than the liner. This subtle difference is a secret to achieving a beautifully rolled edge on the sides of your finished panel, preventing the lining from peeking out and giving your drapery a much more custom, tailored appearance. For example, if your finished panel width is 48 inches, your main fabric might be cut to 50 inches wide, and your lining to 48 inches wide. Remember to cut two pieces of drapery fabric and two pieces of lining fabric if you’re making a pair of panels.
Step 2: Crafting the Bottom Hems – A Crisp Foundation
Next, we’ll focus on the bottom hems of both your drapery fabric and your lining. This technique ensures a neat, weighted bottom edge for your panels. If you have a serger, now is a great time to use it to finish all the raw edges of your fabric pieces. A serger creates a professional, secure edge that prevents fraying and adds durability. However, if you don’t have a serger, don’t worry! You can simply use a zigzag stitch on your regular sewing machine to finish the raw edges, or you can omit this step if your fabric doesn’t fray easily, though finishing the edges is always recommended for longevity.
On each of your four fabric pieces (two drapery, two lining), fold the bottom hem up by 3 inches. Press this fold firmly with a hot iron. Pressing is just as important as sewing; it creates sharp creases and helps the fabric lie flat, making stitching much easier and more accurate. Once pressed, run a straight stitch along the top edge of this 3-inch fold on all four pieces. This secures the hem in place, providing a clean, finished bottom edge for both your main fabric and the lining.
I performed this exact step for both my drapery fabric and the lining, ensuring a straight stitch was applied to all four pieces. This creates a consistent and professional look for the lower edge of your panels, which is often the most visible part when panels are drawn.
Step 3: Uniting Fabric and Liner – The “Pillowcase” Method
Now you should have two drapery pieces and two liner pieces, each with a finished bottom hem. Let’s create one complete panel. Take one drapery piece and one liner piece. Lay them “good sides facing” each other. This means the right side (the patterned or finished side) of your drapery fabric should be touching the right side of your lining fabric. It’s crucial at this stage to ensure that the finished bottom hems of both pieces are aligned at the same end. This ensures your panel hangs correctly once flipped right side out.
Once aligned, pin the two pieces together along both long sides. Now, using your sewing machine, run a straight stitch down each of these pinned sides. Start with a backstitch and end with a backstitch to secure your seams. You’ll essentially be creating a large “pillowcase” with your fabric and liner. At this point, you should have two open ends: the top where you just stitched the bottom hem, and the very top where you haven’t sewn anything yet. This construction method encapsulates the lining beautifully, hiding all raw edges inside and providing that luxurious, full drape.
Step 4: Securing the Top Edge – The Final Stitch Before the Reveal
With the sides sewn, your “pillowcase” is almost complete. The final seam to close before turning the panel right side out is the top edge. This will be the end opposite the bottom hems you worked on earlier. Align the raw edges of the main fabric and liner at the top and run a straight stitch across this entire width. This stitch will secure the top of your panel, creating a finished edge that will later be hidden when you hang your panels. Once you’ve completed this stitch, you’ve essentially created a fully enclosed fabric tube. Now comes the exciting part – preparing to flip it right side out!
Step 5: The Grand Reveal and Finishing Touches – Ironing for Perfection
Congratulations, you’re almost done with the sewing! Carefully reach into one of the open ends of your fabric “pillowcase” and gently pull the entire panel right side out. Take your time to push out the corners neatly to create crisp, defined edges. A point turner or even a blunt pencil can assist with this.
Now for the crucial final step: ironing your edges down for that impeccably clean, custom look. This is where the magic of cutting your drapery fabric 2 inches wider than your liner truly shines. When you iron the side seams, the main drapery fabric will naturally roll slightly over the lining, creating a beautiful, subtle trim along the sides. This conceals the lining completely from the front and even from the back when the panels are closed, giving a superior, weighted drape and a truly professional finish that screams “custom-made.” Spend extra time pressing these edges firmly and evenly to set them in place. The back of your panel should reveal the neat overlap of the drapery fabric over the liner, just as intended.
Hanging Your Custom Window Panels
Once your panels are pressed to perfection, they are ready to be clipped up! I simply use curtain clips attached to a decorative rod. This is a quick and easy way to hang them, allowing for effortless opening and closing. You can also sew a curtain rod pocket or attach curtain rings for a different look. When hanging, consider extending your curtain rod beyond the window frame by several inches on each side, and hanging the rod higher than the window frame. This makes your windows appear larger and allows the panels to stack off the glass, maximizing natural light when open. I finished both of mine in just a couple of hours, proving that if you have a sewing machine and can master a straight stitch, you can absolutely make these beautiful, custom window panels!
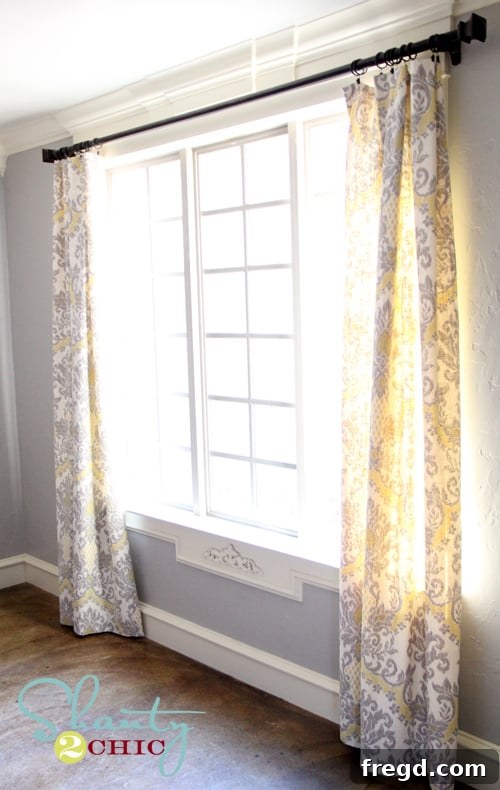
Here they are, all finished and adding a touch of personalized elegance to my dining room!
Don’t you just adore this fabric? Its intricate pattern and vibrant colors truly make a statement and tie the room together beautifully.
I truly hope you love how they turned out as much as I do! Creating these panels was a fun and rewarding experience, and it’s incredible how much a little fabric and a sewing machine can transform a room.
Final Thoughts & Encouragement
Writing a sewing tutorial can be surprisingly challenging; it’s tough to translate simple, tactile steps into clear, concise words! However, I hope this detailed guide has provided you with a comprehensive understanding of how to create your very own custom-lined window panels. The basic idea is simple, and with a bit of patience and your trusty sewing machine, you’ll be able to achieve fantastic results. Remember, the beauty of DIY lies in the personal touch and the satisfaction of knowing you’ve created something truly unique for your home.
Don’t be intimidated; if I can do it, so can you! These panels not only enhance the aesthetic appeal of your dining room but also offer practical benefits like improved insulation and privacy. So, gather your materials, pick a fabulous fabric, and get ready to add a custom touch to your home decor. Happy sewing!
Thanks so much for reading and happy crafting!
~Whitney