
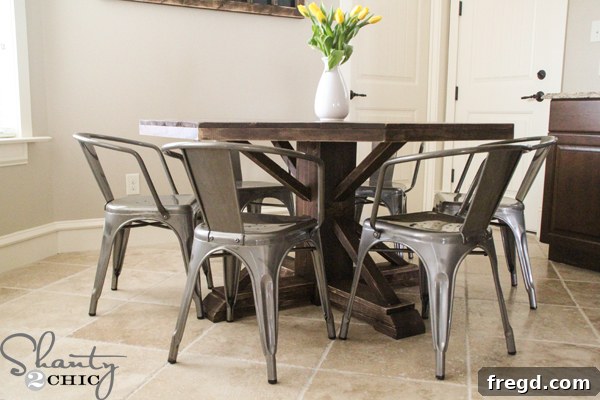
Welcome, fellow DIY enthusiasts! Today, I am absolutely thrilled to unveil a project that has been a labor of love and a fantastic journey into creating beautiful, functional furniture for our new home. If you’ve been following our journey on Instagram, you might have caught glimpses of the building process and perhaps even tried to guess what grand piece was taking shape. Well, the wait is over! Prepare to be amazed by our stunning DIY Octagon Dining Table, a spacious design that comfortably seats six, all crafted for an astonishingly low budget of just $110!
The Inspiration Behind the Build: Luxury on a Budget
I know, I know – the price tag is truly shocking, even for me! When I tell you that the original inspiration for this piece, a beautiful round table from Pottery Barn, retails for $1,899 BEFORE tax and shipping, you can understand my excitement. This DIY version wasn’t just a project; it was a triumphant act of resourcefulness, allowing us to achieve a high-end look without the exorbitant cost. It’s truly a testament to what you can achieve with a little creativity, determination, and the right plans.
A New Home, A New Vision: Why DIY Furniture?
This magnificent table holds a special place in my heart as it’s the very first substantial piece of furniture I’ve built specifically for our new home. As many of you know, when we sold our previous house, we made the strategic decision to sell most of our existing furniture as well. The idea was to start fresh, to build new pieces that truly fit the aesthetic and needs of our new space. I simply couldn’t justify the expense of storing and then temporarily moving furniture that I knew I wanted to replace anyway. Our home has been a whirlwind of construction, and yes, our mattresses were on the floor for a while, but I wouldn’t trade this journey for anything. I am currently living in a woodworker’s paradise, embracing every cut, joint, and finish as I slowly but surely fill our home with custom-made treasures.
Designing the Perfect Breakfast Nook Table: Collaborating with Ana White
For a project of this scale, I knew I needed expert guidance. That’s why I reached out to our incredibly talented friend, Ana White, whose woodworking plans are legendary in the DIY community. We needed a table with a round-ish shape to perfectly complement the breakfast nook in our new kitchen. After some thoughtful discussion, we settled on an octagon design. This clever choice offered the visual softness and flow of a round table, which was essential for the space, while being significantly easier to construct than a truly circular top. The angles of the octagon simplify the cuts and assembly process without compromising the desired aesthetic. You can access the comprehensive, free plans for this amazing “Benchmark Octagon Table” directly HERE, and I’m excited to share my detailed step-by-step photos to guide you through your own build!
Essential Tools for Success: Making Angle Cuts Simple
While this table design does involve a fair number of angle cuts, please don’t let that intimidate you! With the right tools, these cuts are incredibly straightforward and quick. For this project, my trusty Ridgid 12-inch sliding compound miter saw was an absolute game-changer. Its capability to bevel and miter to both sides made cutting all the necessary angles not only super fast but also exceptionally precise. Having a high-quality miter saw truly transforms what might seem like a complex task into a much more manageable and enjoyable part of the building process.
Step-by-Step Construction: Building Your Octagon Dining Table
The Sturdy Legs: Foundation First
The journey begins with building the robust legs of the table. This initial step is surprisingly simple: it primarily involves stacking boards, applying wood glue generously between each layer, and then securing them together with nails. This creates thick, solid posts that will provide unwavering support for your table, a crucial element for a piece designed to seat six. Ensure all surfaces are flush and square as you work, as precision here sets the stage for the rest of the build.
Here you can see one of the completed legs confidently attached to the base structure. To achieve this secure connection, I first pre-drilled pilot holes to prevent wood splitting, then firmly fastened the base board to the leg using 2 1/2-inch wood screws. This method creates a strong, lasting joint that will withstand daily use.
Assembling the Base: Precision with a Kreg Jig
To connect the shorter leg sections, I turned to my incredible Kreg Jig K5. This was actually my first time using this particular model, and I must say, it made an astonishing difference! While I’ve always been a fan of Kreg Jigs, the K5 elevates the building process significantly. Its self-adjusting clamp eliminates the tedious need for manual loosening and tightening of small bolts, making pocket hole drilling remarkably faster and more efficient. This feature was particularly valuable for this table, as I was frequently drilling through both 2x and 1x boards, requiring quick and consistent adjustments. If you’re serious about DIY woodworking, this tool is a worthwhile investment!
This image clearly illustrates where I drilled the pocket holes to join the base components, specifically the piece that sits between the two shorter legs. Pocket holes create strong, hidden joints, resulting in a cleaner and more professional finish for your furniture.
Completing the Base Structure
The base construction continues with careful assembly, ensuring all joints are tight and square. This stage involves connecting various elements to create the solid, central framework that will support the entire table. Each piece is meticulously measured, cut, and fastened to form the robust foundation.
At this point, you’ve successfully completed half of the leg and base assembly! Seeing the structure take shape is always a rewarding moment in any woodworking project. It might seem like a lot of steps, but each one is straightforward, contributing to a strong and visually appealing foundation.
Next up is the construction of the longer leg, following the same proven method of stacking, gluing, and nailing boards together. The principle remains the same, just adapted for a longer component of the base.
This image demonstrates how I attached the long leg to the partially assembled base and the two shorter legs. This step can be a bit tricky, and having an extra set of hands to hold the piece steady while you pre-drill and screw would be incredibly helpful. Unfortunately, I was working solo, so I improvised by resting the leg on my head – a technique I absolutely do not recommend trying at home for safety reasons! Always prioritize safety in your workshop.
The final touches on the base involve adding the last two boards to complete the robust framework. For these connections, I relied on the dependable combination of wood glue and my brad nailer, ensuring a firm and durable assembly. With the base fully constructed, the project truly begins to resemble a functional piece of furniture!
Crafting the Octagon Tabletop: The Art of Planking
With the legs and base firmly in place, it was time to move on to the star of the show: the tabletop. The image above displays the crucial support structure upon which the beautiful octagon top will rest, ensuring stability and longevity. This foundational support is key before planking begins.
Here’s a vital tip for creating a perfectly flush and accurate tabletop, as suggested by Ana White: cut as you go! For the mitered planks that form the octagon, I would cut the first angle, carefully align the board in place on the support structure, and then precisely mark where the second angle needed to be cut on the opposite end. This iterative process guarantees the most accurate cuts and a beautifully seamless tabletop.
As you can see, precisely marking the cut line directly from the piece itself is the optimal method for achieving perfectly fitting mitered joints. This technique minimizes errors and ensures a tight, professional-looking seam across your entire tabletop, which is paramount for both aesthetics and durability.
Once all the individual planks for the tabletop were precisely cut, the next step was to join them together to form a cohesive surface. I once again utilized my dependable Kreg Jig to create strong pocket hole joints. Additionally, I clamped every single joint firmly. This crucial step ensures that all the planks are drawn together tightly, resulting in an impeccably smooth and flat tabletop – essential for both functionality and a beautiful finish.
Adding the Decorative Trim
The penultimate building step involves trimming out the edges of the tabletop with 2×2 lumber. This adds a beautiful, finished look and enhances the table’s structural integrity. I securely attached these trim pieces using a combination of strong wood glue and my trusty nailer, ensuring a seamless and durable edge.
For ease of access and to achieve a firm hold, I found it simpler to nail the trim pieces directly from the top surface of the table. Any resulting nail holes were easily filled later with wood filler, ensuring a smooth surface ready for staining and finishing.
Staining and Finishing: Protecting Your Masterpiece
Applying the Stain
To give our new dining table a rich, warm hue, I applied a single coat of Varathane’s Carrington stain using a foam roller. Varathane, for those unfamiliar, is the excellent Rust-Oleum brand line available at Home Depot, offering consistent colors and reliable products. The foam roller ensures an even, smooth application, which is crucial for a consistent finish across the large surface of the tabletop. One coat was sufficient to achieve the deep, inviting color we desired, perfectly complementing our home’s aesthetic.
Bringing It All Together: Final Assembly and Styling
Due to its substantial size, the table top and base were assembled separately and then brought indoors for the final union. This strategic approach prevented any issues with moving the entire, fully assembled table through doorways. Once inside, I securely attached the elegant trusses to the base using my Airstrike Nailer, adding both structural support and a touch of farmhouse-inspired detail.
Distressing for Character
After much deliberation, I decided to lightly distress all the edges of the table, including the intricate angles of the trusses, to give it a subtly aged and inviting character. My Corner Cat sander proved to be the perfect tool for this task, allowing me to precisely reach and soften those smaller, tighter angles, achieving a beautiful, worn-in look without overdoing it.
The Power of Polyurethane: Long-Lasting Protection
While we don’t apply a protective finish to every piece of furniture we build, certain items, especially dining tables, absolutely demand it. Given that this table will endure the daily adventures of our little monsters, I applied a generous five coats of Varathane Polyurethane in a matte finish to the tabletop. This robust protective layer ensures that the table can be easily wiped clean after meals, safeguarding the beautiful wood from spills, scratches, and everyday wear and tear, allowing us to enjoy its beauty for years to come.
The Final Reveal: A Dream Dining Space for $110!
And there you have it – the completed masterpiece! Building this table myself allowed for such incredible cost savings that I could finally splurge on some stylish metal chairs to complete the look. I found these fantastic chairs at Target. Initially, I had my heart set on a more expensive chair from another store, but when you need six of them, the costs quickly add up. Despite some mixed reviews for the Target chairs, I enlisted my sisters for a crucial comparison trip. We sat in both options, meticulously measured them, debated their pros and cons, and ultimately concluded that we simply couldn’t justify spending double the price per chair. The Target chairs were not only comfortable but also perfectly suited our needs and budget. Being able to purchase six quality chairs at $50 apiece was an unbeatable deal that made this dining set truly affordable and chic!
I am absolutely swooning over this gorgeous table! Not only was it a remarkably easy build, but the incredible savings of at least $2,000 compared to its high-end counterpart make this project an undeniable success. A huge thank you once again to Ana White for providing such fantastic and detailed plans that empower DIYers like us to create dream furniture without breaking the bank. I truly hope this inspires you to tackle your next woodworking adventure!
Explore More DIY Projects and Home Inspiration
Love what you see in the room? You can find more details and tutorials for other elements in our space below:
DIY Chalkboard Calendar: Learn how to create your own functional and stylish calendar HERE
Lantern Chandelier: Discover the charm of our unique lantern chandeliers HERE
Valspar Paint Colors: Get the scoop on the beautiful Valspar paint colors used throughout our home HERE
Cabinotch Cabinets: Find out more about our custom Cabinotch cabinets HERE
Cambria Countertops: Explore the stunning Cambria countertops that elevate our kitchen HERE