
Craft Your Own Rustic Charm: The Ultimate DIY Farmhouse Dining Bench Plan
Welcome, fellow DIY enthusiasts! We’re absolutely thrilled to finally share the highly anticipated plans for our incredibly popular DIY Farmhouse Dining Bench. We sincerely appreciate your patience and your gentle reminders – it means the world to us that you’re eager to bring this charming piece into your home. We promise, the wait is over, and these plans are worth it!
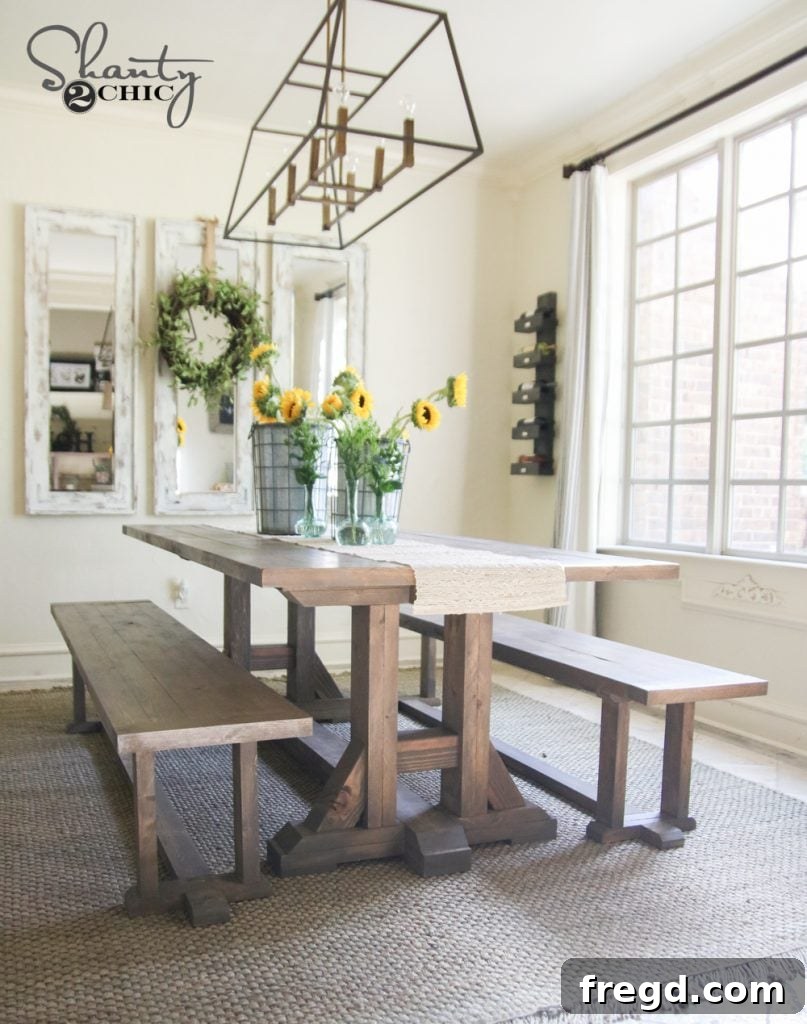
Prepare to be amazed, because you can build this stunning, sturdy farmhouse dining bench for **under $30 in lumber per bench!** Yes, you read that correctly. Achieve that coveted rustic-chic aesthetic without breaking the bank. Just take a look at how beautifully these benches turned out – they perfectly complement any dining space, adding warmth and character.
Are you dreaming of a complete dining set that radiates farmhouse charm? You’re in luck! We also have comprehensive plans for the matching farmhouse dining table. You can find those detailed instructions and transform your entire dining area RIGHT HERE!
Ready to jump into building your very own **DIY farmhouse dining bench**? Excellent! To download and print the FREE PLANS for the bench, simply click HERE!
Why Build Your Own Farmhouse Dining Bench?
Opting for a DIY farmhouse dining bench offers a multitude of benefits beyond just saving money. Firstly, it allows for complete customization. You can choose the exact dimensions, wood type, stain, and finish to perfectly match your existing decor or create a unique statement piece. Secondly, the satisfaction of building something with your own hands is truly unparalleled. Each time you gather around your dining table, you’ll feel a sense of pride knowing you crafted this beautiful and functional piece of furniture. Moreover, DIY projects like this bench are fantastic for honing your woodworking skills, teaching you valuable techniques that you can apply to future projects. This project is not only budget-friendly but also offers an incredible opportunity to infuse your home with personalized, handmade charm.
Essential Tools and Materials for Your Farmhouse Bench
Before you begin, gathering all your necessary tools and materials will ensure a smooth and efficient building process. While the full list is included in the downloadable plans, here’s a quick overview of what you’ll likely need:
- Lumber: The plans detail the specific cuts and dimensions, often utilizing common and affordable lumber like pine or whitewood.
- Table Saw: Highly recommended for ripping down boards and achieving precise straight edges.
- Miter Saw: Essential for making accurate angle cuts, especially for the bench feet.
- Wood Glue: Crucial for strong, durable joints. Don’t underestimate its power!
- Screws: Primarily 2.5-inch Spax screws and pocket hole screws.
- Speed Square: An indispensable tool for marking and ensuring perfect 90-degree angles.
- Kreg Jig K5 Model (or similar pocket hole jig): This tool makes strong, hidden joints with ease, making it a favorite for DIY furniture builders.
- Kreg Clamp: A lifesaver for holding pieces firmly in place while you work, almost like having an extra set of hands.
- Orbital Sander: For smoothing surfaces and preparing for finishing.
- Wood Stain: To achieve your desired color and enhance the wood grain.
- Polyurethane or Protective Finish: To seal and protect your bench from wear and tear.
Step-by-Step Guide to Building Your DIY Farmhouse Dining Bench
Let’s get started on bringing your beautiful farmhouse dining bench to life!
1. Preparing Your Lumber: Ripping Rounded Edges
The very first step we took when building these benches was to run our lumber through a table saw to remove the factory-rounded edges. This step is entirely optional, but it makes a noticeable difference. By squaring off the edges, you achieve a much smoother, more refined finish that significantly enhances the overall aesthetic and feel of the finished piece. It truly elevates the bench’s look, giving it a more custom and high-end appeal. This precision also helps in creating tighter, more seamless joints.
After this process, your boards will feature perfectly straight, crisp edges, ready for precise joinery.
**Important Note:** If you choose to skip this initial step and work with the lumber’s original rounded edges, remember to adjust your measurements accordingly. Always measure your actual lumber before making cuts, rather than relying solely on the plans, as the slight difference in width can affect the overall dimensions of your completed bench.
2. Cutting the Angles for the Feet
Next, you’ll focus on cutting the angles for the bench feet. We utilized a miter saw for this task, which allows for extremely accurate and repeatable angle cuts. Begin by carefully marking your desired cut lines on each board. Precision here is key for stability and aesthetics. Once marked, make your cuts on both sides of each foot piece. Take your time to ensure all angles are consistent, as this will contribute to the bench’s balanced and symmetrical appearance.
3. Assembling the Bench Bases
With your feet pieces cut, you will now assemble two identical bases for your bench. These bases form the fundamental support structure, so accuracy in assembly is crucial. For maximum strength and durability, we applied a generous amount of wood glue to each joint before securing the boards. Then, we used 2.5-inch Spax screws to firmly attach the pieces together. To ensure perfect alignment and square corners, a speed square was indispensable for marking and guiding where each board should line up. Double-check your measurements and make sure your bases are perfectly square before the glue sets.
4. Attaching the Top Runners
The next crucial step involves attaching the top runners to each of the two bases you’ve just meticulously built. These runners are vital as they will sit directly beneath the bench’s top planks, providing robust support and stability for the seating surface. To create strong, invisible joints, we utilized our absolute favorite tool, the Kreg Jig K5 model, to drill 1.5-inch pocket holes into the ends of each runner. When drilling, make sure these pocket holes face inward or downward according to the plans. This ensures they remain completely hidden once your beautiful bench is fully assembled, maintaining a clean and professional appearance.
Once the pocket holes are drilled, apply wood glue to the joints for added strength, then secure the runners to the bench bases using 2.5-inch pocket hole screws. This combination of glue and screws creates an incredibly sturdy and long-lasting connection.
5. Attaching the Bottom Runner
Now it’s time to add the bottom runner, which runs horizontally between the two bench feet, exactly mirroring the top runners but positioned lower for additional structural integrity and design balance. This piece significantly contributes to the bench’s overall stability. To make this step much easier and ensure perfect alignment, we highly recommend using a Kreg Clamp. This invaluable tool acts like a third hand, securely holding your pieces in place while you fasten them. If you don’t already own one, seriously consider adding it to your toolkit – it’s a game-changer for many woodworking projects! Click HERE to get one on Amazon, and you’ll thank us later for the recommendation!
With all the runners attached, your bench base is now fully assembled and ready to receive its top! It should look incredibly robust and well-built at this stage.
6. Constructing the Bench Top
Now that your sturdy base is complete, it’s time to focus on creating the beautiful, planked top of your farmhouse bench. This involves joining several individual planks together to form the wide seating surface. We achieved this by drilling 1.5-inch pocket holes along the edges of the planks and securing them with 2.5-inch pocket hole screws. For an even stronger and more seamless bond, we also applied wood glue between each plank before fastening them. This combination ensures a durable top that will withstand years of use.
**Tip for Ripped Boards:** If you chose to rip your boards down to a narrower width (e.g., 3 inches) in the initial preparation step, be mindful that the edges of the pocket holes might slightly show on the underside of the top. To prevent this, carefully align your boards during assembly, ensuring the visible edges are perfectly flush and the pocket holes are discreetly positioned.
7. Attaching the Breadboards
Now for the breadboards – these pieces are not only decorative, providing that classic farmhouse look, but also add structural integrity to the bench top. First, use a pencil to accurately mark the placement for each pocket hole on the breadboards. This careful marking ensures that your screws will hit the center of your planks for the strongest connection.
Next, drill your pocket holes into each breadboard according to your markings.
Finally, attach the breadboards to the main bench top. Apply wood glue between each joint for a durable bond, and then secure them firmly with 2.5-inch pocket hole screws. This creates a strong and visually appealing edge for your bench top.
8. Joining the Bench Top to the Base
With both the bench base and the bench top fully assembled, it’s time to bring them together! Carefully turn the assembled bench base upside down and center it precisely on top of the bench top. Once aligned, securely attach the base to the top using 2.5-inch Spax screws. Drive these screws directly through the runners of the base and into the underside of the bench top. This method ensures a robust connection, preventing any wobbling and making your bench exceptionally sturdy.
9. Adding the Decorative Feet Pieces
You’re almost there! The final structural step is to add the decorative feet pieces to each end of your bench. These pieces complete the farmhouse look and add another layer of visual interest. Just like many other components of this build, we utilized 1.5-inch pocket holes for attaching these. This allows for a clean finish with no visible screw heads.
Attach these decorative pieces using 2.5-inch pocket hole screws and a dab of wood glue at each joint. Once these are in place, your farmhouse dining bench is structurally complete and ready for the finishing touches!
10. The Finishing Process: Sanding, Staining, and Sealing
The finishing process is where your bench truly comes to life and gains its final character. Before applying any stain, it’s absolutely crucial to thoroughly sand every surface of your bench. We used our trusty Ryobi 18V Orbital Sander for this, ensuring a perfectly smooth and even surface. Sanding removes any imperfections, rough spots, and prepares the wood to absorb stain evenly, resulting in a professional-looking finish. Start with a coarser grit sandpaper (e.g., 80 or 100) and progressively move to finer grits (e.g., 150 or 220) for the best results.
Once sanded, thoroughly clean the bench to remove all dust. We chose to stain our benches in the same beautiful color as our matching dining table: “Briarsmoke” by Varathane. This rich, warm shade perfectly captures the rustic farmhouse aesthetic and is readily available at Home Depot. Apply the stain evenly, following the wood grain, and wipe off any excess according to the product instructions to achieve your desired depth of color.
After the stain has completely dried (refer to the product’s recommended drying time), it’s essential to apply a protective topcoat. This not only enhances the beauty of the stain but also shields your bench from spills, scratches, and daily wear and tear. We applied a coat of Rust-Oleum Triple Thick Poly in a beautiful Satin finish. This product offers excellent durability and protection. Its unique formula goes on white, making it easy to see where you’ve applied it, but fear not – it dries to a crystal-clear finish, preserving the natural beauty and color of your stained wood.
Witness the magic as it goes on white, then dries to a flawless, transparent protective layer.
Your New Farmhouse Dining Bench Awaits!
And there you have it! Your stunning, handmade DIY farmhouse dining bench is now complete, ready to grace your dining room with its timeless appeal and sturdy craftsmanship. Imagine the countless meals, conversations, and memories that will be made around this beautiful piece of furniture that you built with your own hands. We are so incredibly proud of how these benches turned out, and we’re sure you will be too.
Here they are, looking absolutely perfect in our dining room, bringing warmth and a touch of rustic elegance!
Start Your DIY Journey Today!
Building your own **farmhouse dining bench** is not just a project; it’s an investment in your home’s comfort and style. With these easy-to-follow, free plans, you can create a beautiful, durable, and **affordable farmhouse furniture** piece that will be cherished for years to come. Don’t forget to grab the FREE PLANS HERE and embark on your next woodworking adventure. We can’t wait to see your creations!