
🎉 Happy Friday, fellow craft enthusiasts! 🎉
Crafting Memories: Your Ultimate Guide to a Beautiful DIY Baby Shower Banner
Last weekend was an absolute delight! My sisters, mom, and I had the immense pleasure of co-hosting a baby shower for a dear family friend, and it was filled with laughter, love, and sweet anticipation. As someone who truly believes that handmade touches elevate any celebration, I always find immense joy in creating unique decorations, especially banners, to adorn my living room for such special occasions. This particular project, however, has a charming story behind it: it was born out of a creative “Plan A” that went spectacularly wrong, leading me to this brilliant “Plan B” banner. And honestly, I couldn’t be happier with the outcome! It turned out so wonderfully that I simply *had* to share the step-by-step process with all of you.
Why Choose a DIY Banner for Your Next Celebration?
In a world of mass-produced decorations, a handmade banner stands out as a heartfelt statement. This DIY banner isn’t just a decoration; it’s a labor of love, a conversation starter, and a truly personalized touch that shows how much thought and care went into celebrating the mommy-to-be. Beyond its primary role as a festive embellishment during the party, it offers a beautiful bonus: we gently took it down after the shower and presented it to the expectant mother as a thoughtful, lasting gift for her to take home. Imagine it adorning the nursery, serving as a cherished keepsake for years to come! The versatility and emotional value of a custom-made banner are simply unmatched. Here’s a peek at how this charming creation came to life and became the focal point of our celebration…
What makes this project even better? It’s incredibly straightforward and remarkably budget-friendly to create! You don’t need to be an experienced crafter to achieve stunning results. With just a few basic supplies and a little bit of creative spirit, you can craft a banner that looks professionally made without breaking the bank. So, let’s gather our materials and dive into the simple steps to create your very own personalized party decoration. Get ready to impress your guests and bring a unique flair to your next event!
Gather Your Essential Supplies: The Foundation of Your Custom Banner
One of the best parts about this DIY banner project is how easily accessible and affordable the materials are. I sourced all of my supplies from Hobby Lobby, a fantastic resource for any crafting endeavor. For the base of each letter panel, I chose 12×12 inch Kraft paper. This natural, rustic paper adds a wonderful organic texture and serves as a sturdy foundation for the design. A pro tip for saving money: while individual sheets are available, opting for a multi-pack is significantly more cost-effective. I managed to grab a pack for just $3 (it was even half off!), and I knew I’d find countless other uses for the remaining sheets in future crafting adventures. Investing in bulk often pays off for dedicated crafters!
Next up, I selected beautiful 12×12 inch sheets of scrapbook paper. This is where you can truly let your personality shine and customize your banner to match any party theme or color scheme! For this baby shower, I picked designs that felt soft, celebratory, and charming – perfect for welcoming a new little one. Similar to the Kraft paper, you can purchase individual sheets, but if you fall in love with a particular collection or plan more projects, buying a coordinated pack is often a smarter choice. I was so smitten with the patterns and colors of this particular scrapbook paper collection that I knew it would be a versatile addition to my craft stash, ready for countless other creative endeavors down the line. Look for patterns that complement your overall aesthetic for a cohesive and polished look.
The star of this DIY banner, in my opinion, are the magnificent MDF (Medium-Density Fiberboard) letters. These robust, pre-cut letters truly make a statement. I found my very favorite ones at Hobby Lobby – they were a steal at under $2 apiece, especially considering their generous size of about 10-11 inches! Their substantial presence instantly adds a touch of elegance and professionalism to the banner. Using pre-made letters saves a tremendous amount of time and ensures a perfectly crisp, uniform look, which can be challenging to achieve with hand-cut letters. Don’t be afraid to hunt for sales on these – they are a fantastic investment for any crafter looking to add personalized text to their projects. They truly elevate the overall design, making your banner look sophisticated and complete.
Step-by-Step Guide to Crafting Your DIY Party Banner
Step 1: Preparing Your Scrapbook Paper for Layering
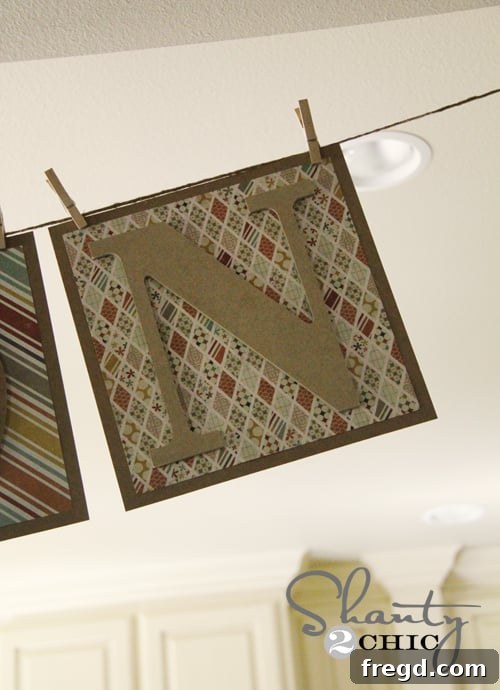
The first step in assembling our beautifully layered banner panels is to prepare the scrapbook paper. To create that lovely framed effect, where the rustic Kraft paper peeks out from behind the decorative scrapbook paper, you’ll need to trim your scrapbook sheets. I carefully cut approximately half an inch off of each side of the 12×12 inch scrapbook paper. This small but significant adjustment means that once adhered, the Kraft paper base will subtly frame the scrapbook paper, providing a neat border that adds depth and dimension to each letter panel. This layering technique is key to achieving a polished and professional look for your DIY baby shower banner, or any celebratory banner for that matter.
Step 2: Adhering Scrapbook Paper to Kraft Paper
Once your scrapbook paper is perfectly trimmed, it’s time to secure it to your Kraft paper base. For this, hot glue is your best friend! It provides a strong, almost immediate bond, which is ideal when you’re working with paper and want to avoid any warping or waiting for glue to dry. Apply a thin, even line of hot glue along the edges and perhaps a few dots in the center of the back of your trimmed scrapbook paper. Carefully center the scrapbook paper onto the Kraft paper, ensuring that the half-inch border is consistent all around. Gently press down to secure it. The natural, earthy tone of the Kraft paper peeking through the edges creates a beautiful contrast with the vibrant patterns of the scrapbook paper, making each banner segment pop. This simple step forms the elegant background for your MDF letters.
Step 3: Attaching the MDF Letters
With your layered paper panels ready, it’s time to bring your message to life with the MDF letters. Flip each MDF letter over and apply hot glue generously to the back surface. Pay special attention to the edges and any thinner sections to ensure a secure adhesion. Then, carefully center each letter onto its corresponding scrapbook paper panel. Take a moment to adjust its position before the glue sets, ensuring it’s perfectly aligned and pleasing to the eye. Press firmly for a few seconds to create a strong bond. The weight and dimension of the MDF letters add a professional, sculptural quality to your banner, transforming simple paper into a captivating piece of art. This step is incredibly satisfying as you watch your chosen message take shape, letter by beautiful letter.
See? I told you this DIY banner project was incredibly simple and straightforward! Sometimes the most beautiful crafts are born from unexpected twists, and this “Plan B” certainly proved that point. The clean lines of the MDF letters paired with the lovely patterns of the scrapbook paper create a visually appealing banner that looks far more complex than it actually is to make. It’s a testament to how simple materials, when combined thoughtfully, can result in something truly spectacular.
Bringing Your Masterpiece to Life: Hanging Your DIY Banner
The final, and perhaps most exciting, step is to hang your newly crafted banner and admire your handiwork! For our baby shower, I used a length of thick, rustic twine, also sourced from Hobby Lobby. I stretched the twine taut across the entryway into my kitchen, creating a perfect backdrop for the festive display. To attach the individual letter panels to the twine, I opted for simple wooden clothespins. This method offers several advantages: it’s incredibly easy, adds a charming, rustic touch, and allows for flexibility in spacing the letters. Plus, it means you don’t have to punch holes in your beautiful paper panels, preserving them for future use or as a lasting gift. This ingenious hanging solution was part of what made this “Plan B” banner so much better than my initial concept, which involved a fussy electric cutter that kept tearing my papers – a frustrating experience that ultimately led to this much more satisfying design!
I am genuinely so glad my electric cutter failed me on that initial project. Sometimes, creative detours lead to the most delightful destinations. This banner popped into my head as a simple, elegant solution, and I am absolutely thrilled with the finished outcome. I truly hope Katie, the mommy-to-be, loves it just as much as I do! It’s a wonderful example of how embracing simplicity and resourcefulness can lead to truly unique and heartwarming results. This banner isn’t just a decoration; it’s a story of creativity, resilience, and the joy of making something beautiful with your own hands.
Versatility and Beyond: Customizing Your Handmade Banners
While this banner was perfect for a baby shower, the beauty of this DIY project lies in its incredible adaptability. Imagine customizing it for other special occasions! You could easily swap out the scrapbook paper patterns and letter colors to create a “Happy Birthday” banner for a child’s party, a “Congratulations” banner for a graduation, a “Welcome Home” display, or even a festive holiday greeting. The MDF letters can be painted or embellished further to match any theme. For a bridal shower, you might use elegant metallics and romantic script fonts. For a seasonal decoration, consider seasonal colors and perhaps small attached elements like autumn leaves or snowflakes. The possibilities are truly endless, making this DIY banner a versatile craft project you’ll revisit again and again. It’s not just a decoration; it’s an investment in your crafting skill and a source of joy for many celebrations to come!
Here are a few more shots to inspire your next DIY project…
Thank you so much for taking the time to stop by and read about this delightful DIY project! I hope you feel inspired to create your own personalized banners for your next celebration. There’s nothing quite like the satisfaction of crafting something beautiful with your own hands, especially when it brings joy to loved ones. If you enjoyed this tutorial, I would absolutely love for you to pin it to your Pinterest boards and share it with your friends and fellow crafters! Your support helps this creative community grow, and it means the world to me. Happy crafting!
A Special Note of Gratitude: Vote for Shanty2Chic!
On a final, very important note, I want to extend my heartfelt thanks to each and every one of you who has already cast a vote, and continues to vote, for Shanty2Chic as Best Craft Blog over at Country Living Magazine! Your dedication and support have been truly overwhelming and incredibly encouraging. Being nominated is an honor in itself, but seeing the passion and effort you all put into supporting us makes it even more special. This community is truly incredible, and your votes reflect the shared love for all things DIY and creative. There are only three precious days left to cast your votes, and we would be absolutely thrilled if you could spare a few more moments to show your support. Every single vote counts and helps us continue to share inspiring projects and connect with amazing crafters like you. You guys truly rock, and your belief in Shanty2Chic fuels our passion for creating and sharing! Thank you from the bottom of my heart for being such an integral part of this journey.
Wishing you all a wonderful, craft-filled weekend ahead!!!