
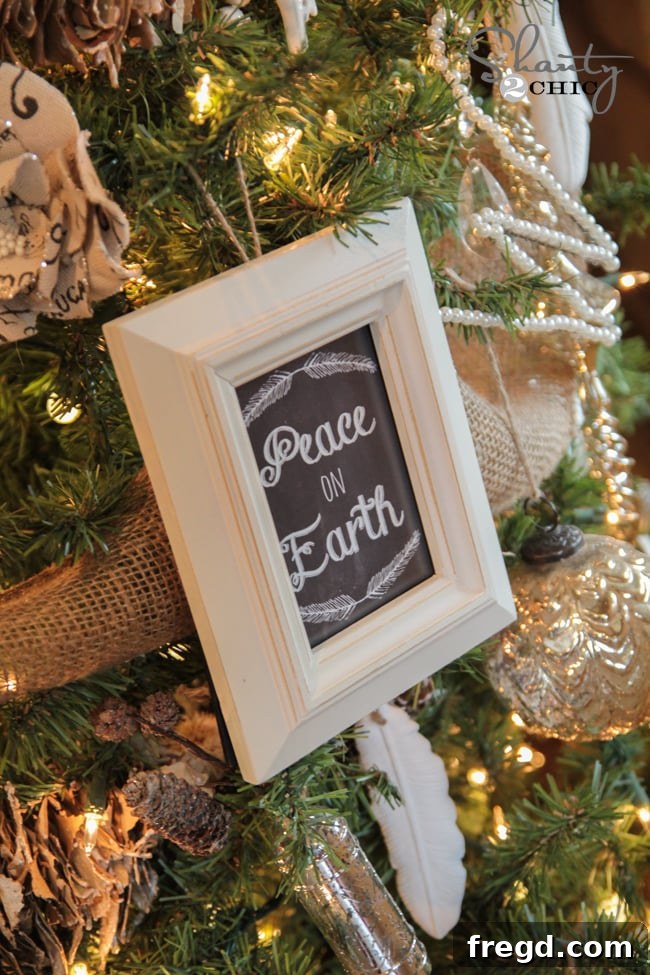
Craft Your Own Festive Frames: Free Printable Chalkboard Christmas Ornaments
Welcome to a truly heartwarming and effortlessly chic addition to your holiday decor! A Christmas tree adorned with handmade ornaments carries a special charm, and we’re thrilled to share a project that brings this unique touch to your home with ease. If you’re looking for an impactful yet simple DIY, our free printable Christmas ornament frames are exactly what you need to infuse your tree with personality and rustic elegance. These beautiful chalkboard-inspired designs are not only stunning but also incredibly simple to assemble, making them a perfect festive activity for anyone.
We’re delighted to present this delightful craft as Day 11 of our special “12 Days of Christmas” series! Throughout this festive countdown, we’ve been sharing unique and inspiring holiday projects, and this one promises to be a standout. Get ready to transform simple materials into treasured keepsakes that will brighten your home for years to come.
This DIY project exemplifies the best of holiday crafting: it’s incredibly straightforward, requires minimal supplies, and delivers maximum aesthetic appeal. Within a short amount of time, you’ll have a set of charming, personalized ornaments that look like they came straight from a boutique. The beauty lies in their simplicity and the striking contrast of the chalkboard design, perfect for a cozy, farmhouse-inspired Christmas or a classic, elegant theme.
Why Choose DIY Printable Christmas Ornaments?
There’s something truly special about decorating your Christmas tree with ornaments you’ve made yourself. Handmade decorations add a personal touch and tell a story, making your holiday setup uniquely yours. Our free printable chalkboard ornament frames offer numerous advantages:
- Budget-Friendly Decor: Achieve a high-end look without the high-end price tag. By utilizing free printables and affordable frames, you can create a cohesive and stylish collection of ornaments for a fraction of the cost of store-bought alternatives.
- Personalized Touch: While our printables offer beautiful designs, the act of assembling them yourself, choosing your frames, and even adding custom touches allows for a level of personalization that mass-produced items simply can’t match.
- Quick & Easy Craft: This project is perfect for busy individuals or families looking for a fun, low-stress craft. From printing to hanging, you can complete several ornaments in under an hour.
- Versatile Style: The timeless appeal of chalkboard art blends seamlessly with various decor styles, from rustic farmhouse to modern minimalist. They provide a sophisticated yet whimsical touch to any Christmas tree.
- Great for Gifting: Handmade ornaments make thoughtful and cherished gifts for friends, family, or teachers. Package a few together for a heartfelt present that shows you care.
Gathering Your Simple Supplies
One of the best aspects of this DIY is how few materials you need to get started. Most items might already be in your craft stash, or easily found at your local dollar store or craft supply retailer:
- Free Printable Chalkboard Ornament Designs: The star of our project! You can download these beautiful designs directly from our site. They come ready to print, saving you time and effort in design creation.
- Printer: Any home printer will do. Ensure it has enough ink for clear, vibrant prints.
- Paper: We recommend using either photo paper (for a glossy, professional finish that makes the colors pop) or white card stock (for a sturdier, more matte and rustic look). Both yield excellent results, so choose based on your preference.
- Small Picture Frames (3.5 x 5 inches): These are key to transforming your prints into ornaments. We’ve had great luck finding inexpensive frames at Hobby Lobby (especially when they’re 1/2 off!), Dollar Tree, or other dollar stores. Look for frames with a sturdy backing and a style that complements your desired aesthetic – distressed white frames offer a beautiful farmhouse vibe.
- Scissors or Craft Knife: For cleanly cutting out your printed designs. A paper trimmer can also be very helpful for straight edges.
- Hot Glue Gun and Glue Sticks: Essential for securely attaching the hanging twine to the back of your frames.
- Twine or Ribbon: Natural jute twine creates a rustic look, while a festive ribbon can add a touch of color or elegance.
Step-by-Step Guide to Crafting Your Chalkboard Ornaments
Let’s dive into the simple steps to create these charming Christmas ornaments. You’ll be amazed at how quickly these come together!
Step 1: Download and Print Your Free Designs
The first and most exciting part is getting your hands on the beautiful chalkboard designs. To download your free printable ornament files, simply click HERE or on the printable button below. This action will open a new browser window with the PDF file. From there, you can easily press the print icon directly from your browser bar. Remember to select your preferred paper type (photo paper for a sleek finish or card stock for durability and a matte look) in your printer settings to achieve the best quality prints. Ensuring your prints are crisp and clear is crucial for a professional-looking final product.
Step 2: Select and Prepare Your Frames
All our printable designs are sized at 3.5 x 5 inches, which is a common and easy-to-find frame size. As mentioned, you can find excellent deals on frames at various stores. The key is to pick frames that complement your holiday decor vision. Whether you opt for elegant distressed white frames like ours, metallic gold, classic black, or even colorful ones, ensure they are clean and ready. Once you have your frames, carefully remove the backings and any glass or plastic inserts. For ornaments, the glass isn’t necessary and can add unnecessary weight, making it easier to just use the print.
Step 3: Cut and Insert Your Printables
With your designs printed, it’s time to carefully cut them out. Precision is key here, so take your time to ensure straight edges that will fit perfectly into your 3.5×5 frames. Once cut, simply drop each printable into its corresponding frame, just as you would a cherished photograph. Replace the frame backing to hold the printable securely in place. You’ll immediately start to see your ornaments taking shape, showcasing the elegant chalkboard designs.
Step 4: Add the Hanging Twine
The final step is to prepare your ornaments for hanging. Cut a small piece of twine (or your chosen ribbon) to an appropriate length for looping. Using your hot glue gun, apply a small dab of glue to the center top of the back of the frame. Quickly press the ends of your twine or ribbon into the glue to form a loop. Hold it in place for a few seconds until the glue sets firmly. This ensures a secure hanger for your beautiful new ornament. Once the glue is dry, your framed printable ornament is ready to adorn your tree!
Your Festive Finish: A Tree Transformed!
And just like that, you’re done! Seriously, this project is so quick that you can create a whole collection of these stunning ornaments in about 10 minutes from start to finish. The impact they make on the Christmas tree is absolutely delightful, adding a touch of rustic charm and personalized elegance that will impress all your holiday guests. They look incredible, elevating your holiday decor with minimal effort and cost.
We’re so grateful you stopped by to discover this festive DIY. We truly believe in the magic of handmade holidays, and these chalkboard ornaments are a testament to how simple yet stunning DIY projects can be. If you enjoyed this project, we would absolutely love for you to share and pin these ideas with all your friends and fellow craft enthusiasts! Spreading the holiday cheer and crafting inspiration is what it’s all about.
Explore More Holiday Inspiration from Our 12 Days of Christmas Series!
Don’t let the holiday crafting stop here! Be sure to delve into the other fantastic Day 11 projects brought to you by our amazing collaborators. Each one offers unique insights and creative ideas to make your holiday season even more special. Simply click on the photos below to discover more festive tutorials and inspiration.
Thank you for being a part of our creative journey this holiday season. Happy crafting, and may your Christmas be filled with joy, beauty, and handmade cheer!