
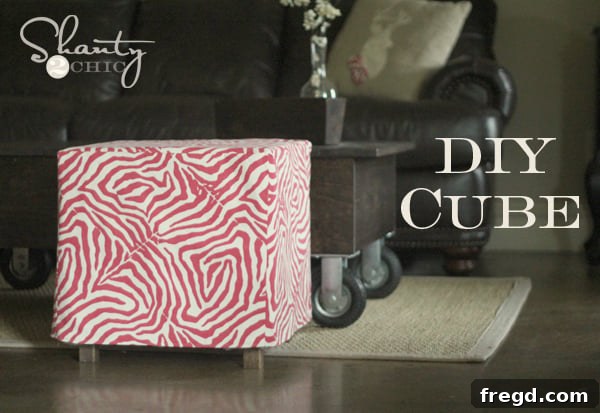
DIY Upholstered Cubes: Affordable, Easy, and Stylish Ottomans for Your Home
Hello fellow DIY enthusiasts! I am absolutely thrilled to share the details of my latest home improvement triumph – a project that perfectly encapsulates my design philosophy: cheap, easy, and undeniably cute! My living room was crying out for a touch of functional elegance, specifically a pair of versatile ottomans to complement my coffee table. So, I turned to the brilliant mind behind so many inspiring woodworking plans, Ana White, with my specific requirements. As always, she delivered beyond expectation, providing the perfect blueprint for these fabulous upholstered cubes.
Why Choose DIY Upholstered Ottomans?
In a world where furniture prices can quickly add up, embracing the do-it-yourself ethos offers a refreshing alternative. Building your own pieces, especially functional items like ottomans, comes with a myriad of benefits. Firstly, the cost savings are substantial. You sidestep retail markups and often leverage more affordable materials, without compromising on quality or aesthetics. Secondly, DIY projects like these upholstered cubes allow for unparalleled customization. You choose the wood, the foam, the fabric, and the finish, ensuring the final product seamlessly integrates with your existing home decor. There’s immense satisfaction in crafting something with your own hands, knowing that your personal touch has brought a unique and stylish element into your living space. These cubes aren’t just footrests; they’re extra seating, impromptu side tables, and even hidden storage (with a little modification!).
The Blueprint for Success: Ana White’s Upholstered Cubes
For those unfamiliar, Ana White is a true luminary in the DIY woodworking community. Her plans are renowned for their clarity, accessibility, and budget-friendly approach, making ambitious projects achievable for even novice builders. When I pitched my idea for coffee table ottomans – keeping my “cheap, easy, cute” mantra firmly in mind – Ana once again proved her expertise. The plans she created for these upholstered cubes are incredibly detailed, breaking down each step into manageable tasks. They empower you to create beautiful, high-quality furniture without the need for specialized skills or expensive tools. Her design philosophy aligns perfectly with mine, focusing on practical solutions that don’t break the bank but still offer a high-end look. You can find the comprehensive, easy-to-follow plans for these remarkable cubes and embark on your own building adventure right HERE!
Budget-Friendly Brilliance: The Cost Breakdown
One of the most exciting aspects of this project is its incredible affordability. Imagine building a stylish, functional piece of furniture for under $20 a piece! Yes, you read that correctly. The cost for the raw wood alone was an astonishing $5 per cube. This makes it an ideal project for anyone looking to refresh their space without a significant financial outlay. When you factor in the cost of foam, batting, and fabric (especially when you catch a sale, which I’ll discuss later), the total still remains remarkably low compared to purchasing similar items from a retail store. This budget-friendly nature is a huge part of what makes these DIY upholstered cubes so appealing, demonstrating that high style doesn’t have to come with a high price tag.
Step-by-Step Journey: Building the Cube Frame
The foundation of these fantastic ottomans is a simple yet sturdy wooden cube frame. The beauty of this design lies in its straightforward construction, allowing for a surprisingly quick build time. In fact, I managed to complete the entire woodworking phase during a single naptime – a testament to how accessible and efficient these plans are!
Gathering Your Materials and Essential Tools
Before diving into the build, ensure you have your materials and tools at the ready. For the wood frame, you’ll primarily need common lumber (check Ana’s plans for specific dimensions). Essential tools include a saw (a miter saw is great for precise cuts, but a circular saw works too), a drill, a measuring tape, and safety gear like eye protection. For joining the wood, I highly recommend using a Kreg Jig, which we’ll elaborate on next.
The Kreg Jig Advantage: Strong and Hidden Joints
For assembling the wooden frame and especially for attaching the seat slats, my Kreg Jig® was an absolute game-changer. If you’re not familiar, a Kreg Jig allows you to create strong, hidden pocket-hole joints. This method is incredibly efficient and results in a very clean, professional finish without visible screw heads on the exterior. It significantly speeds up assembly and creates incredibly robust connections, perfect for furniture that will see regular use. I specifically utilized my Kreg Jig to secure the seat slats, ensuring a solid, dependable surface for the upholstery. This tool truly simplifies complex joinery, making furniture building a joy rather than a chore.
Assembling the Sturdy Cube Structure
The construction process begins with accurately cutting your wood pieces according to Ana White’s plans. Precision here will pay off in the final outcome. Once your pieces are cut, you’ll drill pocket holes as indicated in the plans. These holes strategically allow screws to connect the pieces at an angle, creating strong, stable joints. The process involves assembling the four sides of the cube, then adding the top support slats. It’s a very intuitive process, even for those new to woodworking. Before you know it, you’ll have a complete, sturdy wooden cube frame ready for the exciting next step: upholstery.
Here are a few glimpses into the quick and efficient build process:
Here’s a closer look at using the Kreg Jig for the seat slats:
Crafting Comfort: The Upholstery Steps
Once the sturdy wooden frame is complete, the transformation truly begins with the upholstery. This is where the cube transitions from a bare frame to a soft, inviting ottoman. My approach focused on simplicity and cost-effectiveness without sacrificing comfort or a polished look.
The Foam Board Innovation: Easy Cushioning
For the side cushioning of the cube, I opted for an innovative and incredibly easy solution: white foam board. I found this at Hobby Lobby for just $1.29 a piece, and each cube required two pieces. This was a revelation compared to the traditional methods of struggling with cumbersome cardboard boxes or cutting plywood. Foam board is remarkably simple to measure and cut to size using just a yard stick and a craft knife. Its rigidity provides a smooth, even surface for the batting and fabric, ensuring a clean and professional finish around the sides of the ottoman. It’s a fantastic hack for achieving a polished look with minimal effort and expense.
Sourcing Smart: Chair Cushions for the Top
For the plush top of the ottoman, I found a brilliant shortcut: pre-made chair cushions from Joann’s. The key here, as with many DIY projects, is to keep an eye out for sales. I snagged these cushions at a fantastic 40% off, significantly reducing the overall cost while providing a perfectly sized and comfortable top layer. Using pre-made cushions eliminates the need for cutting and shaping dense foam, saving time and effort. It’s all about working smarter, not harder, to achieve a professional finish.
Layering for Luxury: Batting Application
With the foam board sides and cushion top in place, the next step is to create a smooth, rounded surface with batting. Batting serves a crucial purpose in upholstery: it provides an extra layer of plushness, smooths out any imperfections or edges, and protects your final fabric from wear and tear against the wooden frame. I hot glued the chair cushion securely to the top of the cube, ensuring it wouldn’t shift. Then, I carefully wrapped the entire structure – foam board sides and cushion top – with batting. This process ensures a soft, consistent feel and appearance before the final slipcover is applied.
The Finishing Touch: Custom Slipcovers
The final, transformative step in creating these stylish upholstered cubes is adding the slipcover. This is where your personal style truly shines through, allowing you to select a fabric that perfectly complements your home’s aesthetic. Slipcovers are also incredibly practical, offering the flexibility to change your decor with the seasons or simply refresh a tired look, and they are easily removable for cleaning.
Sewing Made Simple: Crafting Your Slipcovers
Don’t be intimidated by the idea of sewing! If you can sew a straight line, you possess all the fundamental skills needed to create these slipcovers. The design for these cubes is straightforward, making the sewing process quite manageable, even for those new to using a sewing machine. I’m so excited to share the detailed “how-to” guide for sewing these slipcovers in tomorrow’s post, so make sure to check back for that comprehensive tutorial!
The Grand Reveal: Finished Ottomans
And now, for the moment we’ve all been waiting for! The completed upholstered cubes are not just functional pieces of furniture, but vibrant accents that bring character and comfort to my living space. The transformation from simple wood frame to chic ottoman is truly rewarding, and the ease of the process makes it even more satisfying.
Style and Versatility: Coral for Spring
Aren’t these DIY upholstered ottomans absolutely delightful? I am particularly smitten with their vibrant coral color, which injects a much-needed pop of warmth and cheer into my living room. This lively hue instantly makes the space feel ready for Spring, bringing in a touch of seasonal freshness and playful elegance. The beauty of choosing a slipcover is that you can easily update the look with different fabrics and colors to suit any season, mood, or evolving decor style. These cubes are not just pieces of furniture; they are versatile accents that enhance the overall ambiance of any room. Their customizability ensures they will remain a beloved part of your home for years to come.
Don’t Miss Out! Slipcover Instructions Coming Soon!
As promised, I will be sharing the full step-by-step instructions for sewing the slipcovers tomorrow! Make sure to visit my blog then for all the details on how to create these perfectly fitted fabric covers. You won’t want to miss it!
Get Started Today: Free Plans and Printable!
Ready to build your own set of stylish and affordable upholstered cubes? You can download the free printable plans for the cubes and access the full, comprehensive building guide directly HERE!
These upholstered cubes are genuinely easy to make and incredibly fun to customize, proving that stunning home decor doesn’t require a professional carpenter or a massive budget.
Beyond the Cubes: Explore More DIY Projects for Your Home
Thank you so much for joining me on this DIY journey! The satisfaction of creating something beautiful and functional for your home is truly unmatched. If you enjoyed this project and are looking for more inspiration, I’m constantly working on new ways to infuse personality and charm into my living spaces through DIY. Here are just a few more of my latest living room projects that you might find interesting and inspiring: