
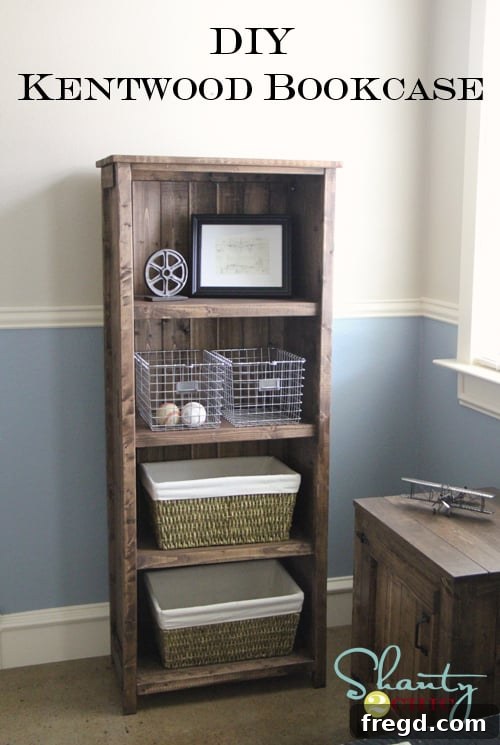
Transforming Spaces: Building a Custom Kentwood Bookshelf for My Son’s Room
Happy Spring Break, everyone! While many might envision leisurely days and relaxation, my idea of a perfect break involves sawdust, power tools, and the immense satisfaction of creating something beautiful with my own hands. With my oldest three children enjoying a visit with their grandparents, I seized this precious window of quiet time to dive deep into some serious crafting projects – and let me tell you, it’s been absolutely exhilarating! Woohoo!
First on my exciting list of completed projects, and one I’m absolutely thrilled to share with you today, is a stunning custom bookcase I meticulously built for my son’s room. This isn’t just any bookcase; it’s a piece designed to perfectly complement the existing decor, bringing both functionality and a touch of handcrafted charm to his personal space.
The inspiration for this project stemmed from a conversation with the incredibly talented Ana White. Having already crafted an amazing bed and nightstands based on her designs, I reached out with a specific request: a bookcase that would harmoniously tie into the existing Kentwood furniture collection. As always, Ana delivered with an exceptional plan that truly exceeded my expectations. I absolutely adore the outcome!
Embarking on Your Own DIY Bookshelf Journey: The Kentwood Plans
For those eager to replicate this project, or simply explore the world of accessible woodworking, you can find the detailed plans for this specific Kentwood Bookshelf design directly on Ana White’s website. Her plans are renowned for their clarity, making even seemingly complex projects approachable for DIY enthusiasts of all skill levels. Follow the link to access the comprehensive guide that will walk you through every cut and assembly step: GET THE KENTWOOD BOOKSHELF PLANS HERE.
While Ana’s plans are incredibly thorough, I’ve gathered a few personal tips and insights from my own building experience that might help smooth your process and enhance your build. Every DIY project offers unique learning opportunities, and I’m excited to share what I discovered along the way.
The Game-Changer: My Indispensable Kreg Jig
If there’s one tool I consistently recommend to anyone venturing into woodworking, it’s my trusty Kreg Jig®. This project, like so many others, was brought to life with its incredible assistance. I truly cannot overstate the amount of time, effort, and yes, sometimes even tears, this fantastic tool has saved me! When I first started using it, I admit I felt a bit intimidated by the idea of pocket holes and specific settings. However, with a little practice, it quickly became an indispensable part of my workshop arsenal. Now, I genuinely won’t consider tackling a woodworking project without it. Seriously, if you’re looking to elevate your DIY game, you absolutely need one. I promise, it’s a worthwhile investment that will transform your building experience.
Mastering Pocket Hole Joinery for Superior Strength
For this Kentwood Bookshelf, I opted for 3/4-inch pocket holes, secured with 1 1/4-inch pocket hole screws. This combination ensures a strong, durable joint that holds the frame together beautifully, creating a robust structure capable of holding a substantial collection of books and decor. The beauty of pocket hole joinery lies in its hidden fasteners, giving your finished piece a clean, professional look without visible screw heads.
The Build Process: From Raw Wood to Sturdy Structure
Watching the bookshelf take shape through the various stages of construction is one of the most rewarding aspects of any DIY project. After meticulously cutting all the pieces according to Ana’s plans, the assembly phase began. Using the Kreg Jig made connecting the frame components surprisingly quick and precise. Each joint felt solid and secure, building confidence with every screw driven. It’s truly amazing how quickly a pile of lumber can transform into a recognizable piece of furniture.
Adding the Back: Simple Panel for a Finished Look
Once the main frame and shelves were securely assembled, it was time to add the back panel. I chose a readily available, inexpensive paneling from Lowe’s for this purpose. This material is fantastic for DIY projects because it’s lightweight, easy to work with, and provides a clean, finished appearance. Installing it was a breeze: I simply applied a strong wood glue along the back edges of the frame and then secured the paneling with small nails using my brad nailer. This step not only encloses the back of the shelves but also adds an extra layer of structural integrity, preventing the unit from racking.
The choice of paneling really makes a difference in the overall aesthetic and stability of the piece. It’s a simple addition that makes the bookshelf look more professional and complete, concealing the raw wood edges and providing a solid backdrop for books and decorative items. This step is often overlooked, but it’s crucial for both form and function.
Crafting the Planked Top: A Touch of Character
One of my favorite details on this bookshelf is the planked top, which I created using 1×3 boards. This design choice adds a wonderful rustic and custom feel to the piece, elevating it beyond a simple utilitarian storage unit. The individual planks give it character and depth, drawing the eye and providing a sturdy, attractive surface. Attaching these planks carefully created a beautiful, cohesive top that perfectly complements the Kentwood style.
The Art of Finishing: Staining for a Rich, Timeless Look
With the construction complete, it was time for the magical transformation – the staining process. Choosing the right stain is crucial for achieving the desired aesthetic and protecting the wood. For this project, I selected Rust-Oleum Ultimate Wood Stain in Dark Walnut. This particular shade offers a deep, rich brown that provides a classic, timeless appeal, perfectly aligning with the rustic farmhouse style of the Kentwood collection. It’s readily available at most Lowe’s stores, making it a convenient choice for your projects.
Before applying the stain, I made sure to thoroughly sand all surfaces, starting with a coarser grit and gradually moving to a finer one. Proper sanding is key to achieving a smooth, even finish and ensuring the stain penetrates uniformly. I applied the stain using a clean rag, wiping it on in the direction of the wood grain and then wiping off any excess to prevent blotchiness. The Dark Walnut stain truly brought out the natural beauty of the wood, adding warmth and sophistication to the piece. After the stain dried completely, I followed up with a protective topcoat to ensure durability and longevity, especially important for furniture in a child’s room.
The Grand Reveal: A Functional Masterpiece
After all the cutting, drilling, assembling, and staining, the moment arrived to see the completed Kentwood Bookshelf in its full glory. Want to see it all finished and beautifully integrated into my son’s room?
The Dark Walnut stain lends a sophisticated depth, while the planked top adds a unique, handcrafted touch. It’s incredible how a simple piece of furniture can transform a room, providing not only essential storage but also a focal point that reflects thoughtful design and personal effort.
The shelves are perfectly sized to hold books, toys, and cherished display items, keeping everything organized and easily accessible. The robust construction promises years of reliable use, standing up to the rigors of a bustling child’s room.
Every detail, from the sturdy frame to the custom finish, contributes to a piece that looks like it came from a high-end furniture store, but with the added pride of being a handmade creation.
What do you think of the finished bookshelf? I’m absolutely thrilled with how it turned out!
This bookshelf is just one example of the many awesome and achievable plans you can find on Ana White’s incredible site. What truly amazes me is the efficiency with which these projects can be completed. This particular bookshelf was a remarkably quick two-hour project for me – I literally started it just after putting the babies to bed and had the main construction finished before it was too late! It’s a testament to the clarity of the plans and the power of having the right tools on hand.
If you’ve found inspiration in this project and enjoyed seeing the transformation, I would be so incredibly grateful if you could share the love by pinning it below! Your support helps spread the word about accessible DIY and encourages more people to pick up a tool and create something wonderful.
Creating a Cohesive Space: More DIY Goodies for the Room
And in case you’re new to following my projects for this room, I wanted to showcase some of the other handcrafted “goodies” I’ve built to create a truly cohesive and personalized space for my son. Each piece was designed to complement the others, offering a stylish and functional environment.
This DIY Kentwood Nightstand was one of the first pieces I tackled for the room. Its sturdy construction and classic design perfectly match the aesthetic of the bookshelf, providing practical bedside storage while adding to the overall charm. Building it myself allowed for customization that retail options simply couldn’t offer.
Looking for even more storage on a budget? These $20 Shelves Anyone Can Build!! are an absolute game-changer. They prove that you don’t need a massive budget to create functional and stylish storage solutions. Easy to assemble and highly versatile, they’re perfect for displaying trophies, books, or decorative items without breaking the bank.
And finally, the centerpiece of the room – this incredible DIY Pottery Barn Platform Bed. Inspired by high-end designs but built with a fraction of the cost, this bed provides a comfortable and stylish foundation for the entire room. Together, these pieces create a harmonized, inviting, and highly functional space that my son absolutely loves.
Join the DIY Community and Build Your Dreams!
Thanks so much for stopping by and taking the time to explore this DIY Kentwood Bookshelf project! I hope you feel inspired to tackle your own home improvement and crafting endeavors. The satisfaction of creating something with your own hands is truly unparalleled.
Don’t forget to check out the incredibly detailed and easy-to-follow plans for this great bookcase, and countless other fantastic projects, on Ana White’s site. Her resources are a goldmine for anyone looking to build beautiful, custom furniture without needing a professional workshop. Access the full plans and start your next project today: FIND THE KENTWOOD BOOKSHELF PLANS HERE! Happy building!