
Crafting Your Own: An Easy DIY Storage Nightstand Tutorial
Hey, fellow DIY enthusiasts! Happy to have you join us for another exciting project. To ensure you don’t miss any of our creative ventures and step-by-step guides, be sure to follow us on Instagram! We share behind-the-scenes peeks, project updates, and plenty of inspiration to fuel your next build.
As many of you know, life in our home is always bustling with my five wonderful children. My youngest, who is undoubtedly the most energetic and keeps us on our toes, recently celebrated his second birthday. The transition to a “big boy bed” has been looming, a milestone I admit I’ve been slightly dreading, knowing it often signals a new era of freedom for him (and perhaps less quiet time for me!). However, when he expertly mastered the art of crib escape, it became clear the time for a change had officially arrived.
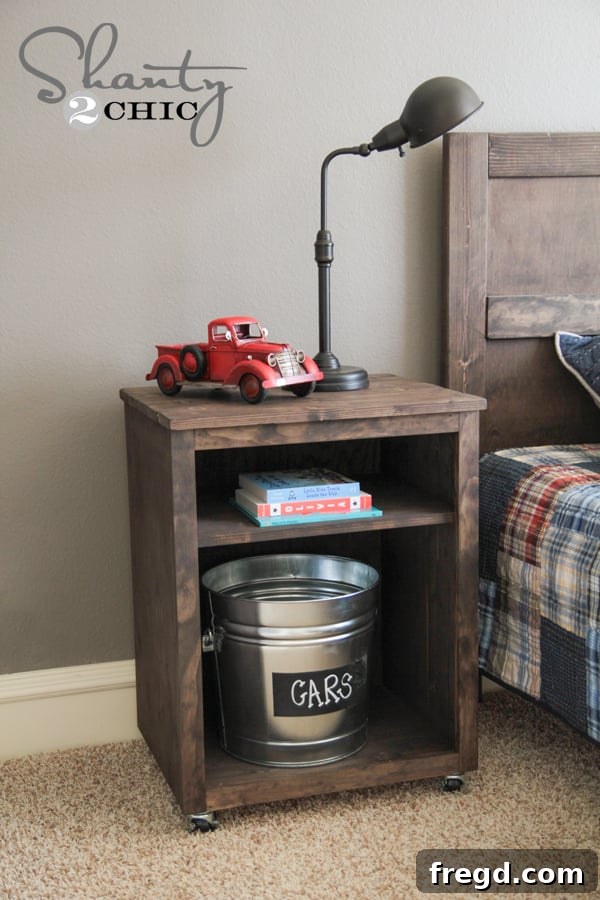
Conveniently, I had just finished building a new bed for his older sister, which meant her previous Pottery Barn-inspired bed that I built became available. It was the perfect fit for his room, and with the bed sorted, my thoughts immediately turned to completing the space with functional yet stylish storage. That’s when the idea for these DIY storage nightstands was born – designed to complement the bed and provide practical organization for a busy little boy’s room. And honestly, they turned out even better than I imagined!
Aren’t they absolutely adorable? What makes them even better is how incredibly simple and cost-effective they are to build yourself. This project is a fantastic opportunity to add a custom touch to any bedroom without breaking the bank. Whether you’re furnishing a child’s room, a guest room, or even your own master suite, these versatile nightstands offer both charm and practicality.
Why Build Your Own Storage Nightstands?
In a world filled with mass-produced furniture, building your own pieces offers a unique blend of satisfaction, customization, and often, significant cost savings. When it came to creating the perfect bedside tables for my son, opting for a DIY approach was a no-brainer. Not only could I tailor the dimensions to perfectly fit his space, but I could also choose materials that I trusted for durability and aesthetic appeal. Store-bought nightstands with similar features, especially those with solid wood construction and thoughtful design details, can often come with a hefty price tag. By building these myself, I achieved the high-end look and robust construction I desired for a fraction of the cost. Plus, there’s an undeniable pride that comes from creating something beautiful and functional with your own hands. This project is ideal for both beginner and intermediate woodworkers looking for a rewarding weekend build.
Essential Materials for Your DIY Nightstand Project
Let’s gather our supplies! Choosing the right wood is crucial for the longevity and finished look of your nightstands. Here’s what you’ll need:
- 1 – 4×8 sheet of 3/4″ Purebond Hardwood Plywood: This will be ripped into 16″ wide boards. Purebond plywood is an excellent choice for its strength, stability, and beautiful grain, making it ideal for furniture. It also offers a formaldehyde-free option for a healthier home environment. While it might be a bit pricier than standard plywood, its quality pays off.
- (Alternatively, you can use 16″ x 8′ pine project panels. This option can be quicker as the panels are pre-cut to width, saving you a step if you don’t have a table saw or access to a lumber yard that rips wood. However, as noted, the cost will generally be higher per lineal foot compared to buying a full sheet of plywood and ripping it yourself.)
- 1 – 1x2x8 Pine Board: This will be used for the side trim pieces, providing a clean, finished edge to the nightstand frame.
- 2 – 1x4x8 Pine Boards: These boards are essential for creating the charming planked top, which truly elevates the nightstand’s farmhouse-chic appeal.
- 1/4″ Hardwood Plywood for the Back (Optional): Adding a back panel gives the nightstand a more finished look and can prevent items from falling out the back. It also adds a bit more stability to the overall structure.
- Wood Glue: High-quality wood glue, like Gorilla Wood Glue, is indispensable for creating strong, lasting joints.
- 1 1/4″ Pocket Hole Screws: These specific screws are designed to work with pocket hole joinery, creating incredibly sturdy and discreet connections.
- Wood Stain: My personal favorite for this project is Rust-Oleum Ultimate Wood Stain in Kona – a beautiful, rich hue that mimics high-end furniture.
- 2″ Locking Casters (4 per nightstand): These add mobility and a touch of industrial charm.
For these nightstands, I ended up using pine project panels due to time constraints. I was in a rush at the lumber yard and didn’t have time to wait for the plywood to be ripped down. While it did increase the overall cost slightly, I was very happy with the final result. However, given the choice, I generally prefer working with hardwood plywood for its superior finish and durability, especially for furniture that will see daily use.
Tools You’ll Need for This DIY Nightstand Project
Having the right tools makes any woodworking project smoother and more enjoyable. Here’s a list of the tools that will be essential for building your storage nightstands:
- Miter Saw: A Ridgid miter saw or similar will be your best friend for making precise, straight cuts and angled cuts if needed. Accuracy here is key for a professional-looking finish.
- Kreg Jig: For creating strong and invisible pocket hole joints, a Kreg Jig (like the K5 model) is a game-changer. It simplifies joinery significantly, even for beginners.
- Cordless Brad Nailer: My Ryobi Airstrike Nail gun is an absolute must-have. It’s incredibly easy to use – truly easier than a hot glue gun! It allows for quick, secure attachment of trim and planks without the hassle of a compressor. Seriously, get one; you’ll wonder how you lived without it.
- Sander (e.g., Ryobi Corner Cat Sander): A versatile sander is important for achieving smooth surfaces, especially when preparing wood for staining. A detail sander like the Corner Cat is great for edges and tight spots.
- Tape Measure and Pencil: For accurate measurements and marking cuts.
- Clamps: Essential for holding pieces securely in place while glue dries or screws are driven.
- Drill/Driver: To drive pocket hole screws and attach casters.
- Cordless Staple Gun (Optional): Useful for attaching the optional 1/4″ plywood back panel quickly and efficiently.
- Staining Brush and Wiping Cloths: For applying and wiping off wood stain. A Wooster Shortcut brush, as pictured, is excellent for its maneuverability.
- Safety Glasses and Ear Protection: Always prioritize safety when working with power tools.
With our materials and tools ready, let’s dive into the build!
Step-by-Step Guide to Building Your DIY Storage Nightstands
Let’s get started on bringing these functional and stylish nightstands to life! Precision in each step will ensure a beautiful and sturdy final product.
1. Making Your Initial Cuts
The foundation of any good woodworking project lies in accurate cuts. Begin by cutting your 16″ wide boards (whether plywood or project panels). From this material, you will create the main structural components:
- Two (2) Side Pieces: Cut each to 26″ in length. These will form the vertical sides of your nightstand.
- Three (3) Top, Bottom, and Shelf Pieces: Cut each of these to 20″ in length. These pieces will create the horizontal surfaces that define your storage areas.
Once your top, bottom, and shelf pieces are cut, it’s time to prepare them for assembly. Using your Kreg Jig, drill 3/4″ pocket holes along one side of each of these three pieces. These pocket holes will allow you to create strong, hidden joints for a clean look.
After drilling, these three pieces should look similar to this, ready for assembly:
2. Assembling the Core Structure
Now for the exciting part – assembly! This is where your nightstand starts to take shape. Apply a generous bead of wood glue along the edges where the shelf, top, and bottom pieces will meet the side pieces. Then, attach the shelf pieces to one of your side panels using 1 1/4″ pocket hole screws. It’s helpful to use clamps to hold the pieces firmly in place while you drive the screws, ensuring a tight and flush fit. Here’s how I aligned them to create the internal shelving and frame:
Once all three horizontal pieces (top, bottom, and shelf) are securely attached to one side panel, your assembly should resemble this robust, half-finished frame:
Next, carefully flip the entire assembly over. You will then attach the remaining side panel to the exposed ends of the top, bottom, and shelf pieces using the exact same method – wood glue and 1 1/4″ pocket hole screws. This creates the full, sturdy box frame of your nightstand. It’s incredibly easy and satisfying to see the structure come together so quickly! At this stage, your nightstand is ready for its decorative trim.
3. Adding the Decorative Trim
The trim pieces are what really define the aesthetic of these nightstands, giving them a polished, built-in look. For this part, I relied heavily on my Ryobi Airstrike Nail gun, paired with wood glue, for attaching each piece. I cannot overstate how incredible and user-friendly this tool is. It makes attaching trim almost effortless – just position the wood, aim, and shoot a nail in. It’s faster and simpler than using a hot glue gun, I promise! If you’re serious about DIY, investing in a cordless nailer will be a decision you won’t regret.
I began by attaching the side trim pieces using the 1×2 pine board. Measure and cut these pieces to fit precisely along the vertical edges of your nightstand. Apply glue, position, and then nail them into place.
Once both side trim pieces are securely attached, the nightstand begins to look much more refined and complete:
Next, attach the top and bottom trim pieces. Again, measure carefully, apply wood glue, and use your nail gun to fasten them securely. These pieces visually cap off the nightstand, giving it a sturdy and substantial presence.
You’re almost done with the basic structure! At this point, the nightstand frame is complete and ready for the planked top.
4. Creating the Planked Top
To add a touch of rustic elegance and truly “dress up” these nightstands, I opted for a planked top. This feature adds character and a custom feel that sets them apart from typical furniture. For this, I used the 1×4 pine boards. As an alternative, you could also use furring strips to save a bit more money, and they would still achieve a lovely planked look. For each nightstand, you will need five (5) cuts at 22″ each from your 1×4 boards.
Before attaching the planks, here’s a little trick to elevate the perceived quality: I used my Ryobi Corner Cat sander to gently round off each edge of every plank. This subtle detail gives the wood a softer, more refined appearance, making it look less like a “garage build” and more like a carefully crafted piece of furniture. It’s amazing what a small touch of sanding can do to transform the feel of a project!
Notice how the edges are now subtly rounded? This small step makes a significant difference in the finished aesthetic.
With the planks prepared, attach them to the top of your nightstand frame. Once again, use wood glue for a strong bond and your nail gun to secure each plank in place. When positioning the planks, allow for approximately a 1/2″ overhang on all sides of the nightstand. This overhang creates a beautiful, substantial tabletop that truly finishes the piece.
5. Finishing Touches: Staining and Details
With the construction complete, it’s time to add the finishing touches that will bring your nightstands to life! My next step was staining. I chose the same beautiful color I used on the Pottery Barn knockoff bed: Rust-Oleum Ultimate Wood Stain in Kona. Oh, Kona! This rich, deep hue truly brings out the natural beauty of the wood and gives the nightstands a sophisticated, timeless appearance.
Staining is a surprisingly simple process, often easier than painting! Here’s how I approach it: Using a good quality staining brush, apply a small amount of stain at a time to one section or side of the nightstand. My favorite brush for this is a Wooster Shortcut brush, which fits comfortably in my hand, doesn’t drip excessively, and is fantastic for getting into tighter spaces. Once you’ve applied the stain to a section, immediately use a clean wiping cloth or an old cotton shirt to wipe off all the excess. This technique ensures an even color and prevents blotchiness.
One of the many reasons I love Rust-Oleum stains is their efficiency. This particular brand often only requires one coat for a rich, deep color and dries in under an hour! This means you can quickly move on to the next steps without long waiting periods. After the stain has fully dried, consider applying a protective topcoat for added durability, especially for furniture that will see heavy use. A satin or matte polyurethane will protect the finish without adding excessive shine.
Once the stain was completely dry, I added 2″ locking casters to the bottom of each nightstand. I adore the look of wheels on furniture – they add a touch of industrial style and make the pieces incredibly easy to move for cleaning or rearranging. You can find these casters affordably at any hardware store.
Finally, I used my new cordless staple gun to attach the 1/4″ hardwood plywood to the back of the nightstands. This step is entirely optional! Leaving the back open creates a different, more open shelving look, which can also be very appealing. However, adding a back panel provides a finished look and prevents items from accidentally falling behind the nightstand.
That’s it! The final step was to set them up in my son’s newly transitioned “big boy” room. What do you think of the finished look? I’m absolutely thrilled with how these custom storage nightstands turned out, providing both style and much-needed functionality for his space.
Bringing It All Together: Your Custom Bedroom Solution
Thank you so much for following along with this DIY nightstand tutorial! It’s truly rewarding to create custom furniture pieces that perfectly suit your needs and style. The best part? You can build these charming and practical storage nightstands for under $50 a piece, which is an incredible value compared to retail options. This budget-friendly project empowers you to achieve a high-end look without compromising on quality or design.
Now, as for my little escape artist, wish me luck in keeping him settled in his fantastic new big boy bed with these cool nightstands by his side! I have a feeling they’ll be filled with books, toys, and all sorts of treasures in no time.
I would absolutely LOVE for you to share this project and pin it with your friends and fellow DIY enthusiasts! Spreading the word helps others discover the joy and satisfaction of building their own beautiful home decor.
And for those of you who might be curious about the other elements in the room, here are a few details:
- Wall Color: Seine by Valspar
- Bedding: Pottery Barn Teen (a fantastic source for stylish and durable kids’ bedding)
- Metal Buckets: Found these versatile storage buckets at Lowe’s in the paint section – perfect for keeping small items organized!
I hope this comprehensive guide covers everything you need to confidently tackle your own DIY storage nightstand project. Happy building!
~Whitney