
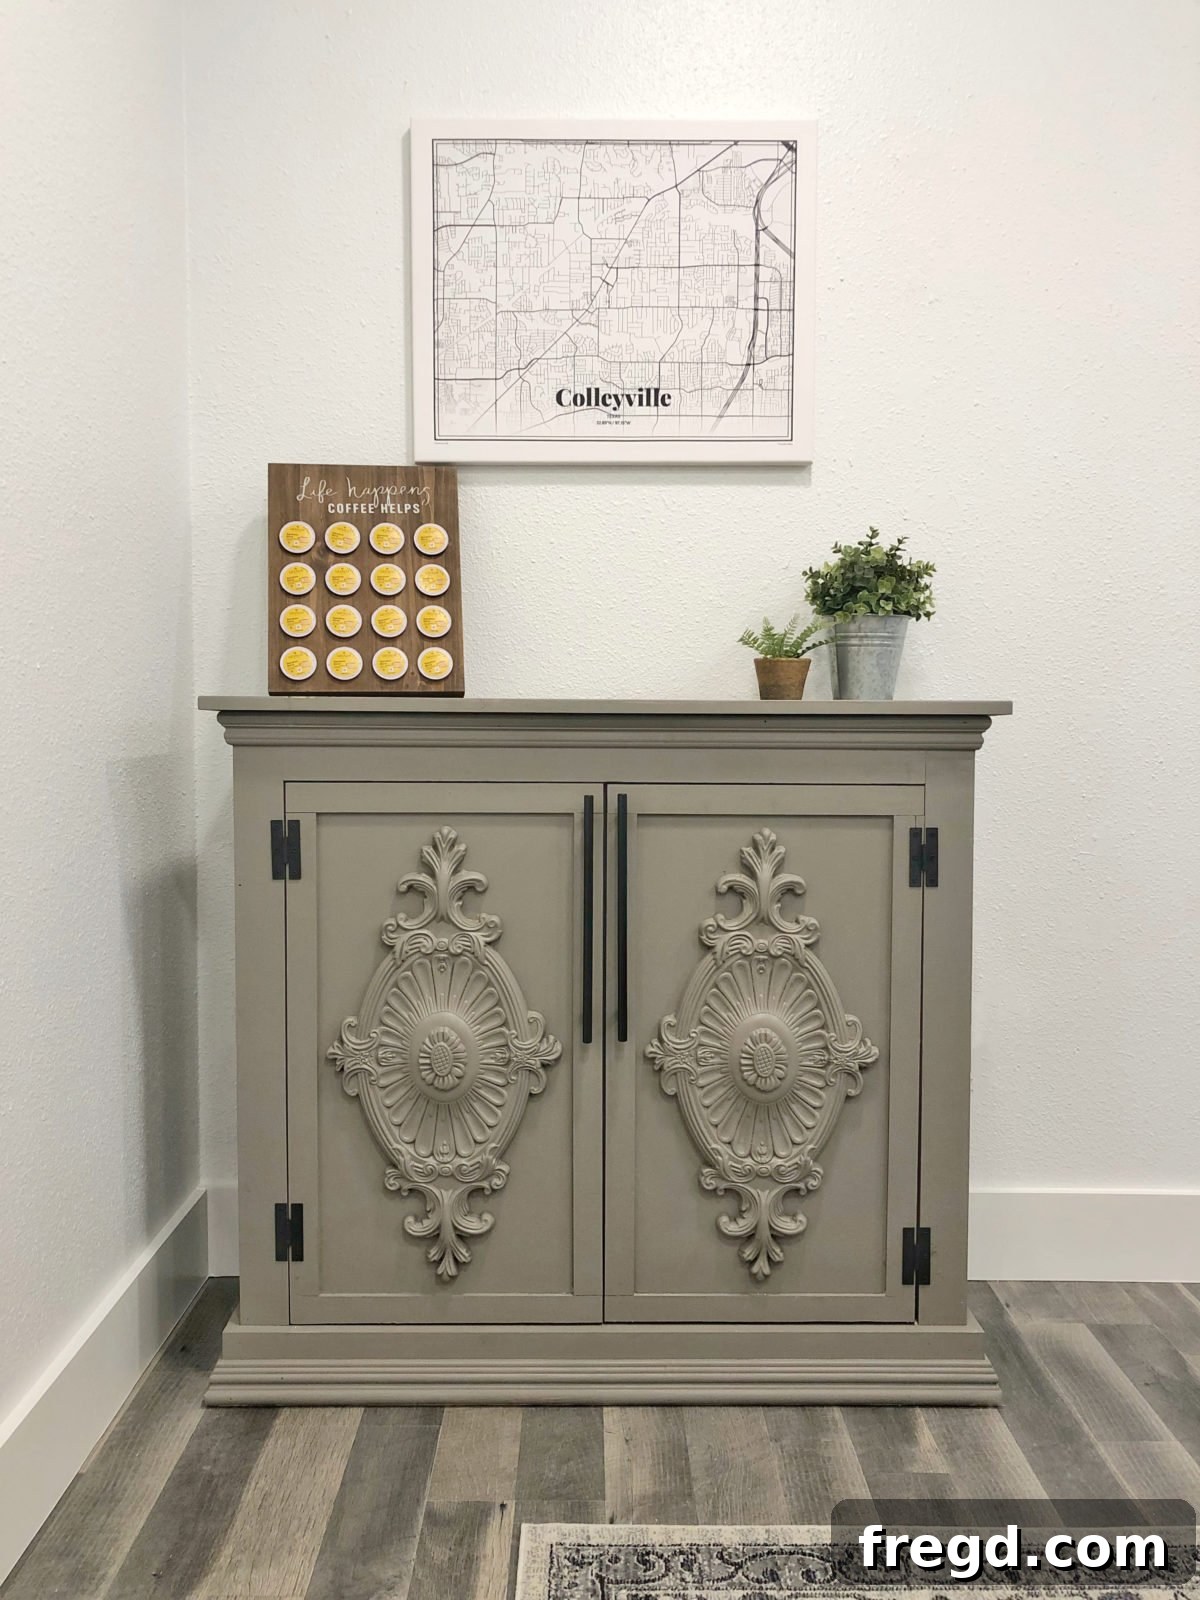
Transforming a house into a home often involves personal touches and functional beauty. Today, we’re thrilled to guide you through building a truly versatile piece of furniture: the DIY Fancy Farmhouse Console. While originally designed for general home use, we quickly realized its potential as an exquisite coffee bar, adding charm and utility to any space. This project is perfect for enhancing your living room, entryway, dining area, or even a dedicated studio space, just as Ashley and I discovered for our new office.
The allure of farmhouse design lies in its rustic elegance and timeless appeal. Our Fancy Farmhouse Console embodies this aesthetic, blending classic lines with practical storage. Imagine waking up to a beautifully organized coffee station, or greeting guests with a stylish console table showcasing your favorite decor. This DIY project offers not just a piece of furniture, but a statement of craftsmanship and personal style. It’s an opportunity to create something unique that perfectly fits your needs and decor.
For those who prefer visual learning, we’ve put together a comprehensive DIY YouTube video that walks you through every step of this build. It’s an invaluable resource to complement these written instructions, ensuring you have all the guidance you need from start to finish. You can watch the full tutorial and see the console come to life by clicking the link below:
Watch the DIY Console Build Video Here!
Once completed, you’ll be amazed at how this console elevates your space. Its design is not only visually appealing but also incredibly functional, offering ample storage behind elegant doors and a generous top surface for display or daily use. It’s more than just a cabinet; it’s a centerpiece that reflects your dedication to creating a beautiful home.
Why Build Your Own DIY Fancy Farmhouse Console?
Embarking on a DIY furniture project like this offers numerous benefits beyond just acquiring a new piece of furniture. Firstly, it allows for unparalleled customization. You choose the wood, the finish, the hardware, and even the internal configuration to perfectly match your home’s aesthetic and your specific storage requirements. This console can serve many roles: a chic coffee bar, a practical entryway table for keys and mail, a sophisticated buffet in your dining room, or extra storage in a home office.
Secondly, building it yourself can be significantly more cost-effective than purchasing a similar high-quality, handcrafted piece. You save on labor costs and can source materials tailored to your budget. Moreover, the sense of accomplishment and pride you feel when looking at a piece you’ve built with your own hands is truly priceless. It’s an investment not just in your home, but in your skills and creativity.
Essential Tools and Materials for Your Build
Before diving into construction, gather all your tools and materials. Having everything ready will make the process smoother and more enjoyable. While the free plans provide a detailed list, here’s an overview of what you’ll generally need:
Recommended Tools:
- Circular Saw or Table Saw: For precise cuts of plywood and other lumber. A table saw offers maximum accuracy.
- Miter Saw: Essential for accurate crosscuts, especially for face frames and trim pieces.
- Pocket Hole Jig (e.g., Kreg Jig): Crucial for creating strong, concealed joints. This project heavily relies on pocket holes.
- Drill/Driver: For drilling pilot holes and driving screws.
- Brad Nailer (or Pin Nailer): For attaching face frames, trim, and backs quickly and securely.
- Wood Glue: For reinforcing all joints, ensuring maximum strength and durability.
- Measuring Tape, Pencil, Speed Square: For accurate measurements and marking.
- Safety Glasses and Hearing Protection: Always prioritize safety in your workshop.
- Sander (Orbital or Sheet): For preparing surfaces for finishing.
Key Materials:
- 3/4” Hardwood Plywood: This will form the main body of your cabinet, offering stability and strength. Choose a good quality plywood for the best results.
- 1×3 Boards: For the face frame and internal dividers.
- 1/4” Hardwood Plywood: For the cabinet back panel.
- Laminated Project Panel (or Solid Wood): For the top surface. This provides a durable and attractive countertop.
- 1/2” Hardwood Plywood: For the door panels.
- 1/4” x 2” Pine Craft Boards: For trimming the door edges, adding a decorative touch.
- 1.25” Pocket Hole Screws: For all pocket hole joinery.
- 1.25” Brad Nails: For attaching face frames and other components.
- 1/2” Pin Nails (optional): For delicate trim work on doors.
- Wood Filler: To fill nail holes and minor imperfections.
- Wood Finish (Paint, Stain, or Sealer): To protect and beautify your console.
- Hardware: Hinges for the doors, and decorative pulls/knobs.
- Ceiling Medallions (Optional): For a unique decorative detail on the doors.
Ready to get started? Before picking up your tools, make sure you have the detailed plans printed out. These plans provide precise dimensions and cut lists, which are essential for a successful build.
Download and Print the FREE PLANS by clicking HERE!
Step-by-Step Guide: Building Your Fancy Farmhouse Console
Step 1: Constructing the Cabinet Box
The foundation of your console is the main cabinet box. We begin by using 3/4” hardwood plywood, meticulously ripped to 12” wide for all the main components. This provides a sturdy base for the entire structure. The bottom shelf, which serves as a critical support, needs 3/4” pocket holes drilled on each end. These hidden holes are key to strong, invisible joinery. Position this shelf precisely 3.5” from the base of the two side boards. Apply a generous bead of wood glue along the joining edges before securing it with 1.25” pocket hole screws. This combination of glue and screws ensures a robust connection. Don’t forget to also add 3/4” pocket holes to the top and inside edges of these side boards – these will be used later to securely attach the console’s top, ensuring a clean finish.
Step 2: Assembling the Face Frame
The face frame is what gives your console a polished, furniture-grade look, covering the raw edges of the plywood. Construct this frame using your 1×3 boards. Drill 3/4” pocket holes into the ends of both vertical pieces. These will allow you to join them seamlessly with the horizontal pieces. Apply wood glue to the mating surfaces and secure the frame components together using 1.25” pocket hole screws. Pay close attention to the bottom horizontal board; it’s designed to overhang 3/4” on each side, a detail that adds to the console’s aesthetic appeal and provides a subtle visual break.
Step 3: Attaching the Face Frame to the Box
With the face frame assembled, it’s time to attach it to the main cabinet box. This step requires precision to ensure a flush and professional finish. Apply a continuous line of wood glue to the front edges of the cabinet box. Carefully align the face frame so that it sits perfectly flush with the top and sides of the box. Once aligned, use 1.25” brad nails to firmly attach the frame into the box, spacing your nails evenly for a secure hold. Remember the 3/4” overhang on each side of the bottom face frame board – this is intentional and should be maintained.
Step 4: Securing the Side Base Pieces
Adding the side base pieces enhances the console’s structural integrity and provides a finished look to the lower section. These pieces are typically cut to fit flush with the face frame and the outer sides of the cabinet. Apply wood glue to the mating surfaces and attach them using 1.25” brad nails. This step creates a cohesive base, visually tying the console together and preparing it for further decorative trim.
Step 5: Installing the Middle Divider
The middle divider is crucial for segmenting the console into functional compartments and providing support for shelves. Begin by attaching a 1×3 board to the front edge of your plywood divider piece using wood glue and brad nails. This 1×3 creates a finished edge for the divider visible from the front. Once this is done, attach the entire plywood divider assembly to the base of the cabinet. Use wood glue and 1.25” pocket hole screws for a strong, hidden connection. Remember to drill pocket holes into the top edge of this plywood divider as well; these will be essential for attaching the console’s top in a later stage, ensuring continuity and strength across the entire structure.
Step 6: Adding Optional Shelves
Shelves greatly enhance the functionality of your console, offering organized storage for everything from coffee mugs and supplies to books and decorative items. This step is entirely customizable to your specific needs. Decide on the number of shelves and their ideal placement within the cabinet compartments. Once you’ve determined the locations, attach each shelf securely to both the center divider and the outer side boards using wood glue and 1.25” pocket hole screws. This method provides robust support for whatever you choose to store, allowing you to tailor the internal configuration to perfection.
Step 7: Securing the Top Panel
The top of your console is both a functional surface and a major aesthetic element. We opted for a laminated project panel due to its durability and finished appearance, cut precisely to size to overhang slightly for a custom look. To attach the top, utilize the pocket holes you previously drilled into the top edges of the side boards and the middle divider. Apply wood glue along these edges, position the top panel carefully, and then drive 1.25” pocket hole screws up through the cabinet frame into the underside of the top. This technique creates a very strong and discreet attachment, leaving no visible fasteners on the top surface.
Step 8: Installing the Back Panel
The back of the cabinet provides stability and encloses the storage area. For this, use 1/4” hardwood plywood, cut to the exact dimensions of the cabinet’s back opening. Once cut, apply a continuous bead of wood glue around the perimeter of the back edges of the cabinet. Carefully place the plywood back panel onto the glue, ensuring it’s square with the cabinet. Secure it firmly in place using staples or short brad nails, spacing them approximately every 4-6 inches along all edges. This will not only complete the enclosure but also add significant rigidity to the entire console structure.
Step 9: Crafting the Decorative Doors
The doors are arguably the most eye-catching feature of this console, allowing for creative expression. Start with 1/2” hardwood plywood panels, cut to the precise dimensions required for your cabinet openings. To give them that elevated “fancy farmhouse” look, we then framed the edges of the front of each door with 1/4” x 2” pine craft boards. These trim pieces add depth and definition. Apply wood glue to the back of the trim pieces and carefully position them on the plywood door panels. Secure them in place using 1/2” pin nails or brad nails. Once dried, these doors will be ready for the unique decorative elements.
Adding the Finishing Touches: Style and Personalization
Now comes the truly exciting part: personalizing your console to reflect your unique style. This is where your DIY farmhouse console transitions from a functional piece of furniture to a stunning statement piece. The options for customization are endless, from the choice of paint or stain to the intricate details of hardware and trim.
Decorative Trim Work
To further enhance the console’s elegance, consider adding decorative trim to both the top and bottom. We used two different styles of baseboard molding to achieve a sophisticated look. For the top trim, a creative trick is to flip a standard baseboard upside down and butt it against the top edge of the cabinet. This provides a unique profile and adds a layer of architectural detail. Experiment with different molding profiles to find one that complements your chosen style. Attach all trim pieces using wood glue and brad nails, ensuring clean mitered corners for a professional finish. Fill any nail holes with wood filler and sand smooth before painting or staining.
Unique Door Embellishments: Ceiling Medallions
One of the most distinctive features of this “fancy” farmhouse console is the use of ceiling medallions on the doors. This unexpected element adds a touch of intricate design and vintage charm that truly sets the piece apart. We sourced beautiful and affordable ceiling medallions online, which are surprisingly lightweight and easy to work with. To attach them, center each medallion on your prepared door panel. Apply a strong adhesive, like construction adhesive or a good quality wood glue, to the back of the medallion. Press it firmly into place and use a few small brad nails to hold it while the glue dries completely. Any visible nail holes can easily be filled with wood filler and sanded smooth before painting. This detail transforms simple doors into works of art.
You can find the beautiful and budget-friendly ceiling medallions we used by clicking HERE!
Hardware Selection
The right hardware can complete the look of your console, tying together all the design elements. For this project, we selected sleek long bar pulls that perfectly complement the farmhouse aesthetic while adding a touch of modern sophistication. Choose hardware that not only looks good but is also comfortable to use and durable.
CLICK HERE for the long bar pulls we used on the doors!
Don’t forget the hinges! Quality hinges ensure your doors operate smoothly and reliably for years to come. We opted for classic cabinet hinges that complement the overall design.
And, CLICK HERE for a link to the hinges!
Bringing Your Vision to Life
Once all the construction is complete and the hardware is installed, the final step is to apply your chosen finish. Whether you opt for a crisp white paint for a classic farmhouse look, a distressed finish for a vintage feel, or a rich wood stain to highlight the natural grain, this step truly brings your console to life. Sand all surfaces thoroughly, clean off any dust, and apply primer if painting. Follow the manufacturer’s instructions for your chosen paint or stain, applying multiple thin coats for a durable and beautiful result. A top coat of polyurethane or a clear sealer will provide added protection and longevity.
We are incredibly proud of how this DIY Fancy Farmhouse Console turned out, especially in its role as a charming coffee bar in our new studio. It’s a testament to what can be achieved with a little creativity, some basic woodworking skills, and a good set of plans. The versatility of this piece means it can adapt to many different functions and styles within your home, making it a truly rewarding project.
We hope this detailed guide empowers you to tackle your own DIY console build. Don’t hesitate to experiment with your own creative twists, making this project uniquely yours. Happy building, and may your newly crafted console bring joy and functionality to your home for years to come!
Thank you so much for joining us on this DIY journey! If you have any questions at all during your build, please don’t hesitate to reach out. We love seeing your completed projects!
Here are a few more inspiring shots of the finished Fancy Farmhouse Console: