
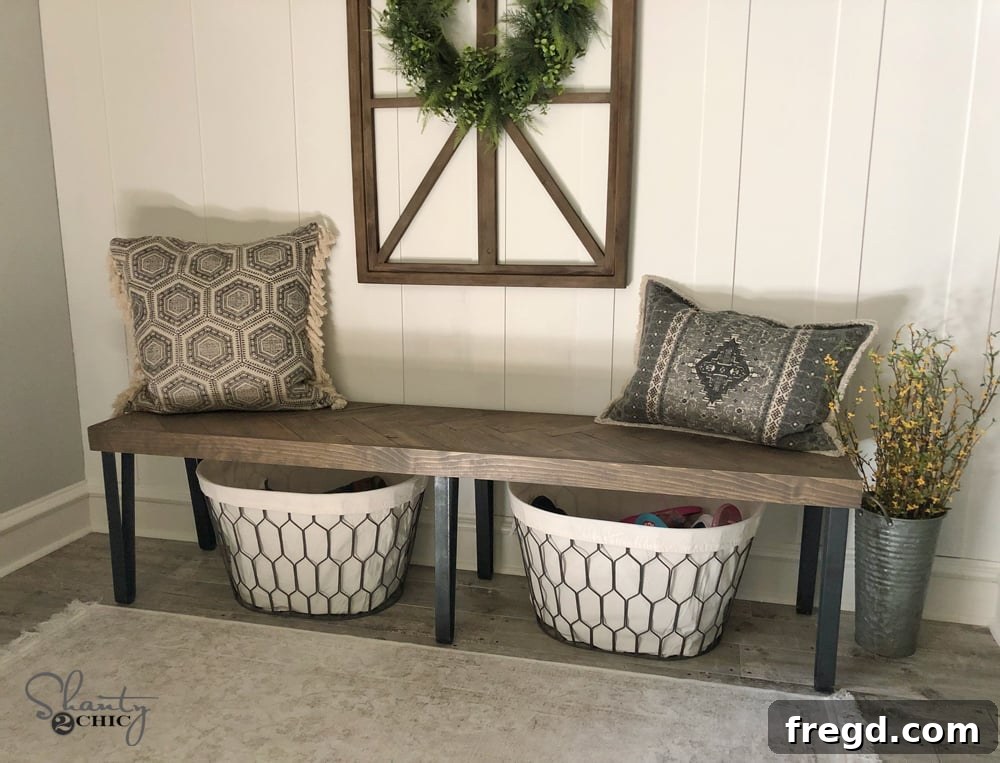
Craft Your Own Masterpiece: The DIY Herringbone Hairpin Bench
Welcome, fellow DIY enthusiasts! Today, we’re thrilled to share an incredibly rewarding and stylish project that will elevate any space in your home: our simple yet stunning DIY Herringbone Hairpin Bench. This charming piece, which I proudly built for my own entryway, perfectly blends modern aesthetics with a touch of rustic appeal. It’s not just a bench; it’s a statement piece, offering both functional seating and eye-catching design. The unique herringbone pattern coupled with sleek hairpin legs creates a versatile furniture item that looks fantastic in hallways, living rooms, or even at the foot of a bed. If you’ve been searching for a weekend project that delivers impressive results, you’ve found it!
Before we dive into the detailed steps, make sure to watch our comprehensive DIY YouTube video HERE. It offers invaluable visual guidance and expert tips that complement these written instructions perfectly, especially for certain tricky cuts.
Ready to get started? You can download the FREE PLANS BY CLICKING HERE! These plans provide precise measurements and diagrams to ensure your build is as smooth as possible.
Why a DIY Herringbone Hairpin Bench is Your Next Must-Build Project
Building your own furniture isn’t just about saving money; it’s about creating something unique that perfectly fits your style and needs. The herringbone pattern, a timeless design, adds texture and sophistication, while the minimalist hairpin legs offer a contemporary edge. This combination makes for a bench that is both classic and on-trend. It’s also incredibly versatile – imagine it as a cozy reading nook seat, a convenient spot to put on shoes by the door, or a chic surface for decorative items. This project is surprisingly approachable for DIYers of varying skill levels, promising a significant sense of accomplishment once completed.
Gather Your Supplies: Materials You’ll Need
To embark on this exciting woodworking journey, ensure you have all the necessary materials on hand. Quality materials are key to a durable and beautiful finished product.
- Project Panel: This will serve as the sturdy base for your herringbone top. Choose a smooth, flat panel of appropriate dimensions for your desired bench size.
- Wood Boards for Herringbone Pattern: You’ll need several smaller pieces of wood, typically 1×2 or 1×3 lumber, to create the distinctive herringbone design. Consider the wood type for its grain and how it will take stain or paint.
- Wood Glue: A strong woodworking adhesive is crucial for securely attaching the herringbone pieces to the project panel.
- Brad Nails (1.25 inches): These will provide immediate hold while the glue dries, adding structural integrity.
- Trim Boards (1×3 lumber): Used to frame the herringbone top, providing a clean, finished edge.
- Hairpin Legs: The defining feature of this bench! You’ll need four, typically 16-18 inches tall, depending on your preferred bench height. Look for durable, aesthetically pleasing options. We’ll provide a link to the exact ones we used later.
- Sandpaper: Various grits (e.g., 80, 120, 220) for smoothing surfaces.
- Wood Finish: Stain, paint, or a clear protective sealer to protect the wood and achieve your desired aesthetic.
Essential Tools for the Job
Having the right tools makes any DIY project smoother and more enjoyable. Here’s what you’ll need for this bench:
- Measuring Tape and Pencil: For precise marking and measurements.
- Speed Square or Combination Square: Essential for drawing accurate straight lines and angles.
- Circular Saw: Your primary cutting tool for the project panel, herringbone pieces, and trim.
- Brad Nailer: For efficiently attaching boards with brad nails.
- Drill/Driver: To attach the hairpin legs securely.
- Safety Glasses and Hearing Protection: Always prioritize safety when working with power tools.
- Clamps: Useful for holding pieces in place while glue dries or during cutting.
Step-by-Step Guide to Building Your Herringbone Hairpin Bench
Let’s get down to building! Follow these detailed instructions to construct your beautiful new bench.
Step 1: Preparing Your Project Panel with a Center Line
The first and most critical step for achieving a symmetrical herringbone pattern is to accurately mark the center of your project panel. This line will serve as your primary guide for aligning the initial herringbone boards. Take your measuring tape and pencil, find the exact midpoint of the panel along its length, and draw a crisp, straight line from one end to the other. Ensure this line is perfectly straight using a speed square or a long straightedge. A precise center line makes all the difference in the final look of your herringbone pattern.
Step 2: Precisely Marking and Placing the First Herringbone Boards
With your center line drawn, it’s time to prepare your individual herringbone boards. For the first board, make two essential marks: one at the center top edge and another down the side, both at 1.75 inches from the corner. These marks are crucial for proper alignment. When you position this board on your project panel, these two 1.75-inch marks must precisely line up with the center line you previously drew. This ensures your herringbone pattern begins perfectly centered and at the correct angle. Take your time with this initial placement, as it sets the stage for the entire pattern.
Step 3: Attaching the Herringbone Boards to the Panel
Once your first board is perfectly positioned, begin working your way outwards from the center line, carefully placing each subsequent herringbone piece. Apply a generous, even layer of wood glue to the back of each board before laying it down. After positioning, secure each board to the project panel using 1.25-inch brad nails with your nailer. The glue provides the long-term bond, while the nails offer immediate hold, allowing you to continue working without waiting for each piece to dry. Continue this process, ensuring each board is snug against its neighbor, until you have covered as much of the project panel as possible, extending beyond the eventual edges of your bench. Don’t worry about the overhang for now; we’ll address that in the next steps.
Step 4: Trimming the First Edge of the Bench Top
Once all your herringbone boards are securely attached and the glue has had some time to set (check glue manufacturer’s recommendations), carefully flip the entire panel over. This allows you to cut a perfectly straight edge against the project panel’s original, clean edge. Using your circular saw, make the first long cut to define one side of your bench. For an incredibly fast and easy method for this particular step, we highly recommend checking out our DIY video. It demonstrates a clever tip that makes this part foolproof and efficient, ensuring a perfectly straight cut every time. Always use appropriate safety gear when operating a circular saw.
Step 5: Trimming the Second Edge to Complete the Rectangle
Now, repeat the process for the opposite side of the bench. Once again, using your circular saw, make a parallel cut to define the second long edge. After these two cuts are made, you will have a perfectly rectangular herringbone pattern, though you’ll notice small triangular gaps on each end where the pattern doesn’t fully extend to the new edges. This is entirely normal and part of the process; we’ll address these gaps in the next step to complete the seamless pattern.
Step 6: Filling in the End Gaps for a Complete Pattern
Remember those small triangular gaps at each end of your herringbone top? Now it’s time to fill them in to achieve a truly complete and polished pattern. Gather some of the scraps from the edges you just cut – these pieces are perfectly angled to fit into those spaces. Carefully measure and cut these scraps to fit snugly into the blank areas. Once cut, apply wood glue and secure them with brad nails, just as you did with the larger herringbone pieces. You can then use your circular saw to trim any excess from these newly added pieces, ensuring they align perfectly with the bench’s shorter ends.
Step 7: Adding the Long Trim Boards (Optional Mitered Edges)
To give your bench top a beautifully finished and robust edge, it’s time to add the trim. Start with the longer trim boards, which are typically 1×3 lumber cut to the exact length of your bench. For a truly professional and seamless look, we recommend cutting each end of these trim pieces at a 45-degree miter angle. This allows for clean, crisp corners when joined with the shorter trim pieces. However, if miter cuts seem daunting, you can opt for straight butt joints at the corners – the choice is yours, and both will result in a functional bench. Attach these longer trim pieces using wood glue and 1.25-inch brad nails, ensuring they are flush with the top surface of your herringbone pattern.
Step 8: Attaching the Shorter Trim Boards and Ensuring a Smooth Surface
With the longer trim pieces in place, cut your shorter trim boards to fit the remaining ends. If you chose to miter the long trim, make sure to miter the ends of these shorter pieces at 45 degrees as well, creating a perfect frame. Attach these shorter boards using wood glue and 1.25-inch brad nails. A crucial detail here is to ensure that the top surface of all your trim boards aligns perfectly flush with the top of your herringbone pattern. This creates a beautifully smooth, level surface that will be comfortable to sit on and easy to clean. Once all trim is attached, allow the glue to dry completely.
Step 9: Attaching the Stylish Hairpin Legs
The final structural step is to attach the hairpin legs, which instantly transform your wooden slab into a chic piece of furniture. Carefully flip your bench top over, making sure the top surface is protected. Position each hairpin leg evenly on the underside of the bench, typically about an inch or so in from each corner. Mark the screw holes, pre-drill pilot holes to prevent splitting the wood, and then secure each leg firmly with appropriate wood screws using your drill/driver. Make sure they are tight and stable. These legs are not just functional; they are a key design element, providing that sleek, modern aesthetic.
CLICK HERE for a link to the exact hairpin legs we used! They really bring the whole look together with their charming simplicity and industrial flair.
Finishing Touches: Sanding and Sealing Your Bench
With the construction complete, it’s time to bring out the beauty of the wood. Start by thoroughly sanding the entire bench, beginning with a coarser grit (like 80 or 120) to smooth out any imperfections, glue residue, or uneven edges. Gradually move to a finer grit (220) for a silky-smooth finish. Once sanded, wipe away all dust with a tack cloth. Now comes the exciting part: applying your chosen finish! Whether you opt for a rich wood stain to highlight the grain, a vibrant paint color to match your decor, or a clear protective sealer to showcase the natural wood, follow the product instructions carefully. Apply thin, even coats, sanding lightly between coats if recommended, to achieve a durable and beautiful finish that will protect your bench for years to come.
Tips for a Successful DIY Project
- Measure Twice, Cut Once: This age-old adage is especially true for woodworking. Precision prevents costly mistakes.
- Safety First: Always wear safety glasses and hearing protection when using power tools. Understand your tools before you operate them.
- Test Cuts: If you’re unsure about a cut, practice on a scrap piece of wood first.
- Patience is a Virtue: Don’t rush steps, especially when waiting for glue to dry or finish to cure.
- Embrace Imperfections: Minor flaws add character to a handmade piece. Don’t let perfection be the enemy of good.
Customization Ideas for Your Herringbone Bench
One of the joys of DIY is the ability to personalize your creations. Here are a few ideas to make your herringbone hairpin bench truly your own:
- Color & Finish: Experiment with different stains (dark, light, weathered grey) or paint colors. You could even paint the hairpin legs in a contrasting color like gold or a bright accent hue.
- Wood Choice: While pine is affordable and easy to work with, consider oak, walnut, or maple for different grain patterns and durability.
- Size Variations: Adjust the dimensions in the free plans to create a longer dining bench, a smaller stool, or even a coffee table.
- Add a Cushion: For extra comfort and a touch of softness, craft or purchase a custom cushion to sit on top of your bench.
Show Off Your Creation!
We absolutely love seeing what you build! Once your gorgeous herringbone hairpin bench is complete and pride of place in your home, be sure to share your amazing work on social media. Use the hashtag #shanty2chic so we can admire your craftsmanship and potentially feature your project on our channels! It’s incredible to see the variations and personal touches everyone adds.
And just look how wonderfully it turned out! This bench is not just a piece of furniture; it’s a testament to your creativity and skill. Enjoy your beautiful, handmade addition to your home!