
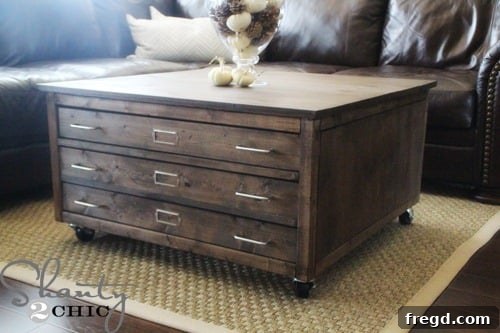
Build Your Dream Coffee Table: A Step-by-Step DIY Pottery Barn Inspired Masterpiece
Embarking on a DIY project can be incredibly rewarding, especially when it results in a stunning piece of furniture that perfectly complements your home decor. This particular build, a Pottery Barn-inspired coffee table, stands out as a true labor of love and a testament to the power of crafting beauty on a budget. It’s more than just a piece of furniture; it’s a statement of style, functionality, and personal achievement that brings warmth and character to any living space.
The Inspiration: High-End Style, Affordable Reality
The journey to creating this magnificent coffee table began, as many great DIY projects do, with a moment of pure inspiration. While leafing through a high-end furniture catalog, a truly adorable coffee table captured my attention and my heart. It was love at first sight! Its classic design, robust construction, and timeless appeal were exactly what I envisioned for my living room. However, that affection quickly turned to a slight wince when I saw the price tag: a staggering $899. For many of us, such a price is simply out of reach, especially when furnishing an entire home.
This is where the magic of DIY truly shines. Instead of resigning myself to admiration from afar, I knew there had to be a way to achieve that sophisticated look without breaking the bank. This challenge led me to collaborate with our incredibly talented friend, Ana, a master of woodworking plans. Her ability to translate high-end designs into accessible, buildable projects is truly unparalleled. Together, we set out to create a similar piece, replicating the charm and functionality of the original while dramatically cutting down on costs.
The result? Our very own version, meticulously crafted, that came in at an astonishing $200 – and that includes all the necessary hardware! The satisfaction of knowing you’ve built something beautiful and saved a significant amount of money is an unparalleled feeling of triumph. It’s a project that continues to bring a smile to my face every time I look at it.
If you’re ready to embark on this rewarding journey, you can access Ana’s detailed plans HERE. To further assist you, I’ve also shared my own step-by-step pictures and insights, offering a visual guide to complement the plans and help you every step of the way as you build your own stunning coffee table.
Essential Tools and Materials for Your DIY Coffee Table
Before diving into the construction, gathering your tools and materials is crucial. Quality tools not only make the building process smoother but also contribute to a higher quality finished product. Here’s what you’ll need:
Key Power Tools:
- Cordless Drill: An indispensable tool for drilling pilot holes and driving screws. My trusted cordless drill made quick work of assembly.
- Kreg Jig Pocket Hole System: This system is a game-changer for creating strong, concealed joints, giving your furniture a professional finish.
- Kreg Jig Rip Cut: An excellent attachment for making accurate, straight cuts on plywood with your circular saw, ensuring precise dimensions for all your pieces.
- Brad Nailer: Perfect for attaching drawer runners, drawer bottoms, and other components where a secure, yet less visible, fastening is desired.
Adhesives and Fasteners:
- Gorilla Glue Wood Glue: Essential for strong, lasting joints. Always use wood glue in conjunction with screws or nails for maximum durability.
- Wood Screws: Various sizes will be needed for different stages of the build, including 2 1/2-inch screws for securing the tabletop.
Premium Wood Selection: PureBond Hardwood Plywood
For the plywood components, my material of choice was PureBond Hardwood Plywood in birch. This isn’t just a preference; it’s a conscious decision based on several significant benefits:
- Formaldehyde-Free: PureBond plywood is manufactured without formaldehyde, ensuring healthier indoor air quality for your family. This commitment to non-toxic materials is a priority for any home project.
- Sustainable Sourcing: It’s made with wood from sustainable forests, aligning with environmentally responsible practices. Building beautiful furniture doesn’t have to come at the expense of our planet.
- Aesthetic Appeal: The birch veneer provides the exquisite look and feel of solid hardwood, offering a high-end finish without the premium price tag or the challenges of working with solid wood for large panels.
- Durability: Its robust construction ensures your furniture will stand the test of time, resisting warping and maintaining its integrity for years to come.
By choosing PureBond, my table not only looks exceptional but also contributes to a healthier living environment. You can learn more about PureBond plywood and understand why many DIYers, including myself and Whitney, have taken the PureBond Pledge by watching this short video:
For more detailed information, visit the PureBond Plywood website.
Having the right tools is paramount for achieving professional results and simplifying complex steps. My Kreg Jig pocket hole system and Kreg Jig Rip Cut were absolutely essential for precise cuts and strong joinery throughout this project.
These tools, along with a reliable brad nailer, form the backbone of efficient and accurate woodworking, turning what might seem like an intricate build into a manageable and enjoyable process.
Kreg Jig Pocket Hole System and Kreg Jig Rip Cut.
Step-by-Step Construction Guide
With your materials cut and tools ready, let’s dive into the core of the project: the construction. Remember, even the most elaborate pieces are built one step at a time.
Step 1: Building the Main Frame
The foundation of your coffee table is its main frame. This needs to be robust and perfectly square to ensure the entire structure is stable and aesthetically pleasing. I used a combination of wood glue and screws at every joint. The wood glue provides exceptional bonding strength, while screws offer immediate clamping and long-term reinforcement. Using a cordless drill makes this process efficient and accurate. Always pre-drill pilot holes to prevent wood splitting, especially when working close to the ends of boards.
Step 2: Preparing for Drawer Slides
Once the main frame is assembled, the next critical step is to install the runners for the drawer slides. These runners ensure that your drawers will open and close smoothly and consistently. I attached these using my brad nailer and a generous application of wood glue. The brad nailer holds the runners in place while the glue sets, creating a permanent bond. Precision here is key; ensure the runners are level and parallel to each other to avoid sticky drawers later on.
As you can see, the frame is now fully assembled with the internal drawer runners in place. While the finished product might appear complex, by tackling it one manageable step at a time and utilizing the right tools, you’ll find it’s surprisingly straightforward and enjoyable.
Step 3: Assembling the Drawers
The drawer assembly follows a similar principle to the main frame – accuracy and strong joinery. I relied on my Kreg Jig pocket hole system to create sturdy and clean drawer frames. Pocket holes are ideal for drawers as they create strong connections without visible fasteners on the exterior. After the frames were built, I used my brad nailer to attach the drawer bottoms securely. This method is quick, efficient, and results in a solid drawer box.
Once all the drawers are assembled, perform a “rough fit” to ensure they slide smoothly into their designated openings. Minor adjustments might be needed at this stage to achieve perfect alignment.
Step 4: Attaching Drawer Faces
The drawer faces are what give your coffee table its finished appearance. These are attached to the front of the drawer boxes. I secured them using my Ryobi brad nailer and wood glue. Apply glue to the drawer box front, position the drawer face carefully, ensuring even gaps around all sides, and then nail it into place. This method provides a strong, seamless attachment.
Step 5: Constructing the Planked Top
The tabletop is a prominent feature of this coffee table, and a planked design adds significant character and a rustic, high-end feel. I used my Kreg Jig and cordless drill to assemble the individual planks into a solid top. Pocket holes on the underside of the planks create strong, invisible joints, ensuring a flat and stable surface. This technique allows for expansion and contraction of the wood while keeping the top securely together.
Step 6: Securing the Tabletop to the Base
With both the base and the top complete, it’s time to join them. To attach the planked top to the coffee table base, I pre-drilled holes from the underside of the base into the tabletop. Using 2 1/2-inch wood screws and a generous amount of wood glue, I secured the top firmly in place. This method creates an incredibly strong connection, ensuring the tabletop won’t shift or wobble. This table is built to last!
The Finishing Touch: Staining and Protection
Now that the structural assembly is complete, it’s time to bring out the natural beauty of the wood with stain and protect it with a durable finish.
Step 7: Applying the Stain
For this project, I opted for a classic Dark Walnut stain, a personal favorite that always delivers a rich, deep hue, enhancing the wood grain beautifully. To apply the stain, use a foam brush for even coverage. Work in small sections, applying the stain liberally. After allowing it to penetrate for approximately 5 minutes, wipe off the excess with a clean cloth. This technique allows the wood to absorb the pigment while preventing a splotchy appearance. Always test the stain on a scrap piece of wood first to ensure you achieve the desired color.
Step 8: Protecting with Polyurethane
Once the stain has dried completely (check the manufacturer’s instructions for drying times, typically 24-48 hours), it’s crucial to apply a protective finish. I used Polyurethane in a satin finish. Polyurethane provides a durable, clear coat that protects the wood from spills, scratches, and everyday wear and tear. Apply one coat with a bristle brush, moving with the grain of the wood. Aim for a thin, even coat to avoid drips and bubbles. Allow it to cure fully before adding hardware or placing items on the table.
Adding the Hardware: Functionality and Style
The right hardware can truly elevate the look of your DIY coffee table, adding both functionality and a touch of bespoke character. For this project, I chose pieces that complement the library-cart aesthetic.
I sourced the drawer pulls and the 2 1/2-inch casters from Home Depot, finding options that were both durable and stylish. For the charming cardholders, which truly complete the library-inspired look, I found the perfect size and style on Amazon. You can find the exact cardholders I purchased HERE. They took about a week to arrive, but they were well worth the wait for their ideal fit and finish.
A note on casters: I chose non-locking casters as my coffee table rests on a rug, which naturally prevents it from rolling freely. However, if your coffee table will be on a smooth, hard surface and you’re concerned about it moving, I highly recommend purchasing locking casters for added stability and safety.
The Finished Masterpiece: A Perfect Addition to Any Home
Seeing the completed coffee table in its new home is truly gratifying. It’s a perfect blend of style, functionality, and the personal satisfaction of a successful DIY project. The rich dark walnut stain, the smooth-gliding drawers, and the industrial-chic hardware come together to create a piece that looks incredibly high-end, yet was built for a fraction of the cost.
This coffee table has found its perfect spot in our living room, becoming a central piece that draws compliments and sparks conversation. It demonstrates that with a little inspiration, the right tools, and a willingness to learn, you can create custom furniture that not only meets your needs but exceeds your expectations in terms of style and quality.
As a side note, if you love the look of the rug this coffee table is sitting on, I found this fantastic seagrass rug at a great price over at Overstock.com. It perfectly complements the natural wood tones of the table, creating a cohesive and inviting living space.
Thank you for following along on this creative journey! I hope this detailed guide inspires you to take on your own woodworking projects and discover the immense satisfaction of building something beautiful with your own hands. Happy building!
~Ashley