
Revamp Your Space: A DIY Wood Frame Mirror Makeover on a Budget
Welcome back, fellow DIY enthusiasts! It feels fantastic to be home and diving back into creative projects. After some wonderful trips, there’s nothing quite like returning to our tools and families, ready to transform everyday items into something special.
Today, I’m thrilled to share a super quick and incredibly satisfying way to elevate a plain, inexpensive mirror into a stunning focal point. I’ve been on the hunt for a stylish mirror for my son’s bathroom, but quality mirrors can quickly become pricey. So, I decided to take matters into my own hands and create a custom piece without breaking the bank. The results speak for themselves!
This tutorial is based on a mirror I picked up at Walmart, but the beauty of this project is its adaptability. You can easily apply this concept to almost any blank mirror you have, simply by adjusting the measurements to fit your specific piece. Get ready to turn that basic mirror into a statement piece!
The Starting Point: A Budget-Friendly Mirror
Every great transformation begins with a simple canvas. My journey started with this unassuming $9 mirror from Walmart. While perfectly functional, its bare appearance left much to be desired. But don’t let its simplicity fool you; it’s the perfect foundation for a custom, high-end look.
Step 1: Carefully Disassemble Your Mirror
The first crucial step is to carefully disassemble your existing mirror. This might seem daunting, but it’s often the trickiest part, and once you conquer it, the rest of the project is smooth sailing! Always prioritize safety when working with glass. Wearing gloves is highly recommended to protect your hands from potential cuts.
Begin by unscrewing any visible hardware from the back of the mirror. Next, remove the cardboard backing, which is typically stapled or glued in place. You might need a screwdriver, pliers, or a pry bar for this. Once the backing is off, you’ll likely discover that the mirror glass itself is glued directly to the inside of the frame. I initially tried using a utility knife to cut through the dried glue, but found it didn’t yield much success.
The most effective method I discovered was to gently and carefully pull the existing frame away from the mirror glass, working one side at a time and pulling towards myself. This allows the glue to slowly release its grip. Remember, every mirror’s construction is slightly different, so take your time, be patient, and apply gentle, even pressure. This careful approach will prevent damage to the mirror glass, which we’ll be reusing.
Step 2: Gather Your Wood Materials & Make Your Cuts
Now for the exciting part: working with wood! This project is incredibly cost-effective, requiring just two pieces of common pine lumber. Pine is an excellent choice for DIY projects due to its affordability, workability, and ability to take stain beautifully.
Materials Needed:
- 1 – 2x4x8 piece of pine: This will form the main structural frame.
- 1 – 1×3 piece of pine at least 4′ long: This will be used for the decorative top and bottom accents.
The total cost for these wood pieces should come in well under $5, making this project exceptionally budget-friendly!
Cutting Your Wood:
First, you’ll need to cut your 2×4 into four pieces to form the main rectangular frame. For my mirror, the dimensions were as shown in the image below, but remember to measure your actual mirror’s dimensions for a perfect custom fit. You’ll need two longer pieces for the sides and two shorter pieces for the top and bottom of the inner frame.
For those of you without a miter saw or circular saw, don’t worry! Most home improvement stores like Lowe’s or Home Depot offer cutting services. Simply bring your lumber and your desired cut list to the lumber department, and they can often make the cuts for you, sometimes for a small fee or even free with purchase. This is a great option to get perfectly straight cuts without investing in power tools right away.
When making your cuts, always measure twice and cut once. Use a measuring tape and a pencil to mark your lines clearly. If using a saw, ensure you wear appropriate safety gear, including safety glasses, and understand how to operate your tool safely. We’re excited to start sharing video tutorials on using various tools, with saws being among the first, to help you master these techniques!
Step 3: Assemble the Main Frame with a Kreg Jig
There are several ways to join wood pieces for a frame, but for strong, hidden joints perfect for beginners, I highly recommend using a Kreg Jig. If you have one tucked away, now’s the time to dust it off! This project is an ideal way to get acquainted with this fantastic tool.
A Kreg Jig creates “pocket holes” – angled holes that allow you to drive screws at an angle, pulling two pieces of wood together for a strong, invisible joint. First, set your Kreg Jig to create 1 1/2″ pocket holes, suitable for 2×4 lumber. Add two pocket holes to each end of your two shorter 2×4 pieces (the ones that will form the top and bottom of your frame). Ensure the pocket holes are drilled on the side of the wood that will be hidden from view (the back of the frame).
Next, use 2″ pocket hole screws to attach these shorter pieces to the longer side pieces. Clamp the pieces firmly together as you drive the screws to ensure a tight, flush joint. This will create a sturdy rectangular frame that will house your mirror. The back of your frame will clearly show the pocket holes, while the front will be clean and seamless.
If you don’t have a Kreg Jig, you can still assemble your frame. Alternative methods include:
- Wood Glue and Clamps: Apply wood glue to the butt joints (where the ends of the wood meet) and clamp them tightly until the glue dries. This provides a strong joint but may require corner clamps for squareness.
- L-Brackets or Corner Brackets: Use small metal L-brackets on the inside corners of the frame for added stability. These are visible but effective.
- Dowels or Biscuits: More advanced techniques that create strong, invisible joints with specialized tools.
Step 4: Add the Decorative Top and Bottom Accents
Now, let’s add the 1×3 decorative pieces to the top and bottom of your newly assembled 2×4 frame. These pieces will add dimension and character to your mirror’s design. It’s crucial to measure your completed 2×4 frame before cutting these pieces to ensure a perfect fit. For my mirror, these pieces measured 20 7/8″ long, but your dimensions may vary.
Once measured and cut, position the 1×3 pieces flat on the top and bottom edges of your 2×4 frame. You’ll want them to be flush with the outer edges of the frame for a clean look. To attach these pieces, I used our new favorite tool:
Introducing the Ryobi AirStrike 18-Volt One+ Brad Nailer!
This tool is an absolute game-changer for DIYers. Forget the hassle of lugging around an air compressor and hose; with the Ryobi AirStrike, all you need is an 18V Ryobi One+ battery, and you’re ready to go! It can drive brad nails up to 2″ long, making it versatile for a variety of projects. What makes it a “no-brainer” for us is that it uses the same battery packs as our Ryobi drills, streamlining our tool collection. You’ll love its convenience and power. Ryobi truly hit the nail on the head with this cordless wonder!
Apply a thin bead of wood glue along the top edge of your 2×4 frame where the 1×3 piece will sit. Then, carefully align the 1×3 piece and secure it with brad nails using your Ryobi AirStrike (or a hammer and finish nails, if you don’t have a nail gun). Repeat this process for the bottom 1×3 piece. The combination of glue and nails ensures a strong, lasting bond.
Step 5: Staining Your Custom Wood Frame
Once your frame is fully assembled and the glue has dried, it’s time to add character with stain! First, give your entire wood frame a light sanding with fine-grit sandpaper (e.g., 180-220 grit) to smooth out any rough spots and prepare the wood for optimal stain absorption. Wipe away any dust with a tack cloth or damp rag.
For this project, I used one of my absolute favorite stains:
Rust-Oleum Ultimate Wood Stain in Dark Walnut
This stain is fantastic and readily available at Lowe’s. It’s incredibly user-friendly, requiring only one coat to achieve a rich, deep color, and it dries in under an hour. Apply the stain with a brush or a clean rag, working in the direction of the wood grain. Allow it to penetrate for a few minutes, then wipe off any excess with a clean cloth. For a deeper color, you can apply a second coat after the first has dried, though with this particular stain, one coat is usually sufficient.
If dark walnut isn’t your style, feel free to explore other options! You could opt for a lighter stain to showcase the natural wood grain, paint it a vibrant color to match your bathroom decor, or even distress the wood for a farmhouse-chic look. Once the stain is completely dry, you might consider adding a clear protective topcoat (like polyurethane or a clear wax) for added durability, especially in a humid bathroom environment.
Step 6: Attaching the Mirror to Your New Frame
With your beautifully stained frame dry and ready, it’s time to reintroduce the mirror glass. For a secure and lasting bond, I highly recommend Gorilla Glue Epoxy. This two-part epoxy creates an incredibly strong adhesive once mixed.
To use it, simply squeeze equal parts from both tubes into the provided mixing tray. Use the mixing stick to thoroughly combine the two components until the mixture is uniform. This activates the epoxy. Immediately after mixing, dab the epoxy onto the wood frame where the edges of the mirror glass will rest. Don’t apply too much, as a little goes a long way, and you don’t want excess oozing out onto the mirror’s reflective surface.
Carefully lay your mirror glass onto the epoxy-applied areas of the frame. Ensure it’s centered and flush. To hold the mirror securely in place while the epoxy cures (which can take several hours, refer to product instructions), I used Gorilla Tape. This heavy-duty tape serves two fantastic purposes:
- Holds the Mirror: It firmly adheres to both the wood frame and the glass, keeping the mirror perfectly aligned until the epoxy sets.
- Covers Edges: It effectively covers the raw edges of the glass, providing a clean, finished look and adding a layer of protection.
Press the tape firmly along all four edges of the mirror where it meets the frame. Allow the epoxy to cure completely according to the manufacturer’s instructions. Patience here ensures a strong, lasting bond.
Here’s a look at the back of the mirror after the glass has been secured and taped:
Step 7: Reattach Hardware and Hang Your Masterpiece
The final step is to reattach the hanging hardware and get your beautiful new mirror on the wall! I simply reused the D-rings and screws from the original mirror’s hardware. These D-rings are robust and provide a secure hanging point.
To hang the mirror, you’ll want to screw matching screws into your wall where you want the D-rings to rest. It’s crucial to ensure these screws are anchored properly. The best method is to locate wall studs using a stud finder and drive your screws directly into them. If you cannot find a stud at your desired hanging location, use appropriate drywall anchors (toggle bolts or self-drilling anchors are good options for heavier items) to ensure the mirror is securely supported. Always choose anchors rated for the weight of your mirror to prevent it from falling.
The Stunning Result: Your Transformed Mirror
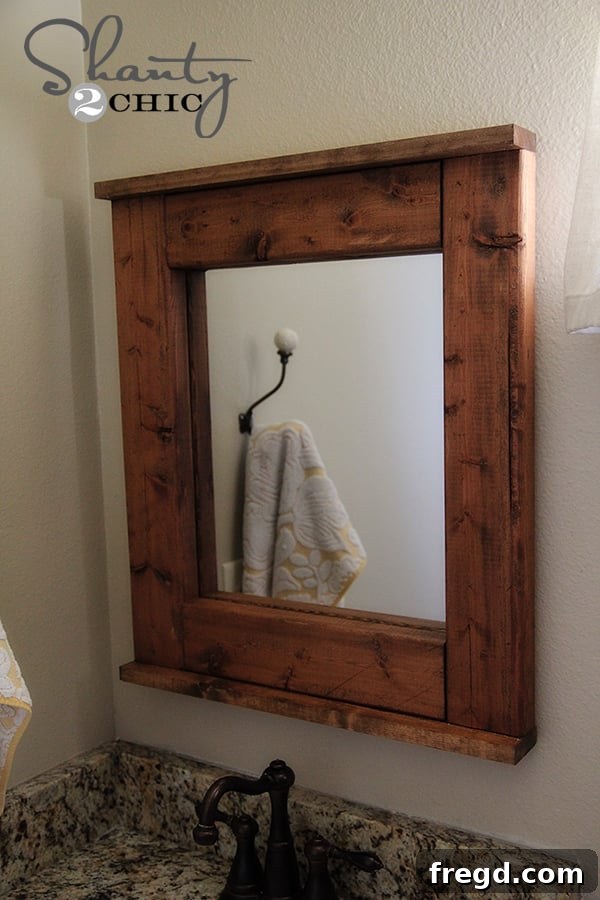
That’s it! Your formerly plain mirror has been transformed into a custom, stylish piece that will elevate any room, especially a bathroom. Here it is, proudly hanging and completely changing the ambiance of the space:
Project Cost Breakdown & Customization Ideas
And the best part? This entire project, from the initial mirror to the wood and stain, cost me a mere $15! That’s an incredible saving compared to purchasing a pre-framed mirror of this quality and style. This DIY mirror makeover is not just about saving money; it’s about the satisfaction of creating something beautiful with your own hands and customizing it to perfectly match your aesthetic.
Customization Options:
- Different Wood Types: Explore oak, maple, or reclaimed wood for different looks and textures.
- Paint Finishes: Instead of stain, paint your frame a bold color, a classic white, or a distressed antique finish.
- Embellishments: Add decorative molding, carved appliqués, or metal corner accents for an even more personalized touch.
- Size Variations: This method works for mirrors of all sizes, from small vanity mirrors to large wall mirrors.
Conclusion: Elevate Your Home with DIY
Thank you so much for stopping by and joining me on this DIY journey! It truly is good to be back sharing projects that bring style and value to our homes without breaking the bank. This wood-framed mirror is a testament to what you can achieve with a little creativity and effort.
I hope this tutorial inspires you to tackle your own mirror makeover. Don’t forget to share your creations and pin this project to your favorite DIY boards! You guys are amazing, and I love seeing your inspired work.
Happy building!
~Whitney