
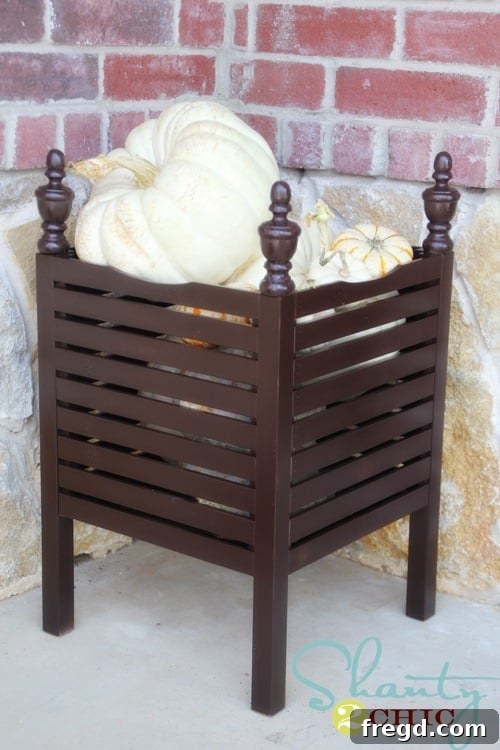
Welcome to a brand new week and the enchanting embrace of autumn! There’s an undeniable magic that Fall brings, from crisp air and changing leaves to the comforting scents of pumpkin spice. As a true admirer of this season, I was absolutely thrilled to infuse some autumnal charm into my outdoor space, starting with a captivating front porch display. Today, I’m excited to share a wonderfully simple yet striking DIY project: a Fall Front Porch Planter Box, brimming with adorable pumpkins, that instantly elevates your seasonal decor. The best part? This entire project was incredibly easy to execute and impressively budget-friendly, costing me just a mere $20!
Creating a welcoming and festive front porch is often the first step in celebrating the changing seasons. It’s an opportunity to express your personal style and extend a warm invitation to guests. For many, DIY projects can seem daunting, but this particular planter box design is a testament to how accessible and rewarding crafting your own decor can be. It combines an ingenious repurposing strategy with minimal tools and time, proving that stunning seasonal transformations don’t require a hefty investment or advanced skills. Get ready to discover how you can replicate this charming Fall accent for your own home, making your porch a true reflection of autumn’s splendor.
The Vision: Repurposing an Unexpected Treasure into a Stylish Fall Planter
Every successful DIY project often begins with a spark of inspiration, sometimes from the most unexpected places. My recent shopping excursion led me to an exciting find in the clearance section of Ikea – an item that, at first glance, seemed unassuming but instantly ignited my creative imagination. This was no ordinary purchase; it was a diamond in the rough, destined for an incredible transformation. The concept of “shantying up” an item, or giving it a chic, customized makeover, is something I deeply enjoy, and this piece was ripe for repurposing into a stunning centerpiece for our fall front porch display.
The beauty of upcycling lies in seeing beyond an item’s intended purpose and envisioning its potential in a new role. This particular Ikea clearance gem was marketed as some sort of bath stool or storage unit. While perfectly functional for its original design, its sturdy structure and ideal dimensions immediately struck me as the perfect foundation for a “planter style box” for our front porch. Its simple lines offered a blank canvas, and its inherent stability made it an excellent candidate for holding a vibrant display of autumn bounty. This creative leap from bathroom accessory to outdoor decor truly exemplifies how budget-friendly finds can be transformed into bespoke, high-impact pieces for your home. By taking an item designed for indoor utility and reimagining it for outdoor aesthetic appeal, we unlocked its true versatility and potential.
The inherent design of the Ikea stool, with its open sides and a sturdy base, provided the ideal framework for what I envisioned as a charming planter. Instead of a solid-top stool, its structure, when modified slightly, would create an inviting cradle for decorative items. This meant less construction and more customization, saving both time and effort. The challenge was minimal, and the potential for a personalized fall display was immense. It’s truly satisfying when a piece of furniture can be so easily adapted to serve an entirely new, decorative function, proving that creativity doesn’t always demand complex carpentry. It’s all about looking at everyday objects with a fresh perspective.
Gathering Your Simple Supplies: What You’ll Need
One of the many appealing aspects of this DIY Fall Front Porch Planter is the minimal and accessible list of materials required. You don’t need to be a seasoned crafter or a woodworking expert to gather these items. Most can be found at your local hardware store, a home goods retailer, or, in this case, even an Ikea clearance section. The key is sourcing items that offer potential for transformation and complement your desired aesthetic.
Here’s what you’ll need to create your own charming fall planter:
- **Ikea Bath Stool/Storage (or similar item):** Look for something sturdy with an open or easily removable top, ideally in a clearance section for maximum savings. The structural integrity is important as it will form the base of your planter.
- **Four Wooden Finials:** These decorative accents, readily available at stores like Lowe’s or other hardware/craft stores, are pivotal in giving the planter an elevated, custom look. Choose a style that appeals to you – ours are a classic design that adds a touch of elegance.
- **Cordless Drill and Drill Bit:** Essential for pre-drilling pilot holes, ensuring a smooth and secure attachment of the finials without splitting the wood.
- **Screws:** To attach the finials securely to the corners of your planter base. Ensure they are appropriate for the finials and the material of your base.
- **Rust-Oleum Espresso Spray Paint (Satin Finish):** A single can is usually sufficient. Espresso offers a rich, versatile color that complements autumnal tones beautifully, and a satin finish provides a sophisticated, subtle sheen.
- **Variety of Cute Pumpkins and Gourds:** The stars of your fall display! Mix and match sizes, colors, and textures to create a visually appealing arrangement. Consider faux pumpkins for longevity or real ones for an authentic touch.
- **Optional Additions:** Other fall decor elements like faux leaves, berries, corn stalks, mums, or even battery-operated fairy lights to enhance your display.
Having all your materials organized before you begin will make the assembly process even smoother and more enjoyable. This curated list ensures that every component serves a specific purpose, contributing to both the structural integrity and the aesthetic appeal of your finished planter.
Step-by-Step Guide: Crafting Your Custom Fall Planter
Transforming this simple Ikea item into a sophisticated fall planter is surprisingly straightforward. Each step is designed for efficiency and ease, making this a truly gratifying DIY experience. Let’s walk through the process:
Step 1: Assembling the Base (The Ikea Hack)
Our clearance find, though designed as a bath stool, had a wonderfully simple assembly process. The key to repurposing it into a planter was to assemble it *without* its designated top. This immediately created an open box structure perfect for holding decorative items. What typically would be the seat of the stool becomes the open top of our planter.
This initial assembly was incredibly quick, taking an astonishing 3 minutes to put together! It truly felt like a “score” to have such a solid base ready in virtually no time. The pre-drilled holes and easy-to-follow instructions (even if we were intentionally deviating from them) made this step a breeze. This speed highlights the beauty of selecting adaptable items for your DIY projects – less time on construction means more time for creative finishing and styling. Ensure all joints are tight and stable, as this will be the foundation of your entire display.
Step 2: Adding Architectural Charm with Finials
To elevate the planter from a simple box to a piece with refined character, I decided to incorporate four wooden finials. These small, decorative elements can make a significant difference in the perceived quality and style of a piece. We purchased ours at Lowe’s, where you can find a variety of shapes and sizes to match your aesthetic. These particular finials are a personal favorite, often used in our projects because they add a classic, architectural touch without being overly ornate.
Attaching these finials securely to each corner of the newly assembled base was a crucial step. For a clean and strong attachment, I used my cordless drill to pre-drill a small pilot hole in each corner. Pre-drilling is a vital step in woodworking, especially when working with smaller pieces or when you want to avoid splitting the wood. It ensures that the screws go in straight and tight, creating a much more durable connection. This attention to detail not only makes the project look professional but also ensures its longevity, allowing you to enjoy your planter for many seasons to come. Always use appropriate safety gear, such as eye protection, when operating power tools.
Once the pilot holes were ready, I simply screwed the finials into place. This process was incredibly fast, adding another quick 3-4 minutes to the overall project time. The transformation at this stage was already remarkable; the finials instantly gave the simple box a more finished, decorative, and substantial appearance. They provided that extra “oomph” that transforms a basic structure into a statement piece. It’s these small details that truly elevate a DIY project from homemade to custom-crafted.
Step 3: The Finishing Touch – Painting for Perfection
With the structure complete, the final step before filling was to give the planter a cohesive and elegant finish with paint. I chose Rust-Oleum Espresso spray paint in a satin finish. Spray paint is an excellent choice for projects like this because it offers quick, even coverage, especially on items with multiple angles and surfaces like our planter. The Espresso color provides a deep, rich brown that perfectly complements the warm tones of autumn pumpkins and fall foliage.
A single, even coat was all that was needed to transform the raw wood and the original Ikea finish into a unified, sophisticated piece. The satin finish is ideal as it provides a subtle sheen without being overly glossy, giving the planter a refined look that blends beautifully with natural outdoor elements. When spray painting, remember to work in a well-ventilated area, use long, even strokes, and apply multiple thin coats rather than one thick coat to avoid drips and achieve a professional finish. Allow adequate drying time between coats and before handling or decorating. This step pulls the entire design together, making the finials and the base look like a singular, thoughtfully designed piece of decor.
Styling Your Fall Masterpiece: Filling with Autumnal Charm
Once the paint was dry, the most enjoyable part began: filling the planter with an abundance of cute pumpkins! This is where your personal style truly shines. I opted for a mix of white and orange pumpkins, varying in size, to create a dynamic and visually interesting display. The contrast of the rustic orange against the creamy whites, all nestled within the deep espresso planter, created a striking yet harmonious composition.
When arranging your pumpkins, start with larger ones at the bottom to provide a stable base, then layer smaller ones on top and in between to fill any gaps. Don’t be afraid to let some spill over the edges for a more abundant, natural look. Beyond pumpkins, consider incorporating other autumnal elements to enhance the display: small gourds, faux fall leaves, sprigs of artificial berries, or even a few real acorns and pinecones collected from your yard. For added texture and a pop of color, consider placing a small pot of vibrant mums inside the planter before arranging the pumpkins around it. This creates a fuller, more layered look that screams “fall.” The possibilities for creative styling are endless, allowing you to refresh your planter’s look throughout the season.
Why This DIY Project is a Fall Must-Do: Benefits & Versatility
This DIY Fall Front Porch Planter isn’t just a seasonal decoration; it’s a testament to smart, creative, and efficient home decor. It embodies several key advantages that make it an absolute must-do for anyone looking to refresh their outdoor space:
- **Unbeatable Cost-Effectiveness:** With a total expenditure of only $20, this project delivers high-end aesthetic appeal without the high-end price tag. It proves that stunning decor doesn’t require breaking the bank, especially when you leverage clearance finds and repurpose items.
- **Remarkable Time Efficiency:** From start to finish, the actual hands-on work for this project was completed in a mere 20 minutes. This makes it perfect for busy individuals or anyone looking for instant gratification from their DIY efforts. You can achieve a significant visual impact in less time than it takes to watch an episode of your favorite show.
- **Exceptional Versatility Beyond Fall:** While designed for a captivating fall display, the true genius of this planter lies in its year-round adaptability. Once the autumn season fades, simply swap out the pumpkins for other seasonal decor. Imagine it filled with festive evergreens and ornaments for winter, vibrant potted flowers for spring, or a lush arrangement of ferns and solar lights for summer evenings. This single piece can serve as a versatile base for countless outdoor displays, making it a valuable long-term investment for your home decor.
- **Personalization and Uniqueness:** By repurposing an everyday item and adding custom touches like finials and paint, you create a piece that is uniquely yours. It reflects your creativity and stands out from mass-produced decor.
- **Eco-Friendly Upcycling:** Giving a new life to a clearance item or something you already own is a fantastic way to practice sustainable decorating. It reduces waste and promotes a mindful approach to consumption.
- **Sense of Accomplishment:** There’s immense satisfaction in looking at a beautiful piece of decor and knowing you created it with your own hands. This project offers that rewarding feeling of accomplishment, boosting your confidence in tackling future DIY endeavors.
This DIY Fall Planter is more than just a decor item; it’s a smart, stylish, and sustainable solution for creating an inviting and ever-changing front porch display throughout the year.
Tips for Your Own DIY Fall Planter Project
Inspired to create your own budget-friendly and beautiful fall planter? Here are a few additional tips to help you make your project a resounding success:
- **Scour Clearance Aisles:** Always check the clearance sections at Ikea, Target, Walmart, or local hardware stores for hidden gems. You might find stools, small tables, or storage bins that can be easily repurposed into planters. Think outside the box and envision items for functions beyond their original intent.
- **Experiment with Colors and Finishes:** While espresso satin is a classic choice, don’t hesitate to personalize your planter with different spray paint colors. A matte black could offer a modern touch, a rich forest green could complement natural elements, or even a distressed white for a farmhouse look. Consider your home’s exterior color and overall decor style.
- **Explore Diverse Fillers:** Beyond traditional pumpkins, think about unique items to fill your planter. For Halloween, add spooky elements like plastic spiders or skull decorations. For a harvest theme, incorporate corn husks, hay bales, or even small bundles of dried wheat. Live plants like ornamental cabbage, kale, or pansies can also create a stunning, vibrant display for cooler weather.
- **Prioritize Safety First:** When using power tools like a drill, always wear appropriate safety gear, including eye protection. Ensure your workspace is clear and well-lit. If spray painting, work in a well-ventilated area to avoid inhaling fumes.
- **Embrace Imperfections:** Remember that DIY projects often carry a unique charm from their handmade nature. Don’t strive for absolute perfection; sometimes, a slightly rustic or imperfect finish adds character and warmth.
- **Consider Durability:** If your planter will be exposed to harsh weather, consider using outdoor-specific paint or applying a clear protective sealant to ensure its longevity.
Conclusion: Crafting Joy, One Pumpkin at a Time
The joy of DIY is truly unmatched, and this Fall Front Porch Planter Box project perfectly encapsulates that sentiment. In just a short amount of time – a mere 20 minutes of hands-on work – and with an incredibly modest budget of $20, we transformed an unassuming Ikea clearance item into a captivating, customized piece of decor. This project is a powerful reminder that creating beauty for your home doesn’t require extensive resources or advanced skills; sometimes, all it takes is a dash of creativity, a willingness to repurpose, and a few simple tools.
What started as a desire to celebrate the beauty of Fall on my porch evolved into a versatile and enduring piece for our outdoor displays, capable of adapting through every season. Imagine it adorned with sparkling lights and evergreens in winter, blooming with colorful annuals in spring, or filled with fresh herbs in summer. This planter is not just for autumn; it’s a year-round testament to the power of imagination and hands-on effort. So, as the days grow shorter and the leaves begin their magnificent transformation, I encourage you to embark on your own DIY journey. Find that unexpected treasure, unleash your inner decorator, and create something beautiful and uniquely yours. Your front porch, and your spirit, will thank you. Happy crafting, and may your home be filled with the warmth and charm of the season!