
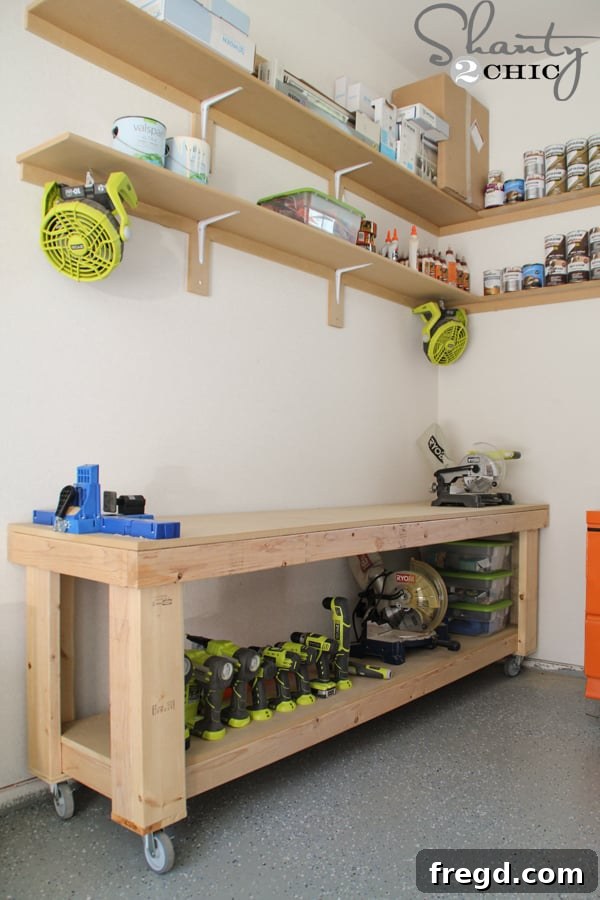
Hey there, fellow DIY enthusiasts! I am absolutely thrilled to share the details of the incredible workbench I recently completed for my new house’s workshop. While my dedicated crafting and building space is still very much a work-in-progress, this workbench marks a monumental improvement and a truly essential addition to my setup. It has already transformed how I approach my projects, providing a solid foundation for creativity and efficiency.
Before diving into the full build, let me show you the star of the show!
My goal for this project was to create a functional yet space-saving solution. I took inspiration from Whitney’s fantastic workbench design but made several modifications to ensure it perfectly suited the more compact footprint of my workshop. My primary aim was to maximize free floor space, allowing for greater maneuverability and versatility within my shop. If you’re curious, you can find her original workbench plans HERE – it’s a wonderful design that served as a brilliant starting point!
This particular iteration is an absolute game-changer for anyone dealing with smaller work areas, like a single-car garage or a dedicated corner in a basement. What makes it even better? The total cost, including the essential locking casters for mobility, came in at a remarkably affordable price point of around $100. This budget-friendly aspect makes it an accessible project for almost anyone looking to upgrade their workspace without breaking the bank.
Why a Custom DIY Workbench is a Game-Changer for Small Spaces
In any workshop, whether you’re a seasoned woodworker or a weekend DIYer, a robust and functional workbench is the undisputed heart of your creative space. It’s more than just a surface; it’s where ideas come to life, where precision cuts are made, and where countless projects take shape. For those of us with limited square footage, a standard, bulky workbench simply isn’t an option. This is where a custom-built, portable workbench truly shines, offering an ideal blend of functionality, flexibility, and cost-effectiveness.
Maximize Your Workshop Potential
Building your own workbench allows for complete customization, tailoring the dimensions and features to your specific needs and the unique constraints of your workshop. Unlike mass-produced benches, a DIY portable workbench can be designed to fit perfectly into tight corners, against walls, or even tucked away when not in use. The addition of high-quality locking casters is paramount for this flexibility. They allow you to effortlessly roll your workbench out into the open for larger projects, position it near natural light, or even move it outdoors on a beautiful day, as I often do, to enjoy the fresh air and watch the kids play while I work. When your project is done, simply roll it back to its designated spot, freeing up valuable floor space.
Affordable Quality and Unbeatable Value
One of the most compelling reasons to undertake a DIY workbench project is the significant cost savings. Purchasing a comparable quality, feature-rich workbench with sturdy construction and mobility can easily run you several hundred dollars, if not more. By sourcing your own materials and investing a bit of your time and effort, you can achieve a superior outcome for a fraction of the price. My version, for instance, came in at approximately $100, which includes the cost of all lumber, fasteners, and those crucial locking casters. This budget-friendly approach makes it an ideal project for those just starting to equip their workshop or for anyone looking to optimize their existing setup without a major financial outlay.
The Joy of Building Your Own
There’s an immense sense of satisfaction that comes from building something with your own hands, especially when it’s a foundational piece for your creative endeavors. This particular workbench project is designed to be quick and easy, making it accessible even for those with intermediate woodworking skills. The clear, step-by-step instructions and free plans provided ensure that you can confidently tackle this build and end up with a high-quality, durable workbench that you’ll be proud to use for years to come. It’s an investment in your productivity and a testament to your growing DIY capabilities.
Free Plans: Your Blueprint for Success
To make this project as straightforward as possible, I’m delighted to offer our comprehensive, free printable plans. These plans detail all the necessary cuts, materials, and assembly steps, eliminating guesswork and ensuring a smooth building process. You can easily access and print them by clicking HERE or by clicking on the image below. Having these plans handy is your first step towards a perfectly constructed, custom portable workbench.
DIY Workbench Plans
Beyond the plans, I’m also providing a detailed, step-by-step guide with plenty of visual aids to walk you through every phase of the construction. This combination of free plans and clear instructions is designed to empower you to build your own robust and reliable workbench with confidence, even if you’re new to woodworking projects of this scale.
Building Your Portable Workbench: A Step-by-Step Guide
1. Prepare Your Materials and Make Your Cuts
The journey begins with preparing your materials. For this project, I chose MDF boards due to their affordability, consistent thickness, and smooth surface, which is ideal for a workbench top and shelves. A helpful tip to save time and ensure accurate cuts: I had my MDF boards pre-cut or “ripped down” at my local Home Depot. Many hardware stores offer this service, which is incredibly useful for managing large, unwieldy sheets of material. Once your boards are sized, carefully make all necessary cuts according to the dimensions provided in the free plans. Precision here is key for a sturdy and square workbench.
Next, you’ll start drilling pocket holes, primarily in the leg components. For this, my Kreg Jig was absolutely invaluable. If you’re unfamiliar, a Kreg Jig allows you to drill angled holes that enable you to join pieces of wood with strong, concealed screws, resulting in clean and incredibly robust joints. It’s a fundamental tool for many DIY furniture builds and makes this workbench assembly remarkably efficient. Always remember to wear appropriate safety glasses when operating power tools.
2. Assemble the Workbench Legs
Once your pocket holes are drilled, the next step is to assemble the four leg structures. The plans will guide you on joining the individual leg pieces using the pocket hole screws. It’s crucial during this stage to ensure each leg assembly is square. Use a reliable speed square or framing square to check all angles as you tighten your screws. This attention to detail now will prevent wobbles and ensure the entire workbench is stable and true once completed. A perfectly square foundation is the backbone of any durable workbench.
3. Construct the Main Frames
Following the legs, you’ll move on to building the two main frames that will form the top and bottom structures of your workbench. While both frames will share a similar rectangular appearance, they are indeed different sizes as specified in the plans to accommodate the overall design and integrate seamlessly with the legs. Again, leverage your Kreg Jig and pocket hole screws to create strong and neat joints for these frames. Double-check measurements and ensure squareness for each frame before proceeding; this will guarantee a perfectly level work surface and stable storage shelf.
4. Attach the Legs to the Top Frame
With your individual leg assemblies and frames ready, it’s time to bring them together. Carefully attach the assembled legs to the top frame using the pocket hole screws you’ve prepared. This step starts to give your workbench its initial three-dimensional structure. It’s helpful to work on a flat, level surface and use clamps to hold the pieces securely in place while you drive the screws. Ensure that the legs are flush with the frame edges for a clean, professional finish and maximum stability.
5. Install the Foot Pads (or Base Supports)
Before attaching the bottom frame, you’ll want to add the foot pads to the base of each leg. These pads serve multiple purposes: they protect your workshop floor from potential scratches, provide a solid base for attaching casters later, and can offer a slight lift, which is sometimes helpful for maneuverability. Follow the plans for secure attachment, typically using screws or robust adhesive, ensuring they are perfectly level across all four legs to prevent any rocking.
6. Secure the Bottom Frame
Now, it’s time to install the bottom frame, which will eventually support your lower storage shelf. I attached this frame to the legs using 2 1/2-inch wood screws driven from the inside of the frame into the legs. This method provides an incredibly strong connection while keeping the exterior of your workbench looking clean and uncluttered. Make sure the bottom frame is positioned at the correct height as indicated in the plans, allowing ample space for your tools and materials on the lower shelf.
7. Install the Locking Casters
We’re nearing completion! This is a crucial step, especially for a portable workbench. Before the structure becomes too heavy to maneuver easily, attach your casters to the bottom of the foot pads. A critical piece of advice: always make sure to purchase high-quality, *locking casters*. Non-locking casters might seem like a small saving, but they can pose a significant safety hazard as your workbench could roll away mid-project. Locking casters ensure your workbench stays firmly in place when you’re sawing, drilling, or sanding, providing a stable and secure work platform. Position them carefully and secure them tightly with appropriate screws for maximum stability and mobility.
8. Attach the Bottom Shelf
Now for the shelves! The lower shelf provides valuable storage space for your tools, materials, and project components, helping to keep your workbench top clear and organized. To attach the bottom shelf securely to its supporting frame, I used a combination of wood glue and my brad nailer. The wood glue provides a strong, permanent bond, while the brad nails hold the shelf in place while the glue dries, ensuring a tight and clean fit. Apply a generous bead of glue along the top edges of the bottom frame, then carefully place the MDF shelf and secure it with brad nails every few inches. This creates a solid and functional storage area for your workshop essentials.
9. Install the Workbench Top
The final structural step is to attach the workbench top, your primary work surface. This is done in precisely the same manner as the bottom shelf: apply a strong bead of wood glue to the top edges of the upper frame, then carefully position the MDF top. Use your brad nailer to secure it firmly in place while the glue sets, ensuring a perfectly flat and stable surface for all your woodworking, crafting, or repair tasks. Once this is complete, your basic workbench structure is finished!
Putting Your New Workbench to Work
Wasn’t that incredibly straightforward? I can’t express how much I love the versatility and practicality of this portable workbench! The ease with which I can roll it around my shop – or even out into the yard on a beautiful day to soak up some sun while working and keeping an eye on the kiddos playing – is truly invaluable. As you can see from the image, I’ve already outfitted it with some of our favorite Ryobi power tools, which are essential for many of my projects. I’ve also permanently mounted my K5 Kreg Jig directly to the top surface, making it always ready for quick and precise pocket hole joinery. This integration of tools maximizes efficiency and keeps my most frequently used items within arm’s reach.
My workshop space is roughly the size of a standard one-car garage, and as you can clearly observe in the photos, this compact and mobile workbench design still leaves me with ample free space to move around, store materials, and tackle larger projects without feeling cramped. It’s a testament to the efficient design that prioritizes both workspace and mobility. This DIY workbench isn’t just a functional piece of furniture; it’s a foundation for greater productivity and enjoyment in my home workshop.
The Perfect Addition to Any Workshop
I absolutely adore this workbench! It has become an indispensable part of my daily routine and significantly improved the functionality of my workshop. With this vital piece of equipment now firmly in place, I feel completely ready to dive back into building even more furniture for the new house. There are so many exciting projects on the horizon, and having such a reliable and adaptable workspace makes all the difference. I hope this detailed guide inspires you to build your own custom, portable workbench and discover the joy and efficiency it brings to your DIY endeavors.
Thank you so much for stopping by and taking the time to read about this project. Happy building!
~Ashley