
Welcome to a new year filled with exciting DIY possibilities! After a wonderful holiday season, one of the most exciting gifts Ash and I exchanged was a fantastic new printer – the Canon SELPHY Photo Printer. This incredible device makes wireless 4×6 prints, and it’s truly revolutionized how I keep our home decorated with updated photos of my amazing kids. I used to be so bad about refreshing our family pictures, but this printer has solved that problem entirely. It also sparked an idea for a creative and functional DIY project that I’m thrilled to share with you today!
Beyond just wanting a dynamic way to display our new prints, I’d also been searching for an elegant solution to camouflage an unsightly air return vent in our living room. It’s one of those necessary but visually distracting elements in a home. Previously, a blanket ladder occupied this space, but I recently gifted it to my sister. This left a perfect spot for something fresh, something that could blend aesthetics with utility. And thus, my new DIY Photo Display Frame was born!
Transform Your Space with a Custom Photo Display Frame
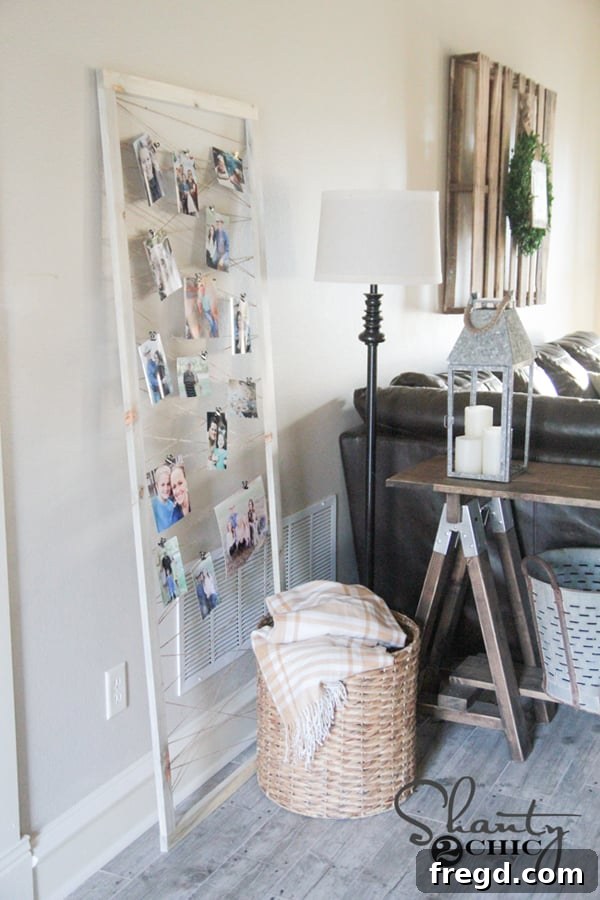
Isn’t it just charming? This versatile DIY photo display frame offers so much more than just a place for pictures. It makes changing out photos incredibly simple, allowing you to refresh your decor seasonally or as new memories are made. Moreover, it adds a beautiful vertical element to the wall, enhancing the room’s height and visual interest. Most importantly, it serves as a brilliant disguise for that pesky return vent, turning a functional necessity into a decorative asset. The best part? This entire project cost me approximately $6 in materials. Who doesn’t love an impactful home decor update that’s also budget-friendly?
Getting Started: Materials and Tools for Your DIY Photo Display
Crafting this beautiful photo display is easier than you might think, and it requires just a few key materials and tools. Let’s dive into what you’ll need to create your own personalized frame.
Choosing Your Wood: Blue Stain Pine or Standard Pine
For this project, I opted for a relatively new favorite material that Ash and I discovered at Home Depot: Blue Stain Pine. This unique wood is actually a tongue and groove paneling, typically found in 1×6 dimensions. We’ve been experimenting with ripping it down into smaller dimensional boards for various building projects, and it’s truly fantastic. One 1×6 board can easily be ripped into two 1×2 boards, which is precisely what I did for this frame. Blue Stain Pine is remarkable; it possesses a natural, weathered grey appearance that adds incredible character, and it’s surprisingly straight and easy to work with. If you already follow us on Instagram, you might recall a shot we shared of it stained in Varathane natural – it truly transforms beautifully.
However, if Blue Stain Pine isn’t readily available in your area, or if you prefer a different look, standard 1×2 pine boards will work perfectly. Simply purchase two 1x2x8 boards, and you’ll be all set to proceed directly to the pocket hole drilling stage, skipping the ripping step entirely. Pine is an excellent choice for its affordability, availability, and ease of cutting and finishing.
Essential Tools for Precision and Durability
Having the right tools makes any DIY project smoother and more enjoyable. Here are the tools I used and recommend for this photo display frame:
Table Saw: My Ridgid table saw was indispensable for ripping the 1×6 Blue Stain Pine into the precise 1×2 dimensions needed for the frame. This machine has quickly become one of my favorite and most frequently used tools in the workshop due to its accuracy and power. If you don’t have a table saw, a circular saw with a straight edge guide can also achieve similar results, or you might be able to have your local lumber yard cut the boards to size for you.
Kreg Jig: For strong, hidden joints, a K5 Kreg Jig is a game-changer. I have mine mounted to a scrap board, which makes it incredibly portable and easy to use on the ground when working with longer pieces, like the ones for this frame. Pocket hole joinery creates incredibly secure connections that are perfect for furniture and decorative pieces, leaving a clean, professional finish.
Ryobi 18V Stapler: This battery-powered stapler made attaching the twine a breeze. Its portability and consistent stapling power are fantastic for projects like this where you need quick and secure fastening. Any manual staple gun with appropriately sized staples would also work effectively.
Other Supplies: You’ll also need thin twine (Hobby Lobby is a great source for various colors and textures), and 1.25″ pocket hole screws for assembly. Optionally, wood glue can be used for extra joint strength, and small bulldog clips (or mini clothespins) for hanging your photos.
Step-by-Step Guide: Building Your DIY Photo Display Frame
Let’s get down to building! Follow these steps to construct your very own personalized photo display frame.
Step 1: Preparing Your Wood – Ripping and Cutting
If you’re using Blue Stain Pine 1×6 paneling, your first step is to rip it down to 1×2 dimensions. Begin by setting the fence on your table saw to trim off the factory edge (the tongue or groove side you don’t want). This ensures a clean, straight starting point. After making this initial cut, reset the fence to cut the board to your desired width – in this case, 1.5 inches to achieve true 1×2 dimensions. Always prioritize safety when using a table saw, wearing appropriate eye and ear protection.
Once you’ve successfully ripped your boards (or if you’re starting with pre-cut 1×2 pine), it’s time for the cross-cuts that will form the frame. You’ll need to make two cuts on each of your 1×2 boards. Measure and cut one piece at 27 inches and another at 68 inches. After cutting both original 1×2 boards, you should have four total pieces: two at 27 inches and two at 68 inches. It’s crucial to ensure that you get one long board and one short board from each of your initial 1x2s to avoid running out of material.
Step 2: Drilling Pocket Holes for Strong Joints
Next, prepare your boards for assembly by drilling pocket holes. Using your Kreg Jig, drill 3/4-inch pocket holes on both ends of your two 68-inch boards. These holes will allow you to securely attach the longer sides of your frame to the shorter end pieces. The Kreg Jig makes this process incredibly precise, ensuring strong and nearly invisible joints. Remember to set your jig collar to 3/4 inch for standard 1x material. Clamp your boards firmly to ensure accurate drilling.
Once the holes are drilled, the ends of your 68-inch boards should look something like this, ready for seamless attachment:
Step 3: Assembling the Frame
Now, it’s time to bring your frame together! Take your two 68-inch boards (with the pocket holes) and your two 27-inch boards. Position the longer boards to run vertically and the shorter boards horizontally, forming a rectangle. Use 1.25-inch pocket hole screws to attach the ends of the 68-inch boards to the 27-inch boards. For added durability, apply a small amount of wood glue to the joint surfaces before driving the screws. Ensure your corners are square as you assemble, using a speed square or by measuring diagonally from corner to corner to ensure equal measurements.
Once all four pieces are securely joined, you will have a sturdy, rectangular frame that forms the foundation of your photo display. Take a moment to admire your work – the structure should be solid and ready for the next step!
Step 4: Adding the Twine for Your Photo Grid
Now for the fun part that brings the display to life: adding the twine! I chose a thin twine for this project, which can typically be found at craft stores like Hobby Lobby. The delicate nature of thin twine allows the photos to truly stand out.
Begin by tying a small, secure knot at one of the top corners on the *back* of your frame. Then, use your Ryobi 18V stapler (or any suitable staple gun) to firmly attach the twine to the frame. Since the thickness of our 1×2 frame is 3/4 inch, I found that 5/8-inch staples worked perfectly, providing a secure hold without penetrating through the front of the wood.
There’s no strict rule for the pattern; feel free to get creative! I opted for a somewhat random, zig-zag pattern, moving from side to side down the frame. As you stretch the twine across, hold each side down firmly and secure it with a staple. The tension doesn’t need to be extremely tight, just enough to keep the lines relatively straight and prevent sagging. This free-form approach adds to the rustic, handcrafted charm of the display.
Continue stapling the twine in your chosen pattern until you reach the bottom of the frame, securing the end with another small knot and a final staple. Once completed, your frame will be ready to display your cherished memories!
The Finishing Touches: Personalization and Display
And just like that, your DIY photo display frame is complete! It’s so simple, incredibly inexpensive, yet undeniably cute and functional. To attach your photos, I highly recommend these little bulldog clips. They offer a neat and minimalist way to secure your pictures to the twine, and they are easy to move, allowing for effortless photo changes. Hobby Lobby also carries adorable gold-colored ones that can add a touch of elegance if that suits your style.
For this particular frame, I chose not to add any stain or finish. I absolutely adore the raw, natural look of the Blue Stain Pine – its inherent character and weathered grey tones are perfect for a rustic aesthetic. However, this is where you can truly make the project your own! Feel free to stain or paint your frame to match your existing decor or to express your personal style. A dark walnut stain would offer a more traditional look, while a light grey or white paint could create a chic, modern farmhouse vibe. Consider distressing the paint for an aged, vintage feel. The possibilities for customization are endless!
Here it is, all set up and proudly displaying photos of my lively crew. It fits perfectly in the space, subtly concealing the air return vent while serving as a vibrant focal point filled with cherished family moments.
This project beautifully illustrates how a simple DIY can solve a practical problem while simultaneously elevating your home’s aesthetic. It’s a budget-friendly way to personalize your living space, constantly update your decor with new memories, and even tackle those tricky home decor challenges like unsightly vents. Plus, the satisfaction of creating something beautiful with your own hands is truly priceless.
Imagine the possibilities! You could create smaller versions for a gallery wall, use different colored twine to match a theme, or even incorporate fairy lights for an added glow. This DIY photo display is not just a frame; it’s a blank canvas for your creativity and a testament to the warmth of your home.
Whether you’re looking for an easy woodworking project, a way to refresh your home decor on a budget, or a clever solution for camouflaging an air vent, this DIY Photo Display Frame checks all the boxes. It’s proof that functional items can also be beautiful and that a little bit of DIY effort can go a long way in creating a home that truly reflects you.
Thank you so much for stopping by and taking the time to explore this DIY project! I hope this detailed tutorial inspires you to create your own personalized photo display frame. If you have any questions at all about the materials, tools, or steps involved, please don’t hesitate to ask in the comments below. I’m always happy to help fellow DIY enthusiasts. Wishing you all a very happy, safe, and creative new year!