
Hello, fellow DIY enthusiasts and home decor dreamers!
Prepare to be absolutely thrilled, because today I’m unveiling a project that has been years in the making and has become one of my proudest accomplishments. To say I’m excited would be an understatement of colossal proportions – much like the piece itself! For as long as I can remember, I’ve harbored an intense admiration for the exquisite sideboards featured at Restoration Hardware. Their timeless design, robust construction, and undeniable elegance have always captivated me. However, the staggering price tag, often soaring between $3,000 and $4,000, was a constant reminder that these beauties were firmly out of my budget. Ouch, indeed.
But every design challenge presents an opportunity for creativity! I envisioned a solution: building a high-end replica without the exorbitant cost. This vision perfectly aligned with the incredible talent and collaborative spirit of Ana White, a true pioneer in the world of DIY furniture plans. It was clear that this would be the ideal piece to tackle together, and that’s precisely what we did! Today, I am beyond excited to share the detailed sideboard plans, empowering you to create your own show-stopping furniture. And for those looking to complete the set, stay tuned – the hutch plans will be following very soon!
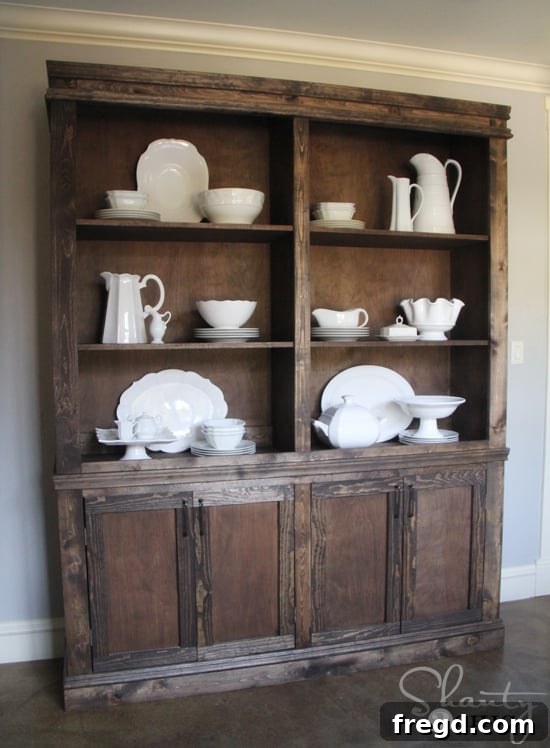
So, without further ado, feast your eyes on the stunning finished product! This isn’t just furniture; it’s a testament to what passion and a few power tools can achieve.
Crafting Your Dream Sideboard: A Beginner-Friendly DIY Guide
Awwww… I absolutely adore it! This magnificent sideboard stands as my largest and undoubtedly most cherished furniture build to date. Its presence transforms our dining space, adding a touch of rustic elegance and substantial storage. While its size might seem a little daunting at first glance, I assure you, there’s no need for intimidation! The beauty of this project lies in its straightforward construction. We utilized basic carpentry techniques, avoiding any complicated angles or tricky joinery. In fact, the entire build, from start to finish, came together seamlessly over a single weekend. I’m excited to share a few key tips and insights here to help you get started, but for the most comprehensive guidance, remember that you can access the full set of plans, complete with step-by-step instructions and detailed diagrams, directly over at Ana-White.com.
Choosing the Right Materials: The Beauty of PureBond Plywood
From the outset, I knew that a rich, stained finish was essential to achieve that Restoration Hardware aesthetic. This immediately led me to select PureBond plywood as my primary material, and I cannot sing its praises enough. This product is a game-changer for any DIYer looking for premium results without the premium price. Essentially, PureBond allows you to achieve the sophisticated look and feel of solid hardwood at a mere fraction of the cost, making it an incredibly smart choice for large furniture pieces like this sideboard.
One of the many benefits of PureBond plywood is its accessibility. You can conveniently purchase it in large 4×8′ sheets at your local Home Depot. Even better, most Home Depot locations offer a fantastic service: they’ll rip down your sheets to your specified dimensions for free! This saves you time, effort, and ensures accurate cuts right from the start. Here are some of the incredibly helpful guys at Home Depot diligently cutting my plywood sheets, making the initial prep work a breeze.
Beyond its aesthetic appeal and cost-effectiveness, PureBond stands out for its commitment to health and environmental responsibility. It’s proudly formaldehyde-free, meaning you won’t introduce harmful VOCs into your home, and it’s manufactured right here in the USA. These qualities make it an obvious and superior choice when working with hardwood plywood, especially for indoor furniture that will be a part of your family’s living space for years to come. It’s a peace of mind purchase.
As an added bonus, PureBond actively supports the DIY community by compensating bloggers for showcasing their plywood in projects. This means you might even have an opportunity to get your hands on this fantastic product for FREE! To learn more about how you can participate and potentially receive PureBond plywood for your next project, simply click the button below for more information. It’s a fantastic way to experience the quality firsthand without breaking the bank.
I was fortunate enough to have my wonderful husband lend a hand with loading the bulky plywood sheets into the car. This particular “date night” involved a trip to Home Depot and some heavy lifting – quite romantic, I know! But in all seriousness, having an extra set of hands for material transport is always a blessing when tackling larger DIY projects.
Essential Joinery: The Indispensable Kreg Jig®
Throughout this sideboard build, I consistently used 3/4″ pocket holes, paired with 1 1/4″ pocket hole screws. This combination provided ample strength and ensured a tight, durable connection for all the plywood pieces, creating a solid foundation for the entire unit. Learning to use a Kreg Jig is one of the most valuable skills any furniture builder can acquire, vastly simplifying the assembly process.
The Building Process: Step-by-Step with Pocket Holes
Here are a few progress shots from the construction phase, giving you a visual insight into how the pieces came together. You can clearly see where I strategically placed my pocket holes, ensuring maximum stability and strength for each joint. Careful planning of pocket hole placement is crucial, especially for large, load-bearing furniture like a sideboard.
This project also marked a significant upgrade in my toolkit – it was my very first build using my fantastic new Ryobi 18-Volt Lithium Drill.
Holy shmoly, what an incredible difference this made! Up until this point, I had been relying on a corded electric drill, which often limited my mobility and required constant access to power outlets. The freedom and power offered by this cordless Ryobi drill were simply revolutionary. I absolutely love everything about it – its ergonomic design, its long-lasting battery, and its consistent performance. For all the ladies out there looking to elevate their DIY game, take note: this would be an absolutely stellar tool to add to your wishlist for Santa this year! 😉 It makes a world of difference.
A few more strategic pocket holes to ensure every connection is rock solid and durable.
Adding Extra Strength: Reinforcing the Base
Given the substantial size of this sideboard and my intention to fill it with various items, I made the conscious decision to add a few 2×6 scraps as braces in the center of the base. This additional reinforcement provides extra structural integrity, ensuring that the piece can withstand considerable weight without any sagging or instability over time. When building large furniture, it’s always wise to err on the side of caution and add extra support where needed, especially if you anticipate heavy use. My goal was to make sure this baby was sturdy enough to last for generations.
Finishing Touches: Affordable Trim Work
Here are a few shots showcasing the trim work, which adds a crucial layer of finished detail to the sideboard. Instead of using traditional, often more expensive, base molding, I opted for a more budget-friendly yet equally effective solution: a simple casing. I encountered some difficulty in finding the exact sizes of base molding I wanted, and upon discovering this alternative, I realized I loved its clean and understated look just as much! Plus, the significant cost savings were an undeniable advantage. It was a win-win situation, allowing me to achieve the desired aesthetic without overspending.
The Grand Finale: Staining and Hardware Selection
My final, and arguably most satisfying, step was giving this beautiful piece its finished look. The right stain and hardware can elevate a DIY project from good to absolutely stunning. These are the specific products I used to achieve the rich, warm finish on my sideboard, creating a depth that truly enhances the wood grain.
For application, I found a 4″ foam roller to be incredibly effective. I prefer to roll on as much of the stain as possible, covering larger surfaces quickly and evenly. Then, for the corners, edges, and any spots the roller couldn’t reach, I meticulously used a chip brush, similar to the one pictured above, to “cut in” and ensure complete coverage. This two-pronged approach helps achieve a professional-looking finish with minimal streaking.
The key to a beautiful, even stain finish is to work in small sections at a time. Apply the stain generously, allow it to penetrate for just a few minutes, and then promptly wipe off any excess with a clean rag. This technique prevents the stain from becoming too dark or blotchy and ensures a smooth, consistent color across the entire piece. Patience and attention to detail during this stage truly pay off.
For the hardware, I employed a clever budget-friendly trick: I used inexpensive metal hinges from Lowe’s and then spray painted them to perfectly match the bronze finish of my chosen pulls. This simple step elevates the overall look without the expense of specialized hinges. It’s amazing what a little spray paint can do!
I am absolutely enamored with the pulls I selected for this sideboard. I stumbled upon them recently while sourcing new knobs and pulls for another exciting project I’ll be sharing very soon. These are 5″ Savoy pulls, and I was thrilled to find them at an incredibly competitive price. I believe they strike the perfect balance, offering a sophisticated blend of modern lines and traditional charm, which complements the sideboard’s overall design beautifully. They truly are the jewelry of this furniture piece.
I purchased mine from a fantastic online retailer called designerknobsandpulls.com.
I was thoroughly impressed with their service; I placed my order and received them in just a couple of days – you really can’t beat that kind of efficiency and speed when you’re eager to complete a project!
Whew… I know that was a lot of information to digest! But every detail, from the choice of wood to the final hardware, contributes to the success and beauty of this DIY sideboard. I hope this comprehensive breakdown empowers you to embark on your own building adventure.
Want to soak in a few more inspiring images of the finished sideboard and its impact on our home?
The Unbeatable Value: High-End Style, Budget-Friendly Price
Now for the grand reveal of the cost! The total expense for all materials to build this magnificent sideboard came in at approximately $250. This number fills me with immense satisfaction, especially when I place it right next to the $3,000 to $4,000 that Restoration Hardware demands for a comparable piece. When you consider the staggering savings, the DIY version becomes not just functional and beautiful, but incredibly gratifying. It truly makes our handmade creation even more beautiful and valuable in my opinion, knowing the effort and smart choices that went into its construction.
I genuinely love this piece of furniture. It’s more than just a place to store dishes; it’s a labor of love, a testament to what’s possible with a little determination and some basic woodworking skills. My hope is to pass it down to one of my children one day, instilling in them an appreciation for handmade items and the value of personal effort. And who knows? If they’re anything like their mother, they might just decide to put their own creative spin on it – perhaps a new coat of spray paint or a distressed finish with Vaseline. The possibilities are endless, and that’s the beauty of personalized furniture! 😉
I sincerely hope you love this project as much as I do! If you’re inspired, I would be absolutely thrilled for you to share this post and pin it below to your favorite DIY boards. Remember, you can find the comprehensive full set of plans, complete with all measurements and detailed instructions, over at Ana-White.com. Happy building!
~Whitney