
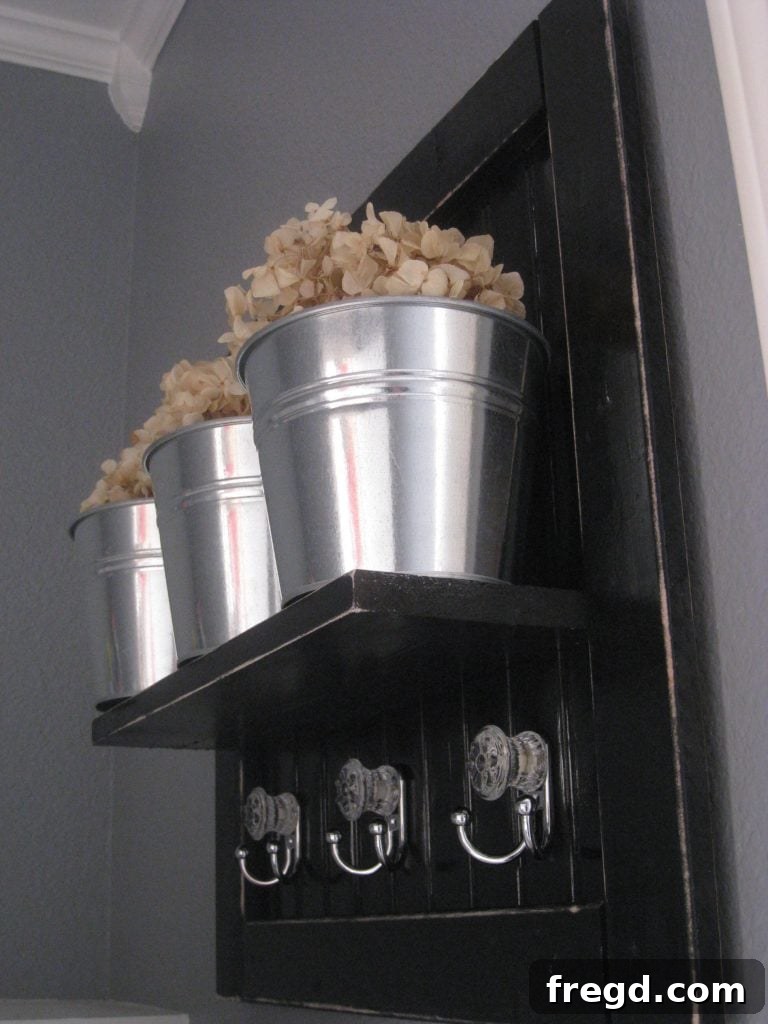
DIY Rustic Entryway Organizer: Crafting a Functional Key & Mail Holder from Scrap Wood
Welcome to one of our all-time favorite DIY projects! If you’re looking for a quick, incredibly easy, and wonderfully cheap way to add both style and organization to your home, you’ve come to the right place. This project delivers an incredible amount of “bang for your buck,” transforming simple materials, many of which you might already have lying around, into a charming and highly functional entryway organizer. Get ready to declutter your space and add a touch of rustic elegance with this fantastic key hook and storage solution.
Why Choose This DIY Entryway Organizer Project?
In today’s fast-paced world, an organized home is a peaceful home. The entryway often becomes a chaotic zone – keys go missing, mail piles up, and essentials are nowhere to be found when you’re rushing out the door. This DIY project tackles these challenges head-on. Not only does it provide dedicated spots for keys and mail, but it also allows for personalized decorative touches that welcome you home. Beyond its functionality, there are several compelling reasons to embark on this particular DIY journey:
- Cost-Effective: By leveraging scrap wood, you drastically reduce material costs, making this an incredibly budget-friendly solution for home organization and decor.
- Eco-Friendly: Repurposing materials from your scrap pile is a fantastic way to practice sustainability and reduce waste.
- Quick & Easy: Even if you’re a beginner to woodworking or DIY, the steps are straightforward and can be completed in approximately an hour, excluding drying time for paint.
- Customizable: From paint colors and finishes to the style of hooks and knobs, every element can be tailored to perfectly match your home’s existing decor.
- High Impact: For minimal effort and investment, you create a piece that significantly enhances both the aesthetic and practical aspects of your entryway.
Gathering Your Materials: The Foundation of Your Rustic Key Holder
The beauty of this project truly lies in its simplicity and the resourceful use of materials. As mentioned, the core components came from our scrap wood pile, proving that beautiful and functional items don’t always require expensive trips to the hardware store. Here’s a detailed list of what you’ll need to create your very own stylish entryway organizer:
Wood Components:
- Bead Board Sheet: An old sheet of bead board will serve as the decorative back panel. The classic vertical grooves add a charming, cottage-style touch. If you don’t have scrap bead board, a small panel can be purchased affordably.
- 1×6 Board: This piece will form the top shelf or header, providing a sturdy base for your hooks and a small ledge for display.
- 1×3 Boards: Used for framing the bead board panel, these add a finished, cohesive look to your project.
Hardware & Adhesives:
- Gorilla Glue Wood Glue: A strong wood adhesive is crucial for securely bonding the wood pieces together.
- Staple Gun & Staples: For quick and firm attachment, especially when securing the framing pieces.
- Saw Tooth Hanger: Essential for easily mounting your finished organizer onto the wall.
- 2-inch Screws: Used for attaching the 1×6 board securely. Ensure you have a drill bit for pre-drilling.
- Glass Knobs: These add a touch of elegance and serve as decorative anchors for your hooks. We found ours at Hobby Lobby (always look for sales!).
- Decorative Hooks: Choose hooks that complement your desired style. Home Depot offers a great selection.
Finishing Touches:
- Rust-Oleum Black Gloss Spray Paint: Provides a sleek, durable finish. Feel free to choose any color that suits your decor.
- Metal Buckets (Optional but Recommended): Purchased affordably (ours were from Ikea), these are perfect for holding mail, small items, or decorative flowers.
- Dried Hydrangea (Optional): For a lovely decorative accent in your metal buckets.
Starting with pieces from our scrap wood pile made this project incredibly cheap. We utilized an old sheet of bead board, a 1×6, and several 1x3s, demonstrating how forgotten materials can be given a beautiful second life.
Tools You’ll Need:
- Tape Measure
- Saw (miter saw or hand saw for cutting wood)
- Pencil
- Drill & Drill Bits (including a smaller bit for pre-drilling)
- Hammer
- Screwdriver (or drill with a screw bit)
- Safety Glasses (always recommended when cutting/drilling)
Step-by-Step Guide to Building Your Entryway Organizer
Step 1: Preparing the Bead Board Base
Begin by cutting your bead board to the desired dimensions for the main back panel of your organizer. The size will depend on how many hooks and buckets you plan to incorporate, and the available space in your entryway. Once cut, take your 1×3 boards and precisely trim them to create a frame around the bead board panel. Measure carefully to ensure snug fits for all four sides.
Step 2: Assembling the Frame
With your bead board and 1×3 trim pieces ready, it’s time to assemble the main structure. Apply a generous amount of Gorilla Glue wood glue to the edges of the bead board where the 1x3s will attach. Carefully position the 1×3 trim pieces around the bead board, ensuring they are flush and square. Use a staple gun to secure the trim firmly in place. The combination of wood glue and staples provides a robust bond, preventing any movement and ensuring the frame holds together for years to come. Wipe away any excess glue immediately.
Step 3: Attaching the Wall Hanger
Before adding the top shelf, it’s often easier to attach your hanging hardware. Flip your framed bead board panel over. Position a saw tooth hanger centrally at the top edge of the back. Using a hammer, carefully secure the hanger in place. Ensure it is level and firmly attached, as this will bear the weight of your entire organizer.
Step 4: Installing the Top Shelf (1×6 Board)
Now, take your 1×6 board, which will serve as the top shelf and the mounting point for your hooks. Apply wood glue generously along the bottom edge of the 1×6 where it will meet the top of your framed bead board. Center the 1×6 board over the top of the bead board panel. Crucially, pre-drill pilot holes through the back of the bead board and into the 1×6. This step is vital to prevent the wood from splitting when you drive in the 2-inch screws. Once pre-drilled, insert and tighten the screws from the back, securing the 1×6 firmly to the bead board assembly.
Step 5: Painting Your Organizer
With the main structure assembled, it’s time for a fresh coat of paint. We opted for one coat of Rust-Oleum black gloss spray paint for a sophisticated and modern look. Find a well-ventilated area, lay down a drop cloth, and apply the spray paint in even, sweeping motions. For best results, apply several thin coats rather than one thick coat, allowing ample drying time between each. This technique minimizes drips and ensures a smooth, professional-looking finish. If you desire a distressed, farmhouse aesthetic, you can lightly sand the edges after the paint has fully cured.
Step 6: Choosing and Installing Decorative Hardware
This is where your organizer truly starts to take on its unique character! We found these super cute glass knobs at Hobby Lobby, taking advantage of their fantastic 50% off sale. These knobs add a touch of vintage charm and sparkle. For the hooks, we selected pretty, sturdy options from Home Depot that complemented the glass knobs beautifully. The choice of hardware significantly impacts the overall style, so take your time to pick pieces you love.
Step 7: Attaching Knobs and Hooks
Carefully measure and mark the desired placement for your hooks along the 1×6 board. Ensure they are evenly spaced for a balanced look. Pre-drill pilot holes for the hooks to avoid splitting the wood. Then, take your chosen hooks and, if designed to accommodate them, thread the glass knobs through the top holes of the hooks. This creates a unique, layered look where the knob acts as both a decorative element and a securement point. Finally, secure the hooks (with the knobs in place) to the 1×6 board from the back, ensuring all components are tightly fastened.
Step 8: Final Installation and Decoration
With all the components securely in place and the paint fully cured, it’s time to hang your beautiful new entryway organizer! Use appropriate wall anchors if you’re not drilling into a stud to ensure it’s stable. Once attached to the wall, add your decorative touches. We chose metal buckets, purchased from Ikea for just $1 each, which fit perfectly on the hooks. These versatile buckets can hold mail, sunglasses, loose change, or, as we did, be filled with lovely dried hydrangeas for an elegant accent.
Customization Ideas to Make It Truly Yours
While we chose a classic black gloss finish with clear glass knobs, the beauty of DIY lies in endless possibilities. Consider these ideas to personalize your entryway organizer:
- Color Palette: Experiment with vibrant colors for a modern look, soft pastels for a farmhouse chic vibe, or a distressed white for a shabby chic aesthetic.
- Wood Finish: Instead of paint, you could stain the wood for a rich, natural look, or apply a clear protective coat to highlight the raw beauty of the grain.
- Hardware Variations: Explore different styles of hooks (vintage, modern, industrial) and knobs (ceramic, metal, antique brass) to match your home’s decor.
- Decorative Accents: In addition to dried flowers, the metal buckets can hold small plants, pens, loose change, or even a small succulent. The top shelf can display small picture frames, candles, or other decorative items.
- Size Adjustments: Easily scale the project up or down to fit a larger wall space or a smaller nook.
The Impact of a Small Project: Time, Money, and Satisfaction
This entire project took only about an hour of active work, with some additional time for paint to dry. The total monetary investment was approximately $15, largely due to sourcing materials from scrap and finding hardware on sale. For such a minimal investment of time and money, the return in terms of functionality, organization, and aesthetic appeal is enormous. There’s immense satisfaction in creating something beautiful and useful with your own hands, especially when it helps keep your home tidy and welcoming.
Thank you so much for stopping by and taking inspiration from this project. We hope you’re excited to create your own unique entryway organizer!
~Ashley