
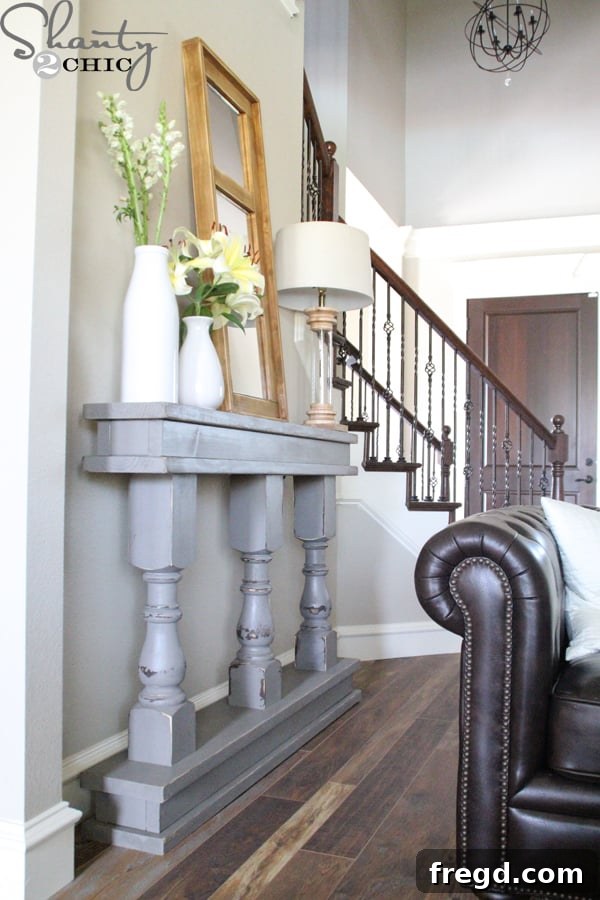
Build Your Own Stunning & Easy DIY Console Table (Free Plans Included!)
Are you searching for that perfect piece of furniture to complete your entryway, hallway, or living room? Do you have a narrow space that’s begging for a touch of character and functionality, but store-bought options just don’t quite fit or break the bank? Look no further! This incredible DIY console table project offers a stylish, practical, and surprisingly simple solution that you can build yourself. Get ready to transform your home with a handcrafted piece that not only looks fantastic but also reflects your personal style.
This tutorial will guide you through creating a beautiful console table featuring elegant turned legs, perfect for adding a touch of farmhouse charm or classic sophistication to any room. We’re thrilled to share our super easy process, complete with free plans, to help you bring this project to life. Not only is it a rewarding build, but it’s also incredibly fun to decorate!
We absolutely adore how this console table turned out! It’s truly a labor of love, designed to perfectly fit those tricky narrow spaces. In our home, it found its ideal spot next to our stairs, adding both beauty and a convenient surface. The best part? We’ve got free, detailed plans just for you!
Why Choose a DIY Console Table?
Building your own furniture offers a wealth of benefits beyond just saving money:
- Customization: You get to choose the exact dimensions to fit your space perfectly, select your preferred wood, and apply a finish that matches your existing decor. No more compromising on style or size!
- Cost-Effectiveness: High-quality console tables can be quite expensive. DIY allows you to achieve a designer look for a fraction of the cost, using readily available materials.
- Sense of Accomplishment: There’s immense satisfaction in creating something with your own hands. Every time you walk past your finished console table, you’ll feel a surge of pride knowing you built it.
- Unique Aesthetic: Your DIY console table will be a unique statement piece, showcasing craftsmanship that mass-produced items often lack.
- Skill Development: It’s a fantastic opportunity to hone your woodworking skills, whether you’re a seasoned builder or just starting out.
Get Your Free Console Table Plans!
Ready to get started? We’ve made it incredibly easy for you to dive into this project. Our comprehensive, free plans are available for immediate download. These plans detail every measurement, cut list, and assembly instruction to ensure a smooth building process. Just click the image below or the link provided to print your copy!
You can also access the Free Plans directly by clicking HERE!
Materials and Tools You’ll Need
When we say this console table is easy, we truly mean it! The simplicity of its construction comes down to using a few standard lumber sizes and these fantastic pre-made turned legs. Here’s a rundown of what you’ll need:
Essential Materials:
- Turned Legs: We sourced our beautiful turned legs from Osborne Wood Products. These legs are the star of the show, providing that elegant touch without the need for complex joinery. We used their knotty pine version, which offers a lovely rustic appeal. While they are a significant part of the cost (around $60 each), they simplify the build immensely and elevate the final look. You can order them directly by clicking HERE.
- Lumber:
- 2×4 boards (for the apron frames)
- 2×10 boards (for the top and bottom shelves)
You’ll want to select straight, knot-free boards for the best results, especially for the top surfaces.
- Wood Glue: Essential for strong, long-lasting joints.
- Pocket Hole Screws: 2 1/2″ and 3″ lengths.
- Wood Screws: 3″ length.
Recommended Tools:
- Miter Saw or Circular Saw: For making precise cuts.
- Kreg Jig: A fantastic tool for creating strong, hidden pocket-hole joints. We highly recommend investing in one if you plan on more DIY furniture projects.
- Drill/Impact Driver: Crucial for drilling pilot holes and driving screws quickly and efficiently. Our Ryobi Impact Driver is a game-changer for attaching 2x lumber!
- Tape Measure & Pencil: For accurate marking and measuring.
- Safety Glasses & Hearing Protection: Always prioritize safety when working with power tools.
- Clamps: Helpful for holding pieces in place during assembly.
Step-by-Step Building Instructions
Let’s get down to building this beautiful console table! Remember to always refer to your free plans for specific measurements and visual guidance.
Step 1: Making All Your Cuts
Unlike some projects where we recommend cutting as you go, for this console table, you can make all your cuts upfront. Precision here is key for a seamless assembly.
Begin by cutting your 2×10 boards. These will form the main horizontal bases for both the top and bottom shelves of your table.
Cut four pieces of 2×10 at 59 1/2″ each.
Next, cut your 2×4 boards for the apron frames. Cut four pieces of 2×4 at 57 1/4″ and four pieces of 2×4 at 4 1/4″. These smaller pieces will be the end supports for your apron frames. Once these cuts are done, you’re ready for pocket holes!
Step 2: Drilling Pocket Holes
Pocket holes are a fantastic way to create strong, concealed joints, giving your furniture a clean, professional look. If you don’t own a Kreg Jig, you can still build this table using traditional 3″ wood screws and wood filler to conceal the holes later.
Set your Kreg Jig to 1 1/2″, which is the standard setting for drilling into 1 1/2″ thick lumber (like 2x4s and 2x10s). Refer to your free plans to identify exactly where to drill your pocket holes. For certain pieces, due to placement against other components, pocket holes might only be feasible in specific areas.
Step 3: Assembling the Apron Frames
You will build two identical 2×4 apron frames. These frames will provide structural support and a surface to attach the top and bottom shelves.
Connect the longer 2x4s (57 1/4″) to the shorter 2x4s (4 1/4″) using wood glue and pocket hole screws. For the side that will face the wall (less visible), use 3″ pocket hole screws for extra strength. For the more visible side, use 2 1/2″ pocket hole screws. Build two of these apron assemblies and set them aside. The Ryobi Impact Driver is fantastic for this step, making quick work of driving screws into 2x lumber!
Step 4: Attaching the Legs to the Bottom Board
Now it’s time to give your console table its distinctive look by attaching the turned legs. Take one of your 59 1/2″ 2×10 boards – this will be the bottom shelf of your console.
Carefully position each leg on the underside of the 2×10 board, referring to your plans for exact placement. Tracing around the base of each leg with a pencil before flipping them over helps ensure accurate alignment when attaching.
Use 3″ wood screws and your impact driver to securely attach the legs to the 2×10. Ensure the legs are firmly fastened and perpendicular to the board.
Step 5: Integrating the Bottom Apron Frame
With the legs attached, it’s time to add one of the 2×4 apron assemblies to create the lower structure of the console table.
Apply wood glue to the contact points where the apron will meet the legs and the underside of the 2×10 board. Then, attach the apron frame using 2 1/2″ pocket hole screws, ensuring everything is square and flush.
Step 6: Securing the Final Bottom Shelf Board
Now, take your second 59 1/2″ 2×10 board. This will form the actual bottom shelf of your console table.
Attach this 2×10 board to the top of the apron frame using 3″ wood screws. Since this is the bottom of the piece, you don’t need to worry about concealing these screw holes – they won’t be visible in the finished product.
Step 7: Constructing the Top Section
Carefully flip your console table over so the completed bottom section is now resting on the ground. This makes it easier to work on the top assembly.
Take one of your remaining 59 1/2″ 2×10 boards. Apply wood glue and then attach this board to the very top of the turned legs using 3″ wood screws. This 2×10 will serve as the support structure for your tabletop.
Next, take your remaining 2×4 apron assembly. Attach this assembly to the underside of the final 59 1/2″ 2×10 board (which will be the very top surface of your console). Use 2 1/2″ pocket hole screws for this step to ensure that no screw heads are visible on the finished tabletop. We want a perfectly smooth, clean top surface.
Step 8: Final Top Assembly
Carefully set the assembled top 2×4 apron frame (with the 2×10 attached to its underside) onto the top of your console table’s leg structure. Attach it by driving 3″ wood screws upwards from the bottom of the 2×10 (that is attached to the legs) into the 2×4 apron assembly. This method ensures all fasteners for the top are hidden, resulting in a flawless finish.
And there she is! Your console table is fully assembled and ready for the exciting part – finishing!
Finishing Touches: Achieving a Beautiful Distressed Look
For this console table, we opted for one of our favorite painting techniques to achieve a charming, weathered, and distressed finish. This method adds depth and character, perfect for a farmhouse or rustic-chic aesthetic.
- Apply Stain: Begin by applying a coat of Rust-Oleum Dark Walnut stain around the edges and prominent areas of the console table. Let it dry completely. This will be the base color that peeks through the distressed paint.
- Vaseline Application: Once the stain is dry, strategically apply a thin layer of Vaseline to the areas where you want the stain to show through after distressing. Focus on edges, corners, and areas that would naturally show wear and tear over time. The Vaseline acts as a barrier, preventing the paint from adhering directly to the stained wood.
- Paint Layers: Apply two coats of Valspar’s Seine paint over the entire console table, covering both the stained and Vaseline-treated areas. Allow each coat to dry thoroughly according to the manufacturer’s instructions.
- Distressing with Sander: Once the paint is completely dry and cured, grab your Ryobi Corner Cat Sander (or any orbital sander with fine-grit sandpaper). Gently sand the edges and areas where you applied Vaseline. The Vaseline will prevent the paint from sticking, allowing it to easily rub off and reveal the dark stain beneath, creating that beautiful distressed effect.
This technique creates a wonderfully authentic distressed look, making your new console table appear like a cherished antique with years of stories to tell. Of course, you can always choose a solid paint color, a natural wood finish with clear coat, or any other finish that suits your home!
Your New Console Table: Styled and Loved!
We are absolutely smitten with the final result! This console table is the perfect blend of style and function, especially for those narrow spots that just need “a little something.” It’s incredibly versatile and provides an excellent canvas for your decorating creativity.
Whether you place it in your entryway to greet guests, in a hallway to display cherished items, or behind a sofa, it adds an instant touch of elegance. We love styling ours with a large mirror, a few favorite books, a vase of fresh flowers, and other decorative accents.
If you’re wondering about the gorgeous mirror propped on top of our console table in the photos, you’re in luck! We also have a DIY tutorial for that. Click HERE to see how we made it and add another custom piece to your home.
Final Thoughts & More DIY Inspiration
We truly hope you love building this console table as much as we enjoyed creating the plans and sharing the process with you! It’s an approachable project that yields impressive results, perfect for enhancing your home decor.
Don’t forget to print your FREE Plans HERE! A massive thank you goes out to Jay from Jay’s Custom Creations for meticulously converting our custom plans into easy-to-use PDF format. His expertise makes these plans accessible to everyone, and we are so grateful for his collaboration.
Your shares and pins on social media mean the world to us and help more DIY enthusiasts discover these projects. So please, if you love this DIY Console Table, spread the word!
And for those curious about the beautiful wood floors in our living room, which provide such a warm backdrop to our DIY creations, you can learn all about them! Click HERE to find out how to install laminate flooring yourself.
Thank you for stopping by and being a part of our DIY community!
Happy building!
Ashley