
Hello fellow DIY enthusiasts and Happy New Year!
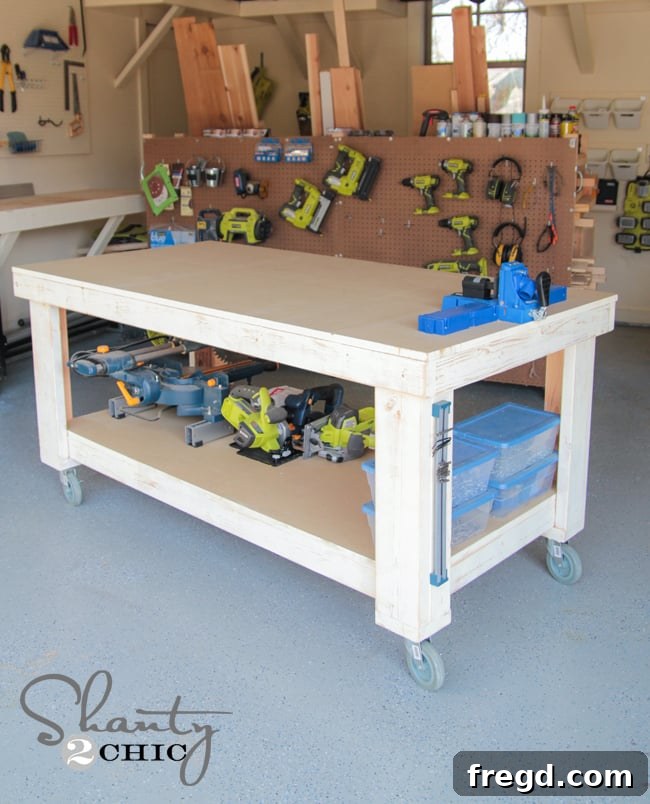
I’m absolutely thrilled to kick off the new year by sharing my latest workshop creation with all of you. After countless hours of projects scattered across my garage floor, I decided it was high time to build myself a dedicated and highly functional workspace. This simple yet incredibly robust DIY workbench has truly transformed my crafting and building experience. Get ready to dive into the details of how you can build your very own!
Elevate Your Workspace with a Custom DIY Workbench
Isn’t it just perfect? I honestly couldn’t be happier with how this custom DIY workbench turned out. For a long time, my sister Ashley and I have collaborated with our fantastic friends at Ryobi Power Tools, creating engaging DIY videos that many of you enjoy. During our shoots, I’ve always admired their immaculately organized workshops and sturdy workbenches, which always left me feeling incredibly inspired to build one for myself. The desire to create a dedicated, ergonomic, and mobile workbench grew stronger with each project, and I finally made it a reality!
While this may appear to be a large and imposing workbench, I promise you, it’s a remarkably straightforward build. I’ve meticulously broken down each step to make the process as clear and accessible as possible. Even if you’re a beginner, you’ll find these instructions easy to follow. Don’t hesitate to ask any questions you might have along the way; I’m here to help you achieve your own perfect workspace!
Ready to Build? Download Your Free Workbench Plans!
To ensure you have all the necessary information at your fingertips, I’ve prepared comprehensive, free printable plans for this DIY workbench project. These plans include detailed diagrams, cut lists, and step-by-step instructions that complement this article perfectly. Having these plans printed out while you work will make the construction process even smoother and more enjoyable. Don’t miss out on this valuable resource – it’s designed to make your workbench building experience a success!
CLICK HERE TO DOWNLOAD THE FREE PRINTABLE WORKBENCH PLANS NOW!
Let’s get started on transforming your garage or workshop with this essential piece of equipment!
Comprehensive Supply List for Your New Workbench
Before we grab our tools, let’s gather all the materials needed for this sturdy and functional DIY workbench. This list is carefully curated to ensure durability, stability, and ease of construction. Sourcing quality materials is the first step to a successful project that will serve you well for years to come.
Here’s what you’ll need:
- 2 – 2x6x8 Lumber: These robust pieces will form the primary framework, providing essential strength and rigidity for your workbench.
- 7 – 2x4x8 Lumber: Versatile and sturdy, 2x4s are perfect for the internal framing, legs, and support structures, offering a great balance of strength and manageability.
- 2 4×8 sheets of 3/4″ MDF (Medium Density Fiberboard): MDF is an excellent choice for the workbench top and bottom shelf due to its smooth surface, stability, and cost-effectiveness. It provides a flat, consistent work area and a solid storage shelf.
- 4 5″ Locking Rubber Casters: Mobility is key! These heavy-duty locking casters allow you to move your workbench with ease, then secure it firmly in place when working. The rubber wheels protect your floor and provide smooth movement.
- 2.5″ Wood Screws: Essential for joining various wood components, ensuring a strong and lasting connection.
- Kreg Jig (Recommended): While optional, a Kreg Jig will significantly simplify the process of creating strong, hidden pocket-hole joints, giving your workbench a professional finish and superior stability.
- Gorilla Wood Glue: For extra strength and durability, wood glue is used in conjunction with screws to create incredibly solid joints, especially for the legs.
- Ryobi Airstrike Nailer (or similar brad nailer): Ideal for quickly and securely attaching the MDF sheets to the frames without the need for unsightly screws.
- Drill/Driver: For pre-drilling holes and driving screws.
- Measuring Tape, Pencil, Safety Glasses: Standard workshop essentials.
Building the Foundation: Constructing the Workbench Frames
The first critical step in building your sturdy workbench is to construct the two main frames: a top frame and a bottom shelf frame. These frames are the backbone of your workbench, providing the necessary support for your work surface and storage. Precise measurements and strong joints are paramount here.
I utilized 2x4s for both of these frames, leveraging their strength and ease of use. For joining the pieces, my secret weapon was my incredible Kreg Jig. This tool makes creating robust, hidden pocket-hole joints incredibly fast and simple. If you don’t own a Kreg Jig, you can still achieve a strong build by pre-drilling pilot holes and attaching all the pieces with 2.5″ wood screws. However, I wholeheartedly recommend investing in a Kreg Jig if you’re serious about DIY woodworking; it truly streamlines the process and results in a much cleaner, screw-free exterior finish.
I set my Kreg Jig for 1 1/2″ pocket holes, which is the actual width of a 2×4. I then used 2 1/2″ pocket hole screws to securely fasten all the frame components together. This combination creates an exceptionally strong joint, crucial for a workbench that will withstand heavy use.
Crafting the Workbench Legs for Stability and Mobility
Now, let’s move on to the legs – an integral part of ensuring your workbench is both stable and capable of supporting significant weight. Each leg is a combination of one 2×4 and one 2×6 piece, meticulously cut to 26.5″ in length. This combination creates a thick, sturdy profile that enhances the overall strength of the workbench. The wider 2×6 face provides excellent stability, while the 2×4 allows for versatile attachment points.
I started by attaching the 2×4 and 2×6 pieces together to form each leg. Again, I used my trusted Kreg Jig for this step, drilling three pocket holes along the length of each 2×4 piece where it joins the 2×6. To maximize the strength and longevity of these critical joints, I applied a generous amount of Gorilla Wood Glue before securing them with 2.5″ screws. The combination of glue and screws creates a bond that is exceptionally robust and resistant to movement.
Observe the thoughtful placement of the pocket holes in the 2×4 pieces, strategically positioned for optimal strength and hidden appearance once assembled. This attention to detail ensures a clean look while maintaining structural integrity.
For added support and to prepare for the casters, each leg also features a 5″ piece of 2×6 attached to its bottom. These smaller pieces serve a dual purpose: they create a strong base for mounting the casters and provide crucial support for the bottom shelf, ensuring it remains level and secure. I used wood glue along with 2 1/2″ wood screws to firmly attach these blocks to the bottom of each leg. This creates a solid foundation that can handle the weight of tools and materials.
Assembling the Workbench: Frames Meet Legs
With all the legs and frames constructed, the next exciting step is to bring them all together to form the main structure of your DIY workbench. This phase truly sees the workbench take shape and requires careful alignment to ensure a level and square build.
The key to this assembly is understanding the orientation of the legs relative to the two frames. The legs are designed to align flush with the *outside* of the bottom shelf frame, providing maximum support for the shelf. Conversely, the legs will fit snugly on the *inside* of the top frame. This specific arrangement not only enhances the structural integrity but also creates a clean, integrated look for your workbench.
To secure these crucial connections, I opted for heavy-duty 2.5″ Torx screws. These screws offer superior grip and are less prone to stripping, ensuring a rock-solid assembly. Before driving any screws, I meticulously pre-drilled all the holes with my drill. Pre-drilling is a vital step that prevents wood splitting, especially when working close to the ends of lumber, and ensures that your screws drive in straight and strong.
Take your time during this step to ensure everything is square and plumb. A little extra effort here will pay dividends in the stability and functionality of your finished workbench. Once the legs are firmly attached to both frames, you’ll have a surprisingly rigid and complete base structure ready for its surfaces.
Adding the Workbench Surfaces: Top and Bottom Shelves
Now comes the satisfying part of adding the working surfaces to your workbench! This stage involves handling the larger, heavier pieces, so don’t hesitate to enlist a helper. I certainly appreciated my husband’s assistance in lifting these hefty panels into place. For both the top and bottom shelves, I chose 3/4″ MDF (Medium Density Fiberboard). MDF is an excellent material for a workbench surface because it’s incredibly smooth, stable, and cost-effective. It provides a perfect flat plane for all your projects.
To make things even easier, I had the friendly team at Home Depot cut my large 4×8 sheets of MDF down to the precise dimensions needed. This saved me time and ensured perfectly square cuts without the hassle of wrestling large sheets on a table saw. If you don’t have a large saw or prefer not to cut large sheets yourself, this is a fantastic service to utilize.
Here are the exact measurements for your MDF pieces:
- Bottom Shelf: 30″ x 66″
- Top Piece: 36″ x 72″
Once the frames were securely attached to the legs, we carefully lifted and positioned the bottom shelf onto its supports, followed by the top piece onto the upper frame. For attaching both pieces of MDF, I used my reliable Ryobi Airstrike Nailer. This tool makes quick work of fastening the surfaces. Importantly, I chose not to use wood glue in this step. My reasoning is simple and practical: workbench surfaces take a lot of abuse. By simply nailing them down, I can easily remove and replace these MDF pieces when they inevitably become too worn or damaged, without having to dismantle the entire frame.
The Finishing Touches: Casters, Paint, and Personalization
The structural build of your DIY workbench is now complete, but it’s the finishing touches that truly make it functional, mobile, and uniquely yours. My final and arguably most impactful step was adding the casters. I sourced heavy-duty 5″ rubber locking casters from Northern Tool. These casters are fantastic because they allow the entire workbench to be moved effortlessly around the garage or workshop, then locked securely in place when you need a stable work surface. The rubber wheels are also great for protecting your floor from scratches.
Beyond functionality, I believe a good workbench should also look appealing and inspire creativity. To give my frames and legs a fresh, clean look, I applied a quick coat of white paint. While a raw wood look is perfectly fine, a coat of paint can protect the wood and brighten up your workspace. After the paint dried, I used my Corner Cat sander to lightly distress the edges and surfaces. This subtle distressing adds character and a slightly aged, “shanty-chic” aesthetic, making the workbench feel more custom and less utilitarian. Because, let’s be honest, every good workbench should have a bit of personality, right?
This blend of robust construction, intelligent design, and personal aesthetic touches results in a workbench that is not just a tool, but a centerpiece of your creative endeavors. It’s mobile, durable, and ready to tackle any project you throw at it!
Presenting the Finished DIY Workbench!
Here it is, folks! The ultimate DIY workbench, ready to revolutionize your garage or workshop space. I am absolutely thrilled with the outcome, and I hope these images convey just how functional and stylish this piece is. It’s more than just a place to work; it’s an invitation to create, organize, and build with greater ease and efficiency.
Why I Love My New Workbench (And You Will Too!)
Did I mention how absolutely, completely, totally in love I am with this workbench? Just checking! Beyond its stunning appearance and practical design, one of the most compelling aspects of this project is its incredible affordability. I managed to build this entire robust and versatile workbench for under $130! This makes it an incredibly cost-effective solution compared to purchasing a pre-made workbench of similar size and quality.
The benefits extend far beyond the price tag. This workbench offers:
- Unmatched Mobility: Thanks to the heavy-duty locking casters, I can effortlessly roll this large workbench to any corner of my garage, bringing the work directly to my tools or optimizing my space for larger projects.
- Superior Stability: The combination of 2×6 and 2×4 lumber, reinforced with Kreg Jig pocket holes and wood glue, creates a rock-solid platform that doesn’t wobble, even under heavy loads or vigorous work.
- Ample Workspace: The generous 36″ x 72″ top provides plenty of room for spreading out projects, tools, and materials, ensuring a clutter-free and efficient workflow.
- Integrated Storage: The large bottom shelf is perfect for organizing power tools, material scraps, or storage bins, keeping your workspace tidy and essential items within easy reach.
- Durability: The MDF surfaces are robust, and the thoughtful design allows for easy replacement of the top if it ever gets too worn, ensuring the workbench lasts for years to come.
- Customizable Aesthetics: A simple paint job and distressing transformed this functional piece into something that also looks fantastic in my workshop. You can customize yours to match your personal style!
This workbench isn’t just a piece of furniture; it’s an investment in your productivity and enjoyment of DIY projects. It has truly transformed my garage from a chaotic storage space into an organized, inspiring workshop.
Share Your Workbench Journey!
Thank you so much for taking the time to explore this DIY workbench build! I genuinely hope this detailed guide inspires you to create your own functional and beautiful workspace. Having a dedicated area to work on your projects makes all the difference, and this workbench is designed to empower you to tackle anything.
I would absolutely LOVE for you to pin this project and share my new workbench plans with all your friends, fellow DIY enthusiasts, and anyone looking to optimize their workshop. Spreading the joy of DIY is what this community is all about! If you have any questions at all, whether about the materials, specific steps, or general woodworking tips, please don’t hesitate to ask in the comments below. I’m always happy to help and guide you through your building journey.
Happy building, and I can’t wait to see your creations!
~Whitney