
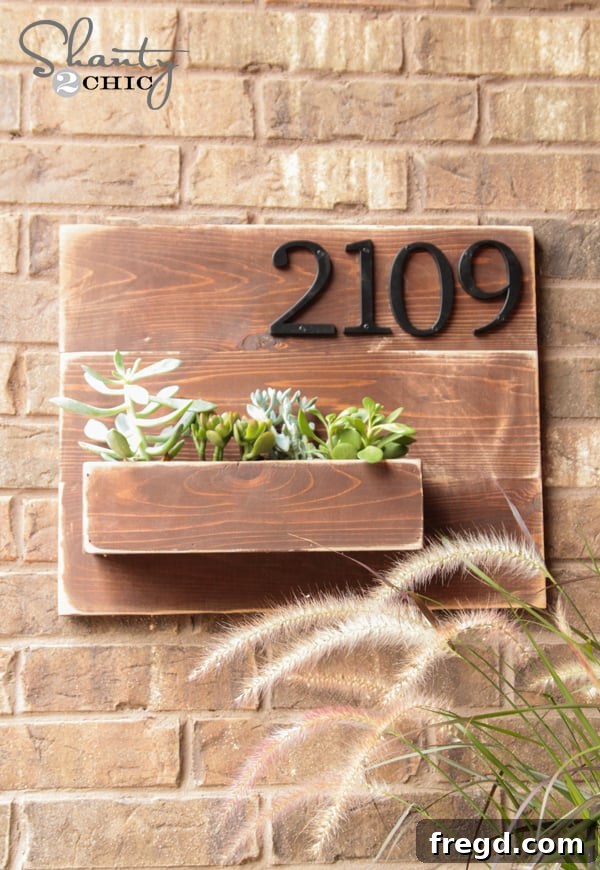
DIY Address Number Wall Planter: Enhance Your Home’s Curb Appeal with This Easy Project!
Welcome, fellow DIY enthusiasts! Today, I’m thrilled to finally share a project that has been a labor of love (and a test of patience with photography!) over the past month. While the actual build time for this charming address number wall planter was a mere 30 minutes, getting it photographed with five energetic kids around proved to be the real challenge of a busy summer! But it’s worth it, because this project is not only incredibly fun but also adds a fantastic touch of personality and functionality to any home.
We had a noticeable blank space right by our front door, and I envisioned something more than just a decorative piece. I wanted a project that would combine aesthetics with practical use. And so, the idea for a DIY Address Number Wall Planter was born! It’s the perfect way to display your house numbers clearly while adding a beautiful, living element to your entryway. Get ready to transform your outdoor space with this simple yet impactful woodworking project.
Isn’t it just adorable? What makes this outdoor planter even more appealing is its straightforward construction. Even better, you can easily hang it using 3M Command Fastening Tape, making it an ideal DIY solution for those who rent their homes and can’t make permanent alterations to walls. This project offers a fantastic blend of charm, utility, and flexibility, all without breaking the bank or requiring extensive woodworking experience.
Let’s dive right into building your very own custom address planter!
Essential Supply List for Your Address Number Planter Project
Gathering your materials is the first step to a successful DIY. This project is surprisingly affordable, especially considering the impact it will have on your home’s curb appeal. With the plants included, my total cost for this entire build came in under $25! You can save even more by choosing different, less expensive plant varieties, though keep in mind they might require more frequent watering – a task I sometimes, admittedly, struggle with. Here’s what you’ll need:
-
1 – 5.5″ Cedar Fence Picket: I used one that was 3/4″ thick. Cedar is an excellent choice for outdoor projects due to its natural resistance to rot and insects, ensuring your planter lasts for years. If your picket is 5/8″ thick, remember to adjust your pocket hole settings accordingly for a flush fit.
-
1 x 4 x 8 Cedar Board: You’ll likely have some scrap left over from this, as it’s typically the shortest length available at hardware stores like Home Depot. This board will form the planter box itself, and cedar’s properties make it perfect for holding plants.
-
Metal Address Numbers: Choose a style that complements your home’s aesthetic. These are readily available at most hardware stores and come in various finishes and fonts. Their metallic sheen will beautifully contrast with the rustic wood.
-
Plants: I opted for succulents from Home Depot due to their low-maintenance nature and beautiful textures. However, you could choose small herbs, seasonal flowers, or other drought-tolerant plants depending on your climate and preference. Remember to consider drainage when selecting your plants.
-
Wood Glue: Essential for strong, lasting joints, especially for outdoor use.
-
Pocket Hole Screws (1 1/4″): These specialized screws, when used with a pocket hole jig, create incredibly strong and concealed joints.
-
Brad Nails (1.25″): For securing the planter box components quickly and cleanly.
-
Wood Stain: I used Varathane Stain in Carrington for its rich brown hue and quick-drying properties. Choose a color that matches your outdoor decor.
-
Spar Varnish: Crucial for protecting your outdoor project from the elements. This type of varnish offers superior UV and moisture protection.
-
Optional: 3M Heavy Duty Mounting Tape: For rental-friendly hanging, or choose traditional screws/anchors for permanent installation.
Tools You’ll Need:
-
Miter Saw: I used my beloved Ridgid miter saw, which is always on my list of favorite tools for its precision and ease of use. If you don’t have a power miter saw, a small hand saw will also work for these cuts, albeit with a bit more manual effort.
-
Kreg Jig: An indispensable tool for creating strong pocket hole joints. I’ll elaborate more on this fantastic tool during the steps.
-
Drill: A cordless drill (like my Ryobi 18V One+ drill) is essential for driving screws and attaching the address numbers.
-
Brad Nailer: A Ryobi Airstrike Brad Nailer makes assembling the planter box quick and easy, but you could use a hammer and finish nails if a nailer isn’t available.
-
Orbital Sander or Corner Cat Sander: For smoothing edges and, if desired, distressing the wood. My Ryobi Corner Cat sander is a personal favorite for its lightweight design and effectiveness on corners and edges.
-
Measuring Tape, Pencil, Safety Glasses.
Step-by-Step Guide: Building Your DIY Address Number Planter
Step 1: Make Your Initial Cuts for the Back Panel
The foundation of our wall planter is the sturdy back panel. Begin by cutting your 5.5″ cedar fence picket. I cut mine into three equal pieces, each 18″ long. Precision here is key for a professional finish. I relied on my trusty Ridgid miter saw for perfectly straight cuts, a tool that truly streamlines any woodworking project. If you’re working with hand tools, take your time and use a speed square to ensure your lines are straight before cutting.
Step 2: Drill Pocket Holes for Strong Joints
Next, we’ll create the hidden strength of our planter using a Kreg Jig. I added 3/4″ pocket holes to two of the three boards you just cut. These holes allow screws to be driven in at an angle, creating incredibly strong and concealed joints. My new Kreg K5 model is a dream to work with, offering fantastic updates and features. However, I often mount my Kreg K4 to a larger board, keeping it handy for extra-long pieces that don’t quite fit on my workbench. Both models are exceptional, but the K5’s enhancements definitely make it my top pick for most projects.
At this stage, your cedar boards should resemble this, with the pocket holes ready for assembly.
Step 3: Assemble the Planked Back Panel
Now, let’s bring these pieces together to form the back panel of your planter. I used my Ryobi 18V One+ drill to effortlessly drive 1 1/4″ pocket hole screws through the pre-drilled pocket holes. Align the boards carefully, ensuring their edges are flush, before securing them. This method creates a very strong, stable, and seamless panel that will serve as the sturdy base for your planter and address numbers.
Once assembled, the back of your panel will look like this, with the pocket holes neatly creating a secure joint.
And the front will display a beautiful planked appearance, ready for the planter box and address numbers.
Step 4: Cut Pieces for the Planter Box
Now it’s time to create the planter box itself using your 1×4 cedar board. Accuracy is important for a tight-fitting box. I made four cuts for the planter:
-
1 piece at 10.5″ (This will be the bottom of your planter)
-
2 pieces at 3.5″ (These will be the side walls)
-
1 piece at 12″ (This will be the front face of your planter)
Before assembly, add 3/4″ pocket holes to one side of the 10.5″ bottom piece. These specific pocket holes will be used to attach the entire planter box securely to the planked back panel. When installed, these holes will face upwards and eventually be concealed by your plants, ensuring a clean look.
Step 5: Assemble the Planter Box
With your pieces cut and pocket holes drilled, attach the two 3.5″ side pieces to the 10.5″ bottom piece. For a durable and neat finish, I recommend using Gorilla wood glue along with 1.25″ brad nails. The glue provides superior bonding strength, while the brad nails hold the pieces in place securely as the glue dries. Ensure all edges are flush for a professional look.
Step 6: Attach the Planter Box to the Back Panel
Now, let’s combine the planter box with the planked back panel. I attached the assembled planter box to the back using a combination of wood glue and 1.25″ pocket hole screws, driven through those upward-facing pocket holes you made in the bottom piece. For this step, I didn’t use precise measurements; instead, I simply used the “old eyeball method” to center the planter box visually on the back panel. This allows for a bit of creative freedom and personal preference in placement.
At this point, your project should begin to truly take shape, looking much like this.
Step 7: Add the Front Board to the Planter Box
The final piece for the planter box is the 12″ board that forms its front. I used my Ryobi Airstrike Brad Nailer along with 1.25″ brad nails and wood glue to securely attach it. This step completes the planter box, giving it a finished look and providing the necessary depth for your chosen plants.
Your DIY address planter is now fully assembled and ready for the finishing touches!
Finishing Touches: Staining, Distressing, and Protection
Step 8: Stain for Rich Color and Character
To give our cedar planter a beautiful, rich appearance, I chose Varathane Stain from Home Depot in the color Carrington. This is consistently one of my favorite shades – I find it to be the richest brown available, offering deep warmth and elegance. A huge bonus is its quick-drying formula, which requires only one coat and dries in under an hour, making the finishing process incredibly efficient and rewarding! Apply it evenly following the wood grain for the best results.
Step 9: Optional – Distress for a Rustic “Shanty” Look
Once the stain had fully dried, I moved on to a completely optional but highly recommended step: distressing the wood. Using my Ryobi Corner Cat sander, I lightly sanded all the edges and corners. This tool is truly my absolute favorite for sanding; it’s lightweight, incredibly powerful, and shares the same battery as my drill, which is a huge convenience. Plus, at only $29 for the tool itself, it’s an unbeatable value! Distressing adds wonderful character, giving the piece a charming, rustic “shanty” feel that I adore. It subtly highlights the wood grain and softens the newness, making it look like it has a story to tell.
This step is all about personal preference and achieving that beautiful weathered aesthetic.
Step 10: Apply Spar Varnish for Outdoor Protection
Since this address number planter is destined for the outdoors, protecting it from the elements is paramount. I finished the entire piece with one coat of Spar Varnish. Spar varnish is specifically designed for outdoor use, offering excellent UV resistance and protection against moisture, which will prevent the wood from weathering prematurely and ensure your project remains beautiful for years to come.
Step 11: Attach Your Address Numbers
After the varnish had thoroughly dried, it was time to attach the metal address numbers. I found a great selection at my local Home Depot, offering various styles to match any home decor. Choose numbers that are easy to read from the street, ensuring your mail carrier and visitors can easily find your home.
Using my drill, I simply screwed the numbers directly into the wood. This quick step brings the whole project together, proudly displaying your home’s address.
Hanging Your DIY Address Planter and Adding Greenery
Step 12: Plant Your Succulents and Hang Your Planter
With the main construction complete, it’s time for the living elements! I picked up a selection of beautiful, low-maintenance succulents from Home Depot to fill the planter. When planting, remember to add a layer of gravel or small stones at the bottom for drainage, then fill with appropriate potting mix before adding your plants. Succulents thrive in well-draining soil and minimal watering.
For hanging, I used 3M heavy-duty mounting tape. It’s incredibly strong and has held my planter steady for weeks, proving to be an excellent solution, especially for renters who prefer not to drill holes. Depending on where you plan to install your planter and its weight once filled with plants and soil, you might opt for different hanging methods. For a more permanent fixture, consider using screws and wall anchors directly into your home’s siding or wall studs. Always ensure your chosen mounting method can safely support the full weight of the planter.
Here are a few more looks at the completed project:
Conclusion: Your New Favorite DIY Home Accent
And there you have it – a beautiful, functional, and personalized DIY Address Number Wall Planter! I absolutely love the welcoming touch it adds to our entryway, enhancing our home’s curb appeal with minimal effort. This project truly embodies my favorite kind of DIY: impactful results achieved in a surprisingly short amount of time. It took me just about 30 minutes to “throw together” the main structure, and the satisfaction of seeing it completed and adorned with vibrant greenery is immense.
Beyond personal use, wouldn’t this planter also make an incredible hostess gift or a thoughtful housewarming present for friends and family? It’s a unique, handmade item that adds warmth and character to any home.
I hope you feel inspired to tackle this project yourself! If you have any questions at all about the steps, tools, or materials, please don’t hesitate to ask in the comments below. Your feedback and queries are always welcome. I would be absolutely thrilled if you’d consider sharing and pinning this project with your friends and fellow DIY enthusiasts – let’s spread the joy of creating beautiful things for our homes!