
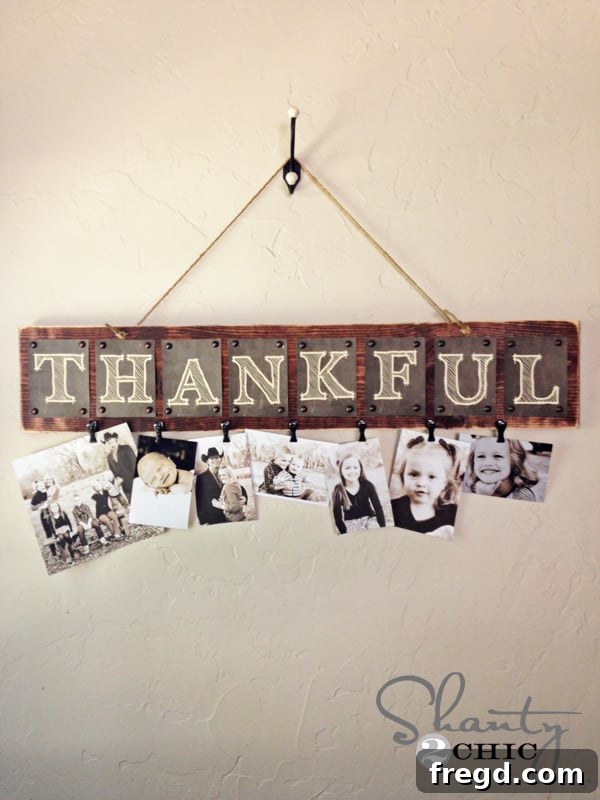
Craft Your Own Charming “Thankful” Photo Board: A DIY Guide to Personalized Home Decor
Hey creative spirits and home decor enthusiasts! If you’re anything like me, you understand the magic that photos bring to a living space. They’re not just snapshots; they’re memories, stories, and daily reminders of the joy in our lives. I firmly believe that photos are among the best decorations and most thoughtful gifts, capable of transforming any blank wall into a gallery of cherished moments.
Recently, I found myself staring at a rather empty stretch of wall in my hallway, longing to fill it with something meaningful and beautiful. My solution? A custom-made photo display board! This project combines rustic charm with heartfelt personalization, and I’m thrilled to share how it turned out. Get ready to add a touch of warmth and gratitude to your home with your very own “Thankful” photo board.
Why a DIY Thankful Photo Board?
This project isn’t just about crafting; it’s about celebrating life’s blessings. The word “thankful” resonated deeply with me, especially amidst the beautiful chaos of family life – my little one is currently navigating the world of potty training, and yes, even for those challenging yet precious moments, I find myself deeply thankful! Choosing this word serves as a constant, gentle reminder of all the good things, big and small, that fill our days.
Beyond personal reflection, this DIY photo board offers numerous advantages:
- Personalized Decor: Create a piece that truly reflects your style and family values.
- Budget-Friendly: Achieve a high-end look without breaking the bank, often for under $10!
- Meaningful Gift: It makes an incredibly thoughtful and unique gift for friends and family, perfect for holidays, birthdays, or housewarmings.
- Easy to Customize: Adapt the message, stain color, and clips to suit any decor theme or occasion.
- Display Flexibility: Easily swap out photos to keep your display fresh and current with new memories.
Getting Started: Your Step-by-Step Thankful Photo Board Project
I’ve done the heavy lifting for you, including creating free printable letters to simplify the process. Follow this detailed guide to create your own beautiful photo board!
Step 1: Gathering Your Materials and Tools
Before you begin, ensure you have all the necessary components. Most items can be found at your local hardware store, craft store, or even printed right at home.
- Wood Board: One 1×8 pine board (a 6-foot piece is usually enough to cut into two boards, making this project even more cost-effective).
- Wood Stain: Rust-Oleum Carrington Stain (or a stain of your choice to match your existing decor).
- Free Printable Letters: Provided in this tutorial (or design your own).
- Bronze Nail Heads: Small decorative tacks for attaching letters.
- Photo Clips: Vintage metal clips (Michaels, Hobby Lobby, or similar craft stores).
- Super Glue Gel: Gorilla Glue Super Glue Gel is highly recommended for strong adhesion.
- Twine: Thick, rustic twine (Hobby Lobby or craft supply store).
- Optional: Cardstock: Cream or white thin cardstock for printing letters.
Tools You’ll Need:
- Saw (if the hardware store doesn’t cut the board for you; a simple hand saw works).
- Paintbrush or rag for applying stain.
- Scissors for cutting letters.
- Hammer for nail heads.
- Drill with a suitable bit for twine holes.
Step 2: Preparing Your Free Printable Letters
This is where the personalization truly begins! I’ve made it incredibly simple to get the “THANKFUL” letters ready for your board. No design skills needed!
CLICK HERE to print letters T-N
CLICK HERE to print letters K-L
Simply click on each link above. A new browser window will open, and you can easily click “print” from your browser’s toolbar. I recommend printing these letters on cream thin cardstock for a lovely, subtle texture that enhances the rustic feel. White cardstock works beautifully too, offering a crisp contrast. For an extra touch of sophistication, photo paper can also be used, giving the letters a slight sheen and a more polished look. While your printer is busy bringing your letters to life, you can move on to preparing your wooden board.
Step 3: Crafting the Wooden Base
The foundation of your photo board is a sturdy piece of wood. I opted for a 1×8 pine board from the local hardware store. A 6-foot piece is quite affordable, usually around $7, and can be cut in half to yield two boards, making this project even more economical or giving you a spare for another creation! Don’t worry if you don’t own a power saw; most hardware stores offer cutting services, or a simple hand saw will do the trick just as easily at home.
Once your board is cut to size, it’s time to add some character with stain. I stained the entire board using Rust-Oleum Carrington Stain. This color has quickly become my absolute favorite for its rich, warm tones, and you’ll likely see me using it on many future projects! Apply the stain evenly with a brush or rag, wiping off any excess according to the product instructions. Allow the board to dry completely. Proper drying time is crucial for the stain to set and for the subsequent steps to adhere correctly.
Step 4: Attaching Your Personalized Message
While your stained wood board is drying, you can begin preparing your “THANKFUL” letters. Carefully cut out each letter from your printed sheets. Take your time to ensure clean edges, as this will contribute to the finished look of your board.
Once the wood board is fully dry, it’s time to attach your letters. For a rustic, handcrafted look, I used bronze nail heads. These small, decorative tacks are perfect for this project and can be found in the hardware section of most home improvement stores. Arrange your letters on the board to ensure even spacing and proper alignment before attaching them. Then, gently push each nail head into the wood a bit with your hand to hold the letter in place, and use a hammer to tap the rest in securely. This method provides a lovely textural element and firmly holds your message in place.
Step 5: Securing Your Photo Clips
Now for the fun part: adding the clips that will hold your precious photos! I discovered these adorable vintage metal clips at Michael’s, and they were the perfect complement to the rustic aesthetic of the board.
Many of these clips come with small red rubber tips on each end. While undeniably cute, they didn’t quite fit the color scheme I was going for. A quick peel removed them easily, allowing the natural metal finish to shine through. To attach the clips to the board, I used Gorilla Glue Super Glue Gel. This specific type of glue is excellent because its gel consistency prevents it from running, making for a cleaner application. You’ll only need a small drop for each clip. Apply the glue, then hold the clip firmly in place for about 30 seconds to allow it to bond securely. Space the clips evenly below your “THANKFUL” message, ensuring there’s enough room for various photo sizes.
Step 6: The Grand Finale – Hanging Your Masterpiece
Your photo board is almost complete! The final step is to prepare it for hanging. Using a drill, create two holes above the “H” and “U” of “THANKFUL.” These holes will be used to thread your twine for a sturdy and aesthetically pleasing hanging mechanism. I chose thick twine from Hobby Lobby, which adds to the rustic charm. Thread the twine through the front of each hole, tying a secure knot at the front to hold it in place. This creates a loop for hanging. All that’s left is to find the perfect spot on your wall, hang it from a hook, and clip on your favorite photos of your loved ones. Seeing those smiling faces displayed beautifully will bring a smile to your face every day!
Customization Ideas for Your Photo Board
While “THANKFUL” is a wonderful sentiment, this project is incredibly versatile. Here are a few ideas to inspire your next creation:
- Different Words: Instead of “THANKFUL,” consider words like “FAMILY,” “MEMORIES,” “LOVE,” “ADVENTURE,” or even a specific name or date.
- Seasonal Themes: Create boards for different seasons, using words like “HARVEST” for fall, “JOY” for winter, or “BLOOM” for spring, with corresponding seasonal photos.
- Color Schemes: Experiment with different stain colors for the wood, or even paint the board if you prefer a solid color. You could also print the letters on colored paper or use different colored nail heads.
- Gift Personalization: If making this as a gift, tailor the word or phrase to the recipient’s personality or a significant event, such as a wedding date or “OUR ADVENTURE” for a couple.
- Embellishments: Add small faux floral accents, ribbons, or other decorative elements to enhance the board’s appearance.
Why This Project is a Must-Try
This DIY Thankful Photo Board stands out as a project that delivers immense value for minimal effort and cost. It’s a testament to the fact that beautiful, personalized home decor doesn’t have to be expensive or complicated. In under $10, you can create a centerpiece that not only fills a blank space but also fills your heart with warmth every time you look at it. It’s a simple, rewarding craft that yields a stunning result, making it an ideal choice for both seasoned DIYers and beginners alike. Plus, the joy of displaying your most cherished memories in such a unique way is truly priceless.
Frequently Asked Questions (FAQ)
Q: Can I use different types of wood for the board?
A: Absolutely! Pine is inexpensive and easy to work with, but you could use oak, poplar, or even reclaimed wood for a unique look. Just ensure it’s smooth enough for staining and letter attachment.
Q: What if I don’t want to use nail heads for the letters?
A: You can use a strong adhesive like Mod Podge or spray adhesive to glue the letters directly onto the board. The nail heads add a rustic touch, but glue works perfectly fine for a smoother finish.
Q: How do I choose the right photos for the board?
A: Select photos that evoke happiness and gratitude. Mix candid shots with posed ones, and don’t be afraid to print them in black and white for a cohesive look or in vibrant colors to make them pop.
Q: Is this project suitable for beginners?
A: Yes! Each step is straightforward, and the materials are easy to handle. It’s a great entry-level woodworking and crafting project.
Here are a few more shots of the finished project, showcasing its charm and versatility:
Conclusion
I truly hope you love this “Thankful” photo board project as much as I do! It’s a simple, affordable, and deeply meaningful way to add personality and warmth to your home. Don’t hesitate to reach out if you have any questions at all about the steps or materials. Your feedback and creations inspire me!
If you enjoyed this tutorial and plan to create your own photo board, I would absolutely LOVE for you to share it with your friends and pin it to your favorite Pinterest boards. Spreading the joy of DIY is what it’s all about!
Also, mark your calendars! We have a really exciting announcement coming up this Wednesday, and I can’t wait to share the news with all of you! Stay tuned for more creative inspiration and fun projects.
~Whitney