
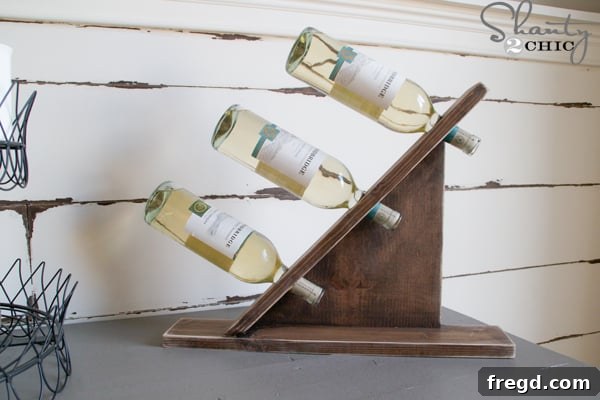
DIY Tabletop Wine Holder: A Rustic Charm for Your Holiday Decor & Gifting
Welcome to Day 9 of our annual 12 Days of Christmas Series! We’re thrilled to bring you another fantastic, easy-to-create DIY project that’s perfect for both festive home decor and thoughtful holiday gifting. Today, we’re diving into the world of woodworking to craft a stunning and practical tabletop wine holder that will impress any wine enthusiast.
While we’ve experimented with various hanging wine racks in the past, there’s something uniquely elegant and functional about a tabletop design. This DIY wooden wine bottle holder offers a sophisticated way to display your favorite vintages, making it an ideal centerpiece for holiday gatherings or a cherished present. The best part? It’s surprisingly simple to construct, even if you’re working with limited tools or materials. We primarily used reclaimed wood scraps for this project, keeping the cost incredibly low. But rest assured, even if you need to purchase new lumber, this project remains remarkably inexpensive, providing a high-end look without the hefty price tag.
Why Choose a DIY Tabletop Wine Holder?
Beyond the satisfaction of creating something with your own hands, a DIY tabletop wine holder offers numerous advantages:
- Customization: You have complete control over the finish, wood type, and even dimensions, ensuring it perfectly matches your home decor or the recipient’s style.
- Cost-Effective: As demonstrated, this project can be made almost entirely from scrap wood, significantly reducing expenses compared to store-bought alternatives.
- Unique Gift: A handmade item carries a special sentiment that mass-produced gifts simply can’t match. It shows thoughtfulness and effort, making it a truly memorable present.
- Functional Decor: It’s not just pretty; it serves a practical purpose, keeping wine bottles neatly organized and easily accessible.
- Skill Building: A project like this is excellent for honing basic woodworking skills, from precise cuts to joining techniques and finishing applications.
Tools and Materials You’ll Need
To embark on this rewarding project, gather the following tools and materials. Many of these are common in any DIY enthusiast’s workshop:
Materials:
- One 1×12 piece of wood (or similar dimensions for your center board)
- Two 1×4 pieces of wood (for the base and top bottle holder)
- Wood glue (optional, but recommended for extra strength)
- 1 1/4″ pocket hole screws
- Wood stain (Rust-Oleum Dark Walnut recommended, or your preferred color)
- Clean cloths (for applying stain and wiping excess)
- 80-grit sanding pad
Tools:
- Measuring tape and pencil
- Straight edge or ruler
- Jigsaw (an 18V cordless jigsaw is convenient for mobility)
- Drill/driver
- Kreg Jig (or similar pocket hole system)
- 1 3/8″ Forstner Bit (for drilling bottle-holding holes)
- Corner Cat Sander (or any orbital sander/sanding block)
- Safety glasses and hearing protection (always prioritize safety!)
Step-by-Step Guide to Crafting Your Elegant Wine Holder
Let’s get started on building this beautiful and functional wine holder. Follow these detailed steps for a smooth and enjoyable crafting experience.
1. Preparing Your Center Board
The core of your wine holder begins with a sturdy center piece. Take your 1×12 board and cut it to 11 1/4″ in length. This piece will form the main vertical support. Next, with your pencil and straight edge, mark a diagonal line from one corner to the opposite corner. This line will guide your cut to create two identical triangular pieces.
Using your jigsaw, carefully cut along this diagonal line. Take your time to ensure a clean, straight cut. This will result in two perfectly symmetrical triangle pieces. For this project, you’ll only need one of these triangles, but the other can be saved for a future DIY endeavor!
2. Preparing the Base and Top Pieces
Next, we’ll prepare the horizontal pieces that will form the base and the top bottle support. Cut two 1×4 boards to a length of 19 1/2″ each. These boards will provide stability and hold your wine bottles securely. For one of these 1×4 boards, you’ll need to cut one end at a 45-degree angle. This mitered cut will be where your wine bottles are cradled, adding both functionality and a touch of design.
Now you should have three main wooden components for your wine holder: one large triangle piece, one 1×4 board cut to 19 1/2″, and another 1×4 board also cut to 19 1/2″ but with one end mitered at 45 degrees. These pieces are the foundation of your project.
3. Drilling Pocket Holes for Strong Joints
Pocket hole joinery is fantastic for creating strong, hidden joints, giving your project a clean and professional look. Using your Kreg Jig, drill three 1 1/4″ pocket holes on the diagonal side of your triangle piece. Also, drill three pocket holes on one of the 90-degree sides of the triangle. These holes will be used to attach the triangle securely to the 1×4 boards, creating a robust structure for your wine holder.
Ensure your Kreg Jig is set correctly for your wood thickness to achieve optimal pocket hole depth and angle. The image above clearly illustrates the placement of these crucial pocket holes.
4. Creating the Bottle Slots
Now for the part that makes this a wine holder – the bottle slots! Grab your 1 3/8″ Forstner bit. Forstner bits create clean, flat-bottomed holes, which are perfect for cradling wine bottle necks. On the 1×4 board that has the mitered end, carefully drill three holes. Start from the mitered end and place your first hole at 4 1/2″ from the end. The subsequent holes should be drilled at 10 1/2″ and 16 1/2″ from the same mitered end. These precise measurements ensure proper spacing and balance for standard wine bottles.
Ensure the wood piece is securely clamped before drilling to prevent movement and ensure safety. Drill slowly and steadily to achieve clean, smooth holes without splintering the wood. A Forstner bit is specifically designed for such applications, providing a superior finish compared to standard drill bits for these types of holes.
5. Staining for a Perfect Finish
Before assembly, it’s often easier to stain all your individual pieces. For this project, we used one coat of Rust-Oleum Dark Walnut stain, which imparts a rich, deep hue that enhances the natural grain of the wood. To apply, simply wipe the stain onto all surfaces with a clean cloth. Allow the stain to penetrate for about 5 minutes, then use a fresh, clean cloth to gently wipe off any excess and blend the stain for an even finish. This technique creates a beautiful, rustic look that is both timeless and elegant. If you desire a lighter or darker shade, you can adjust the application time or apply additional coats.
Allow the stain to dry completely according to the manufacturer’s instructions before proceeding to assembly. This ensures a durable and beautiful finish that will last for years to come. For added protection and durability, especially if the wine holder will be frequently handled or exposed to moisture, consider applying a clear topcoat or sealant after the stain has fully cured.
6. Assembling Your Wine Holder
Now that your pieces are stained and dry, it’s time to bring them all together. Begin by attaching the triangle piece to one of the 1×4 boards (the one without the pre-drilled bottle holes). Position the triangle piece 3.5″ from one end of the 1×4, ensuring it is square and flush. Use 1 1/4″ pocket hole screws to secure the pieces together through the pre-drilled pocket holes on the triangle. Wood glue can be applied before screwing for an even stronger bond.
Next, attach the remaining 1×4 board (the one with the mitered end and bottle holes) to the other side of the triangle piece using the same method. Make sure to align it carefully. When properly assembled, the back of the triangle piece should be perfectly flush with one side of both 1×4 boards, creating a seamless and sturdy structure. This alignment is crucial for the stability and aesthetic appeal of your finished wine holder.
Double-check all connections to ensure they are tight and secure. Any wobbling at this stage should be addressed by tightening screws or, if necessary, adding more glue or screws. The flush alignment of the triangle piece with the 1x4s is a hallmark of a well-executed build, ensuring both strength and visual appeal.
7. Adding Character with Distressing
For that coveted rustic, aged look, distressing is the perfect final touch. Using an 80-grit pad on your Corner Cat Sander (or any orbital sander), gently rough up the edges and surfaces of your assembled wine holder. The 80-grit sandpaper creates noticeable imperfections and wear, simulating years of use and adding character. Focus on corners and edges where natural wear would occur. You can also lightly sand down some of the flat surfaces to reveal subtle undertones of the raw wood, creating an appealing contrast with the stain.
If you prefer a more dramatic distressed look, you can experiment with other techniques like using a hammer to create subtle dings, a wire brush to add texture, or even strategically scraping with a screwdriver. The key is to achieve a look that feels authentic and complements the rustic aesthetic of the dark walnut stain. Once distressed to your liking, wipe down the entire piece to remove any sanding dust.
Showcase Your Masterpiece!
And just like that, your beautiful DIY Tabletop Wine Holder is complete! All that’s left is to add your favorite bottles of wine, and it transforms into an instant showstopper. Whether gracing your dining table, kitchen counter, or a festive side table, this piece is sure to draw admiration. It’s not just a functional item; it’s a statement of handcrafted elegance.
Perfect for Gifting (or Keeping!)
While we initially made this rustic wine rack for ourselves to enjoy, the thought of its gifting potential is undeniable! It makes an exceptional present for a hostess, a wine connoisseur, or anyone who appreciates handmade, personalized items. Imagine presenting this beautiful piece filled with a few bottles of their favorite wine – it’s a gift that speaks volumes and offers lasting utility. If you have someone special in mind who would absolutely love a unique, custom-made wooden wine holder, now is the perfect time to craft one for them. It’s a project that brings joy in the making and in the giving.
Join the Holiday Crafting Journey
This tabletop wine holder is just one of many inspiring projects shared during our 12 Days of Christmas Series. Don’t forget to explore the creative contributions from our talented friends who have also shared their unique Day 9 projects. Their ideas offer a wealth of inspiration for your holiday crafting and decorating needs, from festive treats to charming home accents. Clicking through these links will open new tabs, allowing you to easily browse their wonderful creations and gather even more ideas for your festive season. Happy crafting!
Unlocking Your Woodworking Potential: Tools for DIY Success
While the original giveaway for a Kreg DIY Kit and K4 Master System has concluded, we still want to highlight the incredible value these tools bring to any woodworking enthusiast. These Kreg products are renowned for their ability to simplify joinery, making projects like this wine holder more accessible and enjoyable for DIYers of all skill levels. They empower you to create strong, professional-looking joints with ease, opening up a world of possibilities for future projects. If you’re looking to elevate your woodworking game, investing in quality tools like these is a fantastic step.
A Kreg DIY Kit is an excellent starting point for anyone interested in pocket hole joinery, providing the essentials needed for countless home improvement and crafting projects. For those looking for more versatility and advanced features, the Kreg K4 Master System offers a comprehensive solution, enabling you to tackle a wider range of woodworking challenges with precision and confidence.
We hope this detailed guide inspires you to create your own beautiful and functional tabletop wine holder. It’s a project that combines rustic charm with practical elegance, perfect for adding a personal touch to your home or gifting to someone special. Happy crafting!