
Hello, fellow DIY enthusiasts and friends! We are absolutely thrilled you’ve landed on our page today. If you’re passionate about transforming spaces and creating beautiful, functional items with your own hands, you’re in the right place. To stay updated with all our latest creative endeavors and innovative DIY projects, make sure to follow us closely on Instagram and Pinterest! We love sharing our journey and connecting with our amazing community there.
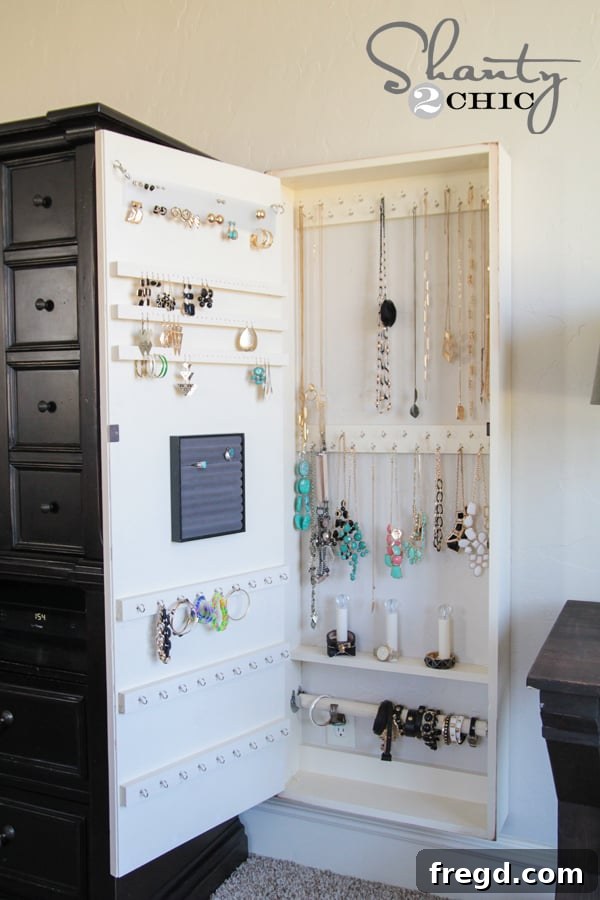
Today, we’re diving into a project that has truly exceeded all my expectations – I am beyond excited about how this custom DIY Jewelry Organizer turned out! This idea has been simmering in my mind for quite some time, even before I shared my popular DIY bathroom storage cabinet. I wanted to meticulously fine-tune every detail and perfect the design before I even picked up a single piece of wood. It was actually quite amusing to see how many of you, our wonderful readers, commented that the bathroom storage cabinet would make for fantastic jewelry storage. It just goes to show that great minds truly do think alike! This particular project, while echoing some of the design principles of its predecessor, is specifically tailored for jewelry. It’s smaller in size, incredibly compact, and engineered for maximum functionality, providing a dedicated home for all your precious accessories. Prepare to be amazed as you witness the stunning transformation and the incredible utility of my latest creation!
Unlock Elegance and Order with Your Own DIY Jewelry Organizer
Ahhh… every time I cast my eyes upon this DIY jewelry cabinet, it brings an instant smile to my face! There’s an undeniable satisfaction that comes from creating something both beautiful and incredibly functional with your own hands. This project is a testament to the power of DIY – not only does it provide a stylish solution for organizing all your cherished accessories, but it also frees up valuable space and adds a touch of bespoke elegance to any room. If you’re tired of tangled necklaces, missing earrings, and a cluttered dresser, then this custom jewelry storage solution is precisely what you need.
For those who enjoyed my DIY bathroom organizer from just over a week ago, you’ll find many similarities in the construction of this jewelry case. It’s designed to be a very approachable project, making it an ideal “beginner” build, especially if you’re just getting started with a Kreg Jig. There are no complicated angles or intricate joinery required, which means less frustration and more enjoyment throughout the building process. The key to a successful outcome here lies in two simple principles: selecting genuinely straight pieces of wood and meticulously measuring your cuts. Precision in these foundational steps will ensure that your finished cabinet looks professional and functions flawlessly. Let’s embark on this exciting building journey together!
Essential Materials: DIY Jewelry Organizer Supply List
Gathering your materials is the first crucial step towards building your dream jewelry organizer. Most of these items can be found at your local home improvement store or craft supply store. Remember, quality materials will result in a more durable and aesthetically pleasing finished product.
- 2 – 1 x 6 x 8 pine or white wood boards
- 2 – 1 x 4 x 8 pine or white wood boards
- 1 – 1 x 2 x 6 pine or white wood board
- 1 – 1 x 3 x 6 pine or white wood board
- Frameless Beveled mirror from Target ($14.99) (or a similar mirror measuring approximately 16″ x 52″)
- 1/4″ hardwood plywood piece cut 19″ by 55″ (Many hardware stores, like Home Depot, offer cutting services, which can save you time and hassle!)
- 3 – 1/8″ x 24″ bass wood strips (usually around $1 a piece at craft stores like Hobby Lobby)
- 1″ dowel (optional, for bracelet storage – adjust quantity based on your needs)
- 1.5″ dowel (optional, for additional bracelet storage – offers versatility)
- Closet rod hanger (optional, for bracelet storage – an ingenious solution for bulkier bracelets)
- Ring Tray (I found mine at Container Store for $12, but similar options are widely available online or at home organization stores)
For all the “bells and whistles” you see in my completed organizer, including the optional additions for enhanced functionality, my total material cost came in just under $100. This is a remarkable value for a custom piece of furniture that offers so much storage and organization. The beauty of DIY truly shines here, as you have the freedom to customize every aspect to perfectly fit your personal jewelry collection and aesthetic preferences. Whether you wear delicate necklaces, statement bracelets, or a multitude of earrings, you can adapt this design to suit your unique needs. That’s the real magic of building it yourself!
Building the Mirrored Door: Step-by-Step Guide
We’ll begin this exciting project by constructing the door for our jewelry case. This door will not only provide a secure closure but will also elegantly incorporate a full-length mirror, adding both functionality and aesthetic appeal to your space. For the door frame, I opted for 1×4 white wood boards due to their clean finish and ease of workability. Using my miter saw, I carefully cut these boards to the precise dimensions needed for the frame. Accuracy in these initial cuts is paramount for a perfectly square and sturdy door.
Next, I utilized my trusted Kreg Jig to create strong, concealed joints. Specifically, I used the K5 Kreg Jig model, which both Ash and I frequently rely on for our projects. If you’re on the fence about purchasing a pocket hole jig, I wholeheartedly recommend the K5. For those who already own an older model, consider adding the K5 to your wishlist; its numerous upgrades and enhanced features make it incredibly user-friendly and significantly speed up the building process. I drilled pocket holes into the ends of my shorter door frame pieces.
At this stage, your shorter board sections should be prepped and ready for assembly, featuring neatly drilled pocket holes. This preparation ensures a clean and strong connection when joining the frame pieces.
Using the specialized Kreg driver bit, which conveniently comes included with the Kreg Jig, I then proceeded to attach the shorter frame pieces to the longer vertical pieces. I secured these connections with 1.25″ pocket hole screws, ensuring a robust and lasting bond for the door frame. Applying a small amount of wood glue to the joints before screwing them together will further enhance the strength and durability of the frame, creating a truly solid structure.
Once all the sides were securely attached, the foundational frame for the door was complete. It should now resemble a sturdy, rectangular structure, ready for its backing and mirror. The integrity of this frame is crucial, as it will support both the plywood back and the mirror itself.
To finish the back of the door and provide a solid surface for mounting the mirror, I applied wood glue generously to the back of the assembled frame. I then carefully positioned the 1/4″ hardwood plywood piece on top, ensuring it was perfectly aligned with the frame edges. As mentioned in the supply list, this plywood piece was pre-cut to 19″ by 55″. Having Home Depot (or your preferred hardware store) handle these larger cuts is a fantastic time-saver and makes transportation much easier, saving you an extra step in your workshop.
To firmly attach the plywood backing to the door frame, I employed my truly amazing Ryobi Airstrike Stapler. This cordless 18-gauge stapler is an absolute game-changer, making quick work of fastening the wood with 3/4″ staples. If you haven’t experienced the freedom of a cordless stapler, I highly recommend reading the reviews – it’s a tool that consistently earns rave endorsements for its power and convenience!
With the plywood backing securely attached, I flipped the entire door frame over and proceeded to paint it. I chose a lovely cream color that perfectly matches the existing trim in my home, ensuring a cohesive and elegant look. Once the paint was thoroughly dry, it was time to attach the mirror. To ensure it had ample time to set and bond properly while I moved on to constructing the main case, I used a high-quality mirror adhesive. This adhesive typically comes in a standard caulk canister and is applied with a caulk gun. You can usually locate it in the mirror or hardware aisle of your local hardware store. I applied a thin, continuous bead of the adhesive to the back of the mirror, following the edges and adding a few strategic lines across the center for maximum adhesion, as shown.
After applying the adhesive, I carefully flipped the mirror over and gently placed it onto the painted door frame. To ensure it stayed perfectly in place and allowed the adhesive to cure undisturbed, I used painter’s tape to secure the mirror temporarily to the wood frame. This step is crucial for preventing any slippage and guaranteeing a flush, professional finish.
Constructing the Main Jewelry Case
With the mirrored door patiently setting aside, it’s time to move on to the heart of our project: the main case for the jewelry organizer! Just like with the door, I started by precisely cutting all my wood pieces. For the robust frame of the case, I opted for the 1×6 boards, which provide ample depth for various storage configurations. Accurate measurements and clean cuts are essential for a perfectly square and stable cabinet.
Once again, my reliable Kreg Jig came into play. I drilled pocket holes into each of the smaller pieces that would form the ends of the case. During the assembly process, I found my Kreg right-angle clamp to be an indispensable tool. If you own a Kreg Jig, seriously consider adding this clamp to your toolkit. It acts like an extra set of hands, holding your pieces together perfectly square while you drive in the screws, making assembly significantly easier and more accurate.
For this section of the build, I used 1.25″ pocket hole screws to ensure strong and secure joints. Applying wood glue to the mating surfaces before driving the screws will further enhance the structural integrity of your case, creating a piece that will last for years to come.
With the main frame of the case fully assembled and robust, I then integrated the top and bottom 1×4 pieces. These are crucial components, as they will serve as the primary attachment points for mounting your finished jewelry organizer securely to the wall. Each of these pieces was cut to 19.25″ in length. You can clearly see in the image where I strategically drilled pocket holes, allowing me to firmly attach these bracing pieces to the main case structure. This thoughtful design ensures that your cabinet will be safely and stably anchored, capable of holding the weight of your entire jewelry collection.
Customizing Your Interior: Jewelry Storage Solutions
Now for the truly exciting part – personalizing the interior of your DIY jewelry organizer! This is where you can let your creativity shine and tailor the storage to your specific collection. I’ll walk you through how I configured mine, but remember, the options are truly endless, and the beauty of DIY is crafting a piece that perfectly suits your individual needs. We all have different types and amounts of jewelry, so embrace the opportunity to customize!
Being a dedicated bracelet enthusiast, I knew my organizer needed ample space for these accessories. I incorporated three dowels in the middle of the case, perfect for easily accessing bracelets I wear on a regular basis. Creating this specific shelf is straightforward. I started with a 1×3 board cut to 19.25″. First, I added pocket holes to the bottom of the shelf, which will be used to attach it to the main case. Next, I precisely cut holes for the dowels using a 1″ Forstner bit. If you don’t have one, Ryobi offers an excellent and affordable set of these bits, which are incredibly handy for precise, flat-bottomed holes. The unique tip of a Forstner bit ensures a clean, accurate cut.
To use the Forstner bit, simply mark a small dot where you intend each dowel to be placed. Before engaging the drill, gently push the bit’s pointed tip onto the marked dot, allowing it to create a precise starting point. These specialized bits are fantastic because they produce a perfectly circular hole with a clean, flat bottom surface, which is ideal for seating your dowels securely – very cool indeed!
Once the holes were drilled, I added a dab of wood glue into each opening before inserting my dowels. Each of my dowel pieces was cut to 4.5″ in length, providing ample space for bracelets without protruding too far. The wood glue ensures a permanent and sturdy fixture for the dowels.
After securing all the dowels, I attached this completed shelf to the main cabinet frame. Utilizing the pocket holes I drilled earlier, I fastened it securely from the bottom of the board with 1 1/4″ pocket hole screws, ensuring a clean and hidden attachment.
For dedicated necklace storage, I incorporated another piece of 1×4 wood into the cabinet, positioning it 18″ below the top 1×4 brace piece. This strategic placement creates an ideal area for hanging necklaces of varying lengths. Once all these internal components were securely in place, I gave the entire case a thorough coat of paint, matching the cream color of the door, and allowed it to dry completely.
The Door’s Interior: Smart Storage Solutions
While the main case was drying, I turned my attention to maximizing the storage potential on the interior of the door. I began by attaching three 1×2 pieces, each cut to 18″ long, evenly spaced across the door’s surface. I used wood glue for added strength and then secured them with my Ryobi nailer. A crucial tip here: ONLY nail at the very ends of each board where they meet the 1×4 frame, and avoid nailing in the middle section where your mirror is located, unless you’re prepared to purchase a new mirror! (Trust me on that one! 😉) Before attaching any hooks, I painted all these boards to match the rest of the organizer.
To efficiently attach all the cup hooks for necklaces and bracelets, I relied on this incredibly handy driver bit from Ryobi. This small tool is super affordable and remarkably clever. It saved me an immense amount of time and effort in twisting in all those eye hooks by hand. It’s officially called an eye and hook bolt driver, and you can easily find it at Home Depot. It’s a must-have for any project involving multiple hooks.
For dedicated ring storage, I used a specialized ring holder tray that I discovered at the Container Store. To secure it firmly and permanently to the center of the door’s interior, I used a strong epoxy adhesive. This ensures your rings are always neatly displayed and easily accessible.
To create effective storage for my dangle earrings, I utilized bass wood strips, each cut to 18″. These lightweight yet sturdy strips, which I sourced from Hobby Lobby, are perfect for this application. Bass wood is easy to work with and provides a clean finish.
Using a small drill bit, I meticulously drilled holes every 1/2″ along the length of each bass wood strip. This precise spacing allows for individual hanging of dangle earrings, preventing tangles and making it easy to see your entire collection at a glance.
To create a slight offset and allow dangle earrings to hang freely without hitting the mirror or other parts of the door, I cut six pieces of 1×2 wood, each 1″ long, to act as spacers beneath the bass wood strips. These small blocks provide just enough clearance.
Finally, I used my reliable Ryobi nail gun to attach these bass wood strips, supported by their 1×2 spacers, to the interior of the door. This method creates elegant and functional rows for all your dangle earrings.
After these were securely attached, I gave them a fresh coat of paint to match the door’s interior, ensuring a seamless and polished look. These specialized holders are perfect for organizing and displaying all my beautiful dangle earrings.
I wanted some truly serious function for my stud and post earrings. My initial plans for organizing these smaller, often finicky pieces were, unfortunately, a big fail. So, I pivoted and decided to use quilter’s template plastic instead – a stroke of genius, if I do say so myself! I found a sheet of this versatile plastic at Hobby Lobby for about $2. With a small hole punch, I meticulously created holes every 1/2″ across the plastic sheet. To hang it, I drilled a slightly larger hole in each top corner and then suspended it from small cup hooks using metal rings. While it might not be the most “beautiful” aesthetic solution, I absolutely LOVE its function. It works perfectly, allowing me to easily store my studs without any annoyance. I can lift it up effortlessly to browse my collection and see through it when I’m fumbling to put the backs on my earrings. It truly works like a charm, baby!
Turning back to the main case, I also added cup hooks to both the top and middle 1×4 brace pieces. The hooks on the top brace are ideal for gracefully holding my longer necklaces, preventing them from tangling. The hooks on the lower brace are perfectly spaced for shorter necklaces. I intentionally staggered mine in height and spaced them approximately every inch, creating an organized cascade of beautiful jewelry that’s easy to access and admire.
I was absolutely charmed by Beckie’s brilliant idea of adding decorative knobs to dowels, which infuses a little extra cuteness and personal flair into the functionality. Inspired by her creativity, I found these perfect knobs at Home Depot and added them to my dowels, elevating the aesthetic of my bracelet storage.
For my collection of bulkier bracelets, I devised another clever solution: a simple closet rod holder from Home Depot, paired with a 1.5″ dowel. I merely attached the rod holder securely within the case and then strung my bracelets onto the dowel. This method is fantastic for displaying and accessing a larger quantity of bracelets, and I absolutely LOVE how it turned out, combining practicality with a neat display.
Final Touches and Installation
Whew… that just about covers every detailed aspect of assembling and customizing this incredible DIY jewelry organizer! Now, with all the internal components in place and perfectly tailored to your needs, it’s time to bring this masterpiece to its final home on your wall. The method for hanging this jewelry cabinet is exactly the same robust and secure process I utilized for my DIY Bathroom Storage Cabinet. For a comprehensive, step-by-step guide on how to safely and securely mount your new organizer, please be sure to check out that detailed post HERE. It covers everything from finding studs in your wall to using appropriate anchors, ensuring your beautiful creation remains firmly in place for years to come. Remember, proper installation is key to both the safety and long-term enjoyment of your DIY project!
Here are a few final shots showcasing this magnificent project in action, filled with all my cherished accessories and bringing an unprecedented level of order to my routine!
Your Clutter-Free & Stylish Jewelry Solution Awaits!
So, what do you think? I am absolutely head over heels in love with this DIY Jewelry Organizer! This project has proven to be an absolute game-changer, packed with incredible functionality and smart storage solutions. Not only does it keep all my precious jewelry beautifully organized and easily accessible, but it also brilliantly recaptured a significant amount of valuable space in my closet that was previously lost to clutter. I truly hope you love it as much as I do and feel inspired to create your own personalized storage haven.
If this project has sparked your creativity, I would be absolutely thrilled for you to share it and pin it with all your friends and fellow DIY enthusiasts! Spreading the word helps our community grow and inspires more people to tackle their own home improvement challenges. Thank you so very much for stopping by, reading through our guide, and being a part of our creative journey. Happy building!
~Whitney