
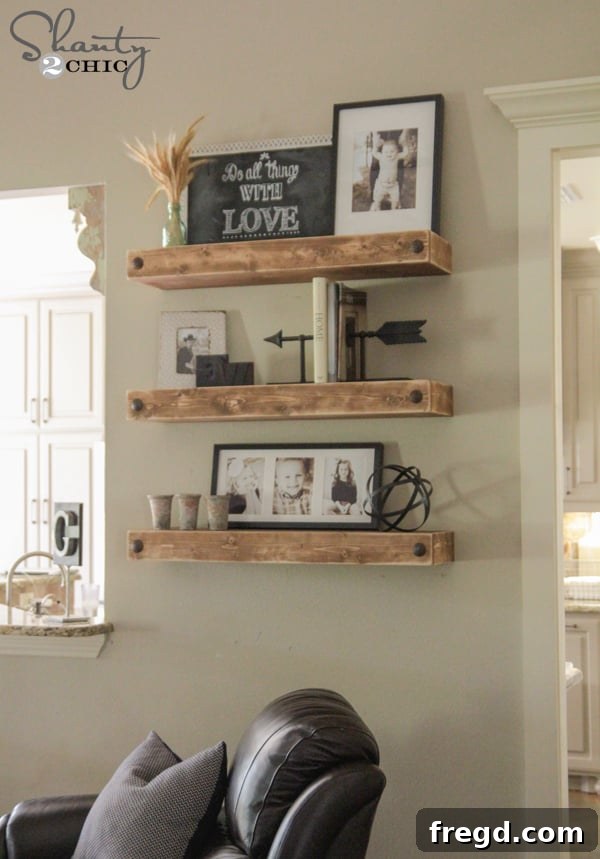
Welcome, fellow DIY enthusiasts! If you’re anything like us, you appreciate the transformative power of floating shelves in any living space. We’ve explored various floating shelf designs before; in fact, I previously shared my bathroom floating shelf project, and Ashley showcased her stunning living room floating shelves. These projects are always a hit, adding both style and functionality to a room. Today, we’re diving into a new, simplified build perfect for anyone looking to elevate their home decor with a touch of DIY charm.
My living room has long called for some practical yet stylish wall storage, inspiring me to create this set of custom floating shelves. These aren’t just any shelves; they are designed for maximum visual impact and ease of construction, making them an ideal weekend project for DIYers of all skill levels. The unique design adds fantastic height and character to the room, creating an eye-catching focal point that feels both modern and warm.
I absolutely adore how these turned out! The added vertical interest truly transforms the space. For this project, I intentionally streamlined the construction process compared to my previous floating shelf tutorials, aiming for a build that is quicker, simpler, and just as robust. My goal was to make this DIY accessible to everyone, from seasoned woodworkers to those just starting their crafting journey. You’ll be amazed at how easily these come together.
Below, I’ll guide you through every step of this rewarding project, from cutting your lumber to adding those final, distinctive touches. To make things even easier, you can also download a FREE set of printable plans by clicking HERE or using the button below. These detailed plans include all the measurements and instructions you’ll need to replicate these beautiful shelves in your own home.
Watch Our Floating Shelf Building Guide!
For a visual walkthrough of the entire process, be sure to check out our comprehensive How to Build a Floating Shelf Video HERE!
Essential Tools and Materials for Your Floating Shelves
Before we begin, gathering all your tools and materials is key to a smooth and efficient build. Here’s a comprehensive list of what you’ll need to create three stunning floating shelves:
Lumber and Wood Products:
- (3) 2×3 boards, 8 feet long: These will form the robust internal framework of your shelves, providing crucial support.
- (1) 4×8 sheet of 1/4″ PureBond Hardwood Plywood: We chose PureBond for its beautiful grain, which takes stain exceptionally well, and its eco-friendly, formaldehyde-free composition. This will be used for the top and bottom surfaces of your shelves.
- (2) 1×2 whitewood boards, 8 feet long: Inexpensive and wonderfully versatile, whitewood will be used for the decorative front and side trim, offering a charming rustic finish when stained.
Fasteners and Adhesives:
- 1.5″ Pocket Hole Screws: Essential for strong, concealed joints in your shelf frames.
- 2.5″ Pocket Hole Screws: For securely attaching the inner supports to the main frame.
- 3″ Torx Screws (or equivalent wood screws): For mounting the shelf frames directly into wall studs, ensuring maximum stability.
- 1.25″ Brad Nails: For attaching the plywood surfaces and whitewood trim with minimal visible holes.
- Gorilla Wood Glue: A powerful adhesive that significantly enhances the strength and durability of all wood joints.
Tools:
- Miter Saw or Circular Saw: For precise and clean cuts on all your lumber. A miter saw is ideal for the 2x3s, while a circular saw with a guide (like a Kreg Rip-Cut) works perfectly for plywood.
- Kreg Jig (K5 recommended): Indispensable for creating strong and hidden pocket hole joints.
- Ryobi Drill/Driver: A versatile tool for pre-drilling holes and driving screws.
- Ryobi Impact Driver: Highly recommended for driving long screws into wall studs with minimal effort and maximum torque.
- Ryobi AirStrike Brad Nailer: For fast and efficient attachment of plywood and trim with brad nails.
- Kreg Right Angle Clamp: A fantastic tool for holding pieces securely at a 90-degree angle while assembling pocket hole joints.
- Stud Finder (Ryobi Phone Works Stud Sensor recommended): Crucial for locating wall studs, ensuring your shelves are mounted securely.
- Level: Absolutely essential for ensuring your shelves are perfectly straight on the wall.
- Tape Measure: For accurate measurements of all your cuts.
- Pencil: For marking cuts and stud locations.
- Safety Glasses and Ear Protection: Always prioritize safety when working with power tools.
- Corner Cat Sander and/or JobPlus Sander: For distressing and smoothing surfaces, especially when aiming for a rustic finish.
- Rubber Mallet: For installing decorative clavos.
Finishing Supplies:
- 3M Painter’s Tape: To protect your walls during the staining process.
- Varathane Wood Stain (your preferred color): For beautifying and protecting your wood.
- Stain Applicator (rag, brush, or foam applicator): For even stain application.
- Optional: Clavos or decorative nails: For an authentic, rustic touch.
Step-by-Step Guide: Building Your DIY Floating Shelves
Part 1: Constructing the Shelf Frames (The “Giant E’s”)
The core strength of your floating shelves comes from their internal 2×3 lumber frames. These frames, which my four-year-old adorably dubbed “giant E’s,” are what you’ll securely fasten to your wall.
First, I began by cutting down the 2×3 boards. For each shelf, you’ll need one longer piece that serves as the main wall-mounted backbone, and three shorter support pieces that project outwards. I cut three pieces of 2×3 at 32.5 inches for the main wall anchors. Then, I cut nine pieces of 2×3 at 8 inches each. These 8-inch pieces will create the internal structure that supports the shelf’s depth. Remember, each individual shelf will require three of these smaller, 8-inch pieces. Precise cuts here are vital for a clean, stable frame.
Next, to create incredibly strong and hidden joints, I used my trusted Kreg Jig (a K5 model, to be precise) and my Ryobi drill to bore 1.5-inch pocket holes into one end of each of the nine smaller, 8-inch boards. Pocket holes are game-changers in woodworking, allowing screws to be driven at an angle, creating a very secure joint without visible fasteners on the exterior of your finished piece.
After creating the pocket holes, this is how all the individual components looked before assembly – a collection of precisely cut and prepared wood pieces, ready to be joined into a sturdy shelf frame.
To enhance the structural integrity of each joint, I applied a small, consistent bead of Gorilla Wood Glue onto the 32.5-inch boards where the shorter, pocket-holed pieces would be attached. Wood glue, when combined with screws, creates a bond that is often stronger than the wood itself, ensuring your shelves can handle substantial weight.
For flawless assembly, I utilized my incredibly useful Kreg Right Angle Clamp to hold the smaller pieces firmly in place against the longer boards. This clamp is truly a lifesaver, perfectly fitting into the pocket hole to ensure everything stays aligned while you drive in the first 2.5-inch pocket hole screw. Its ability to secure joints at a perfect 90-degree angle makes this step astonishingly easy and precise.
Part 2: Securely Mounting the Frames to Your Wall
Once your “giant E” frames are robustly constructed, the next critical step is to securely attach them to the wall. Proper wall mounting is paramount for safety and stability, especially for floating shelves that will bear weight.
I began by carefully positioning one of my shelf frames where I envisioned it on the wall. The absolute key here is to locate the wall studs. Studs are the vertical wooden supports within your walls, providing solid anchor points for screws. I highly recommend using a stud finder to accurately pinpoint these. For this project, I used Ryobi’s innovative Phone Works Stud Sensor. This remarkable device, part of the affordable Phone Works line, connects directly to your smartphone, offering an incredibly precise and user-friendly way to find studs. You can explore it further HERE at Home Depot. After locating the studs, I marked their exact positions directly onto my shelf boards.
Before driving the screws, I used my Ryobi Drill with a small drill bit to pre-drill holes through the shelf board at each marked stud location. Pre-drilling is a crucial step that prevents the wood from splitting, ensuring a cleaner and stronger attachment point. It also makes driving the screws much easier, especially into dense wall studs.
When it came to attaching the frames to the wall, I reached for my Ryobi Impact Driver. While a standard drill can get the job done, an impact driver offers unparalleled ease and power for driving long screws into studs. It requires almost no effort on your part, efficiently sinking screws with impressive torque. To simplify the process of holding the frame against the wall, I lightly started each 3-inch screw into its pre-drilled hole before lifting the entire assembly into position.
I used 3-inch Torx screws for their superior gripping power and reduced cam-out, but standard wood screws of the same length will also work perfectly. As you drive each screw into the wall studs, continuously check the frame with a level. This ensures that your floating shelves are perfectly straight and aesthetically pleasing. Once all screws are driven, your “giant E” frames are robustly mounted and ready for the next phase of construction!
And just like that, you’ll have three sturdy “giant E’s” securely affixed to your wall. These form the hidden backbone of your floating shelves, promising exceptional support and durability for years to come.
Now for the exciting part – covering these frameworks to reveal the beautiful, clean lines of a true floating shelf!
Part 3: Enclosing the Frames with Plywood
To create the seamless top and bottom surfaces of these floating shelves, I selected PureBond Hardwood Plywood from Home Depot. This product is a personal favorite due to its exceptional quality and the stunning depth it achieves when stained, providing a rich, finished look. PureBond plywood is also a responsible choice, being formaldehyde-free.
I meticulously ripped my plywood boards down to size using my Kreg Rip-Cut guide attached to a circular saw, which ensures straight and accurate cuts. However, if you don’t have the tools or prefer to save a step, a convenient option is to have the knowledgeable staff at Home Depot cut these pieces for you. This not only makes transportation easier but also means less work for you once you get home! For this stage, you’ll need to cut your plywood into specific dimensions to cap the top and bottom of your shelf frames. Refer to your printable plans for exact measurements. The image below illustrates the essential cuts required for this part of the project.
Once all the necessary plywood pieces were precisely cut, they were ready to be installed. This is how they looked, carefully prepared to form the outer shell of our elegant floating shelves.
I started by attaching the bottom plywood pieces to the shelf frames. Using my Ryobi AirStrike brad nailer loaded with 1.25-inch brad nails, I securely fastened the plywood along the edges and into the internal 2×3 supports. The brad nailer makes quick work of this, creating almost invisible holes that are easily filled later, contributing to the seamless “floating” appearance.
With the bottom pieces firmly in place, you can already start to see the shape of your floating shelf taking form. The internal frame is now neatly enclosed, and the structure is solid.
Next, I repeated the exact same process for the top plywood pieces. Align them carefully over the frame and secure them with 1.25-inch brad nails, ensuring they are flush with the bottom pieces and the wall. This step completes the basic enclosure of your shelf, giving it its solid, box-like form.
After attaching both the top and bottom plywood panels, all three of your shelf structures should now resemble neat, sturdy boxes wrapped around the wall-mounted frames. This is a significant milestone in the build, as the shelves are now fully formed and ready for their aesthetic enhancements.
Part 4: Adding Trim for a Polished Finish
Now comes the stage where we add the finishing touches that truly make these shelves “float” and provide a refined, rustic look. For this part, I opted for inexpensive whitewood. Its appealing price point is a huge plus, and I particularly love how it unevenly takes stain, contributing to a wonderfully authentic, distressed appearance that complements various decor styles.
I started by precisely cutting the side trim pieces. These pieces will cap the exposed ends of the plywood, creating a seamless, robust edge. Measure each side carefully to ensure a snug fit.
Before attaching the trim, I applied a generous line of wood glue to the edge of each piece. This adhesive bond is critical for preventing gaps over time and ensures the trim is permanently secured, making the shelf feel like a single, solid unit.
With the glue applied, I used my brad nailer to attach the side trim pieces with 1.25-inch brad nails. Once the sides were secure, I cut the longer front trim pieces to span the entire length of each shelf. Again, I added wood glue along the outer edge of these front pieces before carefully attaching them. This final layer of trim hides all raw plywood edges, encapsulating the internal structure and creating that unmistakable thick, substantial look characteristic of floating shelves.
I used the same 1.25-inch brad nails for attaching the front trim, spacing them appropriately to ensure a strong hold. Be sure to wipe away any excess wood glue that squeezes out to ensure a clean surface for staining.
And with the trim successfully installed, your floating shelves are structurally complete and ready for the exciting finishing stages!
Part 5: Adding the Perfect Finish and Distressing for Character
With the construction complete, it’s time to bring out the true beauty of your floating shelves with a custom finish. This is where you can really infuse your personal style into the project!
Before applying any finish, I meticulously used 3M painter’s tape to mask off the wall around each shelf. This crucial step prevents accidental drips or smudges, ensuring your walls remain pristine while you work on the shelves. A clean edge makes all the difference in a professional-looking finish.
For the stain, I chose Varathane wood stain from Home Depot, opting for one of our absolute favorite colors. Varathane stains are known for their rich pigmentation and quick drying times. Apply your chosen stain evenly, following the wood grain, and allow it to penetrate the wood for a beautiful, deep hue. The beauty of this process is seeing the natural wood tones emerge, especially with the unique way the whitewood trim accepts the stain.
After allowing the stain to dry for a mere hour (yes, just an hour!), I moved on to the distressing phase. My goal was to give these shelves an authentic, well-loved, and rustic appearance, as if they’d been part of the home for decades. I accomplished this by using my Corner Cat sander and my JobPlus sander to strategically rough up the edges and surfaces. Don’t be afraid to experiment with your sanding technique – the idea is to create natural-looking wear and tear, highlighting the contours and corners of the shelves. This step truly gives them character and a unique story.
My final, delightful step was to incorporate some charming decorative elements. I found these incredible clavos (ornamental nail heads) that add an extra touch of rustic elegance. Using a rubber mallet, I carefully attached these to the front trim of each shelf. These small details make a big impact, enhancing the “shanty-chic” aesthetic and tying the whole look together. You can find similar clavos to complement your shelves HERE on Amazon! They provide a fantastic contrast against the distressed wood, adding character and a handcrafted feel.
The Grand Reveal: Your Transformed Space!
And there you have it – the finished floating shelves, all beautifully styled and ready to enhance your living room! What do you think of this transformation?
I sincerely hope you love these DIY floating shelves as much as I do! It’s truly incredible what a substantial impact a project costing under $50 can have on a room’s aesthetic and functionality. Yes, you read that right – this entire set of shelves came in at under $50, making it an incredibly budget-friendly way to achieve high-end style. You simply can’t beat that value for custom, handmade home decor!
These shelves are more than just storage; they’re a statement piece, a testament to what you can achieve with a little effort and the right guidance. They provide the perfect canvas for displaying cherished photos, favorite books, plants, or decorative accents, allowing you to personalize your space even further. The rustic charm combined with their practical utility makes them an invaluable addition to any home.
We would be absolutely thrilled if you would share this tutorial and PIN these beautiful floating shelves to inspire others! Your support helps us continue to create and share these exciting DIY projects. Thank you so much for stopping by and taking the time to follow along with this build. If you have any questions at all about the process, materials, or anything else, please don’t hesitate to ask in the comments below. We’re always here to help you make your DIY dreams a reality!
Happy building!
~Whitney