
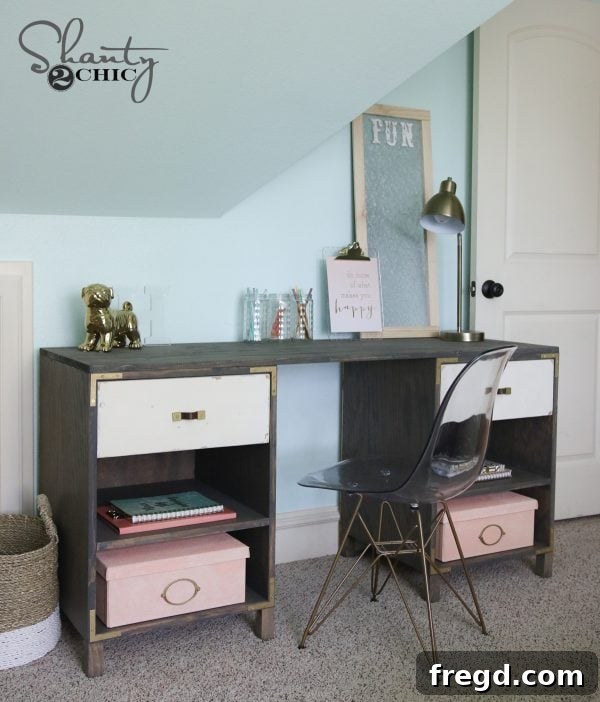
Hey friends! Mark your calendars for an exciting event! Catch the next two episodes of our show, Open Concept on HGTV, airing Sunday, June 12th at 11:00 AM and 11:30 AM CST. We’re thrilled to bring you inspiring home transformations, and today, we’re diving into a project that’s close to our hearts: an amazing DIY Cubby Storage Desk we crafted specifically for our children.
There’s a special joy in designing and building custom pieces for my teenage daughters. I adore the creative freedom of decorating their spaces with touches of pink, adding charming gold accents, and bringing their unique personalities to life. This particular build was a delightful undertaking for my second-to-oldest daughter. Just a few weeks ago, I shared the plans for a platform bed I built for her. Now, as part of a complete room revamp, this custom cubby storage desk was the next essential item on our project list. The outcome surpassed all expectations, perfectly blending style and functionality. Take a look at her fantastic new DIY Cubby Storage Desk!
Building Your Dream Workspace: The DIY Cubby Storage Desk
Isn’t it absolutely adorable? I believe its timeless design will gracefully grow with her for many years to come – or at least until I get a new creative itch and decide to build her something new! This project is surprisingly straightforward, making it an excellent choice for DIY enthusiasts of all skill levels. If you’ve never tackled drawer slides before, this desk offers a perfect opportunity to learn this valuable woodworking technique. Below, I’ll walk you through the entire build process step-by-step. For even more detailed instructions and cut lists, you can easily download and print the FREE PLANS by clicking HERE or the button below!
Why Build a DIY Cubby Storage Desk?
There are countless reasons to embark on a DIY furniture project, especially when it comes to creating functional pieces like a storage desk. First and foremost, a DIY desk allows for unparalleled **customization**. You can tailor the dimensions, cubby sizes, and overall aesthetic to perfectly fit your space and match your existing decor, something mass-produced furniture rarely offers. Secondly, it’s incredibly **cost-effective**. Building your own desk often comes in at a fraction of the price of purchasing a comparable quality piece from a retail store. Beyond the practical benefits, there’s immense satisfaction and **personal pride** in crafting something with your own hands. It’s a unique piece imbued with effort and love, designed to meet specific needs like a student’s study area, a craft space, or a home office. This particular design with its integrated cubbies and drawers provides excellent **organizational solutions**, helping to keep clutter at bay and maintain a tidy workspace. It’s also a fantastic project for **developing or honing woodworking skills**, introducing you to techniques like pocket-hole joinery and drawer slide installation.
Gathering Your Materials and Making Initial Cuts
The foundational step for this cubby storage desk involves constructing the sturdy boxes that will form each side of the unit. We used high-quality hardwood plywood for this, specifically Purebond Plywood, which we sourced from Home Depot. These come in large 4′ x 8′ sheets, and a valuable tip for anyone without a truck or large vehicle is to have the friendly staff at Home Depot cut the sheets down into more manageable sizes for easier transportation. This saves you time and effort when you get home.
For a bit more detail on the initial cuts, our plans illustrate the specific dimensions. It’s helpful to visualize the cuts before you start. For this project, I had the Home Depot staff rip two pieces to 19.5″ each. A “rip cut” refers to a cut that runs the length of the board, parallel to the wood grain. This yielded two 19.5″ x 96″ pieces and a leftover scrap piece. Once these larger pieces were home, I used my miter saw to make all the smaller, precise cross-cuts needed for the individual components of the cubby boxes.
Mastering Pocket Hole Joinery with Kreg Jigs
Once all your cuts for the cubby boxes are precisely made, it’s time for pocket hole joinery. This technique is a game-changer in DIY furniture building, creating incredibly strong and discreet joints. We are huge fans of Kreg Jigs, and you might already be familiar with their versatility. If you’re new to woodworking, deciding which Kreg Jig to start with can feel a bit overwhelming. Rest assured, Ash and I have used various models over the years, and you truly can’t go wrong with any of them. However, if you anticipate building more than just one piece of furniture, we highly recommend investing in the Kreg K5. It’s incredibly user-friendly and robust, making your projects much more efficient. For this specific desk, I actually utilized my Kreg Foreman – and let me tell you, this tool is a serious workhorse. If you find yourself consistently making numerous pocket holes and tackling many furniture builds, the Kreg Foreman should absolutely be at the top of your “must-buy right now” list. It significantly speeds up the process, allowing you to crank out almost a pocket hole a second if you maintain a good rhythm. Simply plug it in, place your wood, and pull down the handle.
Think of it as a Kreg Jig on steroids – it dramatically increases efficiency for high-volume projects. After creating your pocket holes, the top, bottom, and shelf pieces of your cubby boxes will be ready for assembly, looking something like this:
Assembling the Cubby Boxes
With the pocket holes ready, the next step is to assemble the cubby boxes. To ensure precise and square assembly, I always start by drawing out my lines on the longer side pieces using a speed square. This simple tool is the fastest and most accurate way to get perfectly straight and square lines, guiding your placement for the inner shelves and dividers. Once the lines are marked, I apply a thin, even line of wood glue where the shorter pieces will meet the longer boards. Wood glue adds significant strength and durability to your joints, making the finished piece much more robust. Then, using my trusty Ryobi 18V drill and 1.25″ pocket hole screws, I securely attached the shorter shelf and divider pieces to the longer side boards. This methodical approach ensures a strong, square, and professional-looking box structure. Once assembled, each completed cubby box will look like this:
Adding a Refined Touch with Custom Screen Molding
The next crucial step to elevate the desk’s appearance is to add screen molding to the front edges of the side pieces. This thin, typically 3/4″ wide molding serves a dual purpose: it elegantly covers the raw, exposed edges of the plywood, providing a clean, finished look, and it adds a decorative trim that enhances the overall aesthetic. While standard screen molding is readily available, I often find it comes with a slightly rounded edge, which didn’t quite fit the crisp, modern design I envisioned for this desk. So, I decided to take a DIY approach and create my own custom molding! If you have access to a table saw, this is an incredibly simple and cost-effective technique you can master in minutes. I took a 1x10x6 pine board and ran it through my table saw multiple times, carefully shaving off 1/4″ strips with each pass. These perfectly straight-edged pieces then became my custom screen molding – easy peasy and exactly the profile I wanted!
To achieve a seamless, framed look, you’ll need to use your miter saw to cut precise 45-degree angles on the ends of the top, bottom, and side pieces of your screen molding. This creates perfect corners when assembled. Once all the molding pieces are cut, apply a continuous line of wood glue to the front edges of each cubby box. This glue will provide a strong, lasting bond. Then, using my Ryobi 18-gauge brad nailer, I attached the screen molding with 3/4″ brad nails. Remember that the piece covering the shelf will be a straight cut, not mitered, to fit flush against the side molding. The result is a beautifully finished, professional-looking edge that truly transforms the desk.
And here it is, all prettied up and ready for the next stage!
Constructing and Installing the Drawers
Next up are the drawers, a critical component for the desk’s storage capacity. Precision is absolutely key here, so make sure to measure diligently as you go. A crucial rule of thumb for smooth-operating drawers is to ensure the total width of your drawer box is exactly 1 inch less than the width of the opening it will slide into. For instance, if your desk opening measures 18 1/4″ wide, the assembled drawer box should have a total width of 17 1/4″. This 1-inch allowance accounts for the drawer slides and ensures a proper fit.
I used 1×6 pine boards to create the drawer boxes. When selecting your lumber, it’s incredibly important to choose good, straight boards without significant bows or twists. This will directly impact how smoothly and properly your drawers function. After making all my necessary cuts according to the plans, I added 3/4″ pocket holes to the ends of all my short pieces. These pocket holes, combined with a line of wood glue and 1.25″ pocket hole screws, were then used to firmly attach the short boards to the longer boards, forming a sturdy rectangular drawer box. After the box was assembled, I used my Ryobi 18-gauge stapler to attach a 1/4″ hardwood plywood bottom to each drawer, providing a solid base before moving on to the slides.
This formed my drawer box, robust and ready for its slides!
For the drawer slides, consistent placement is key. I measured 6.5″ from the bottom edge of the top piece of plywood within the cubby and used a speed square to draw a precise, level line on the inside of the boxes. This line served as my guide for aligning the drawer slides. I attached the fixed part of the drawer slides to the desk’s interior first using my drill and the provided screws. The corresponding slides, which attach to the drawers themselves, align directly with the edge where your drawer front will sit, ensuring a flush and functional fit. This meticulous installation ensures smooth operation and a professional finish for your drawers.
The back of the bottom of the drawer looked like this, ready for action:
Attaching the Desk Feet and Final Assembly
Adding the feet is next, providing stability and a lifted aesthetic to the desk. These were crafted from simple 2×2 pieces cut from a standard pine 2×2 board. To ensure strong and hidden attachments, I used my K5 Kreg Jig to create 3/4″ pocket holes on each foot. These feet were then securely attached to the bottom of the cubby units using 1″ pocket hole screws and a dollop of wood glue under each for extra reinforcement. While I unfortunately missed snapping a photo of this particular step, the general appearance is similar to the image provided, though I made a conscious choice to orient the back legs so that the pocket holes would be completely hidden from view once the desk was in place. This small detail ensures a cleaner, more professional finish.
Time to finish her off!
Before bringing the desk pieces upstairs for final assembly, I also attached the 1/4″ hardwood plywood to the back of the cubby units using staples. This back panel adds significant rigidity to the structure and gives the desk a complete, finished look from all angles. For the final assembly, rather than moving a heavy, fully assembled desk, I attached everything in her room to make transportation up the stairs much easier. I used 1″ wood screws through the top of each side cubby unit and into the main desk top panel. I deliberately chose not to use wood glue for this part of the assembly. This provides the flexibility to easily disassemble the desk in the future if we decide to move it or reconfigure her room, without causing damage.
The Art of Finishing: Stains, Paints, and Hardware
The finishing touches are where this DIY Cubby Storage Desk truly comes to life. For the main wood sections, I applied one of my absolute favorite stain combinations. I love to mix equal parts of Varathane Ash and Varathane Weathered Grey wood stains. This blend creates a beautifully subtle, sophisticated hue that complements a wide range of decor styles. I find that cheap plastic containers from Home Depot are perfect for mixing these stains evenly. The application process is simple: brush the mixed stain on, allow it to penetrate for a few minutes, and then wipe off the excess with a clean rag. This technique allows the natural wood grain to show through while imparting a rich, custom color.
For the drawer fronts, I opted for Rust-Oleum Heirloom White spray paint, which provides a lovely, soft, off-white finish. To add a charming, slightly distressed look, I employed our popular “vaseline distressing” tip underneath the paint. This technique involves lightly applying petroleum jelly to areas where you want the paint to rub off easily, creating an authentically aged appearance. Finally, the desk was completed with some ridiculously cute cabinet pulls that I found at Target, adding a touch of personality and charm.
Here it is, all finished up and ready for my daughter’s room!
Styling and Decorating Your New Custom Desk
Beyond the build, styling the desk and its surroundings is just as important in creating a functional and inspiring space. For the decorative gold corners, I sourced these charming pieces from Home Depot. Upon closer inspection, their original finish was a bit off from the exact shade I desired, so I easily rectified this by dabbing on some Martha Stewart craft paint to achieve a more cohesive and perfect match. Small details like this can make a big difference in a custom project.
The overall ambiance of her room is enhanced by the wall color, which is Embellished Blue by Sherwin-Williams, providing a serene backdrop for the desk. The stylish and comfortable chair is from Industry West, and a chic lamp from Target illuminates her workspace. For additional organized storage within the cubbies, I utilized affordable Ikea baskets, which I customized with some Martha Stewart craft paint to inject splashes of vibrant color, perfectly complementing the room’s palette. These elements combine to create a cohesive, inviting, and highly functional study or craft area for a teenage girl.
Ready to Build Your Own?
That should cover just about everything you need to know to embark on your very own DIY Cubby Storage Desk project! This desk is not just a piece of furniture; it’s a testament to personalized design, practical storage, and the satisfaction of building something truly unique. We hope this comprehensive guide inspires you to pick up your tools and create a custom workspace that perfectly fits your needs and style. Don’t forget to download the free plans for detailed instructions and measurements. Please don’t hesitate to reach out if you have any questions at all, and thank you so much for stopping by our blog! Happy building!