
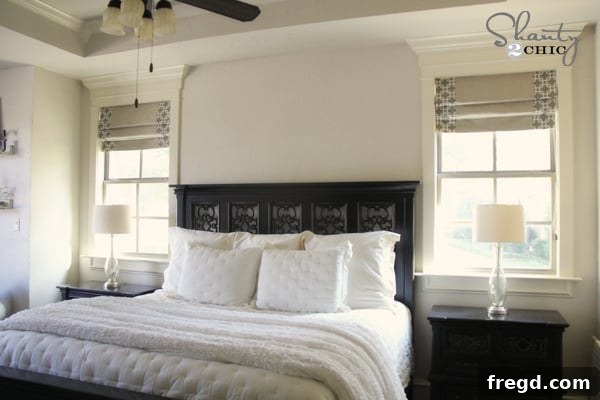
Transform Your Bedroom: DIY Roman Shades and Lined Window Panels
Hey friends!
It’s truly wonderful to connect with you all again. Your incredible support, kind comments, and enthusiastic shares on my recently unveiled farmhouse-style bedroom desk have been nothing short of inspiring! Reading your feedback is always a highlight for us, and it fuels our passion for sharing more DIY adventures. As you might have guessed from that last project, I’ve been completely immersed in the exciting process of redecorating my bedroom from top to bottom. Today, I’m absolutely thrilled to pull back the curtains – quite literally! – and share the latest additions to this cozy sanctuary: my brand new, handmade roman shades and coordinating window panels.
Window treatments are more than just functional necessities; they are pivotal design elements that can dramatically alter the mood and aesthetic of any room. For my bedroom, I envisioned a space that felt both serene and stylish, blending traditional comfort with a touch of modern sophistication. DIY window treatments were the perfect solution to achieve a custom look without breaking the bank, allowing me to carefully select fabrics that spoke to my personal style and provided the functionality I needed. This project was a delightful journey into creating bespoke pieces that truly enhance the overall ambiance of my newly refreshed bedroom.
The Art of Personalization: Crafting Custom Roman Shades
While I’ve guided you through the process of making both roman shades and window panels in previous tutorials, this time around, I added a subtle yet impactful twist to achieve a truly unique look. The fundamental steps remained consistent, leveraging the robust techniques I’ve refined over time, but I introduced a modification by incorporating two distinct fabrics. This layering approach allowed for a deeper exploration of texture and pattern, adding visual interest and a bespoke touch that store-bought options simply can’t replicate. It’s these small, thoughtful details that elevate a DIY project from good to absolutely stunning.
If you’re eager to dive into creating your own elegant window treatments, you’ll find my comprehensive DIY Roman Shade Tutorial HERE. This guide is designed to be incredibly straightforward, breaking down each step to ensure even novice sewers can create beautiful, fully functional roman shades. I can personally attest to their durability and ease of use; the roman shades I’ve made using this method have graced my windows for years, operating smoothly every single day and maintaining their charm. This project is a testament to how simple straight stitches can yield professional-looking results that stand the test of time.
Selecting the Perfect Fabrics: A Journey from Discovery to Savings
The foundation of any successful fabric project lies in the choice of materials. My quest for the perfect fabrics began serendipitously at a local Joann’s store, where I first laid eyes on the stunning textiles that would eventually adorn my windows. However, ever the savvy DIYer, I knew the importance of exploring all options. A quick online search led me to Fabric.com, a treasure trove of textiles where I was able to secure the exact same fabrics at a significantly lower price point – a fantastic saving that made the project even more rewarding! The convenience of online shopping, coupled with their incredibly fast, free shipping, meant my chosen fabrics arrived at my doorstep within three days. Woohoo indeed!
For the primary fabric of my roman shades, I chose a gorgeous Robert Allen linen duck fabric. This material perfectly embodies the sophisticated, textured look of traditional linen, but without the common drawback of excessive wrinkling. It offers an elegant drape and a wonderfully tactile surface that instantly elevates the feel of the room. Moreover, its substantial weight – notably thicker than typical linen – makes it an ideal choice for window treatments, providing excellent structure and durability. This fabric creates a classic, timeless base that grounds the overall design of the shades, contributing to a serene and inviting atmosphere.
To complement the understated elegance of the linen duck, I selected an accent fabric known as Premier Prints Gotcha Summerland Grey. This delightful print introduces a fresh, modern geometric pattern that beautifully contrasts with the traditional linen. The interplay between the classic texture and the contemporary design creates a dynamic visual interest, striking a perfect balance that truly reflects my personal aesthetic. This combination feels both fresh and enduring, injecting personality into the bedroom while maintaining a sophisticated appeal. It’s this thoughtful mix of styles that truly brings the entire design together.
The Secret to Ultimate Comfort: Blackout Lining
Beyond aesthetics, functionality was paramount, especially for a bedroom. To ensure optimal light control and privacy, I opted to use a high-quality blackout liner for both my roman shades and window panels. This simple addition has been a game-changer; with all window treatments closed, my bedroom transforms into a wonderfully dark, secluded retreat, perfect for undisturbed sleep or a cozy midday nap. Blackout liners are also fantastic for energy efficiency, helping to insulate the room against both heat and cold. I managed to find mine on sale at Joann’s for an incredible price – around $2 a yard – proving that high-impact upgrades don’t have to come with a hefty price tag. It’s a small investment that yields significant comfort and practical benefits.
To achieve the distinctive two-fabric design on my roman shades, I simply added a 7-inch strip of the accent fabric to each side before embarking on the main construction of the shade. This technique creates a beautiful border that frames the primary fabric, offering a sophisticated, custom-tailored appearance with minimal effort. It’s a super simple modification that yields maximum visual impact, making the shades look far more intricate than they actually were to create. This small detail truly makes the shades pop!
Here are a few pictures showcasing the beautiful outcome of my DIY roman shades:
Completing the Look: Custom Lined Window Panels
To achieve a harmonized and layered window treatment, I also crafted matching window panels. These panels not only add a rich, flowing softness to the room but also provide additional insulation and light control, working in tandem with the roman shades. For this project, I once again leveraged my trusted Lined Window Panel Tutorial, which you can access HERE. This tutorial provides clear, step-by-step instructions for creating beautiful, professional-looking panels, ensuring that your windows are dressed to impress.
Both the roman shades and the window panels were surprisingly simple to construct, relying primarily on straight stitches. This makes them incredibly approachable for anyone with basic sewing machine skills, or even those looking to practice and improve. There’s a profound satisfaction that comes from creating something so beautiful and functional with your own hands. If your sewing machine has been gathering dust, now might be the perfect moment to brush it off and embark on a rewarding DIY home decor project! The impact on your space – and your sense of accomplishment – will be immense.
Here are a few pictures offering a closer look at my newly installed window panels:
A Fully Transformed Bedroom Oasis
The completion of these window treatments truly signifies the culmination of my bedroom redecoration project. The harmonious blend of the DIY farmhouse desk, the custom roman shades, and the elegant window panels has transformed the space into a cohesive and inviting oasis. Every element, from the sturdy, rustic desk to the soft, layered window coverings, works in concert to create an atmosphere of relaxed sophistication and personalized comfort. The mix of the traditional linen duck and the modern geometric print, combined with the practical benefits of the blackout liner, has resulted in a bedroom that is not only beautiful to behold but also incredibly functional and restorative.
This entire process, while requiring dedication and effort, has been incredibly rewarding. Stepping into my bedroom now feels like entering a space truly tailored to my tastes and needs – a testament to the power of DIY. The ability to select every fabric, customize every detail, and build pieces with my own hands has infused the room with a unique character and warmth that could never be achieved with off-the-shelf items. It’s a space where comfort meets style, and where every corner tells a story of creative endeavor and personal touch.
And a few more glimpses from around the bedroom, showing the full effect:
Your DIY Journey Starts Here
I sincerely hope you love the finished look of my bedroom as much as I do! It has undeniably been a labor of love, requiring time and effort, but the end result is profoundly satisfying and absolutely worth every moment. There’s an unmatched sense of pride and comfort in knowing that every detail, from the desk to the window treatments, was crafted with intention and personal touch. This project stands as a testament to the fact that with a little creativity and willingness to learn, you can achieve stunning, high-quality home decor that perfectly suits your style and needs.
Thank you so much for taking the time to stop by and share in my latest DIY endeavor. Your readership and enthusiasm mean the world! If you’re considering tackling similar projects, or if any part of this tutorial sparked a question, please don’t hesitate to reach out in the comments below. I’m always happy to share tips, insights, and encourage fellow DIY enthusiasts. Now, who’s ready to dust off their sewing machine and add some personalized charm to their own home?
~Whitney