
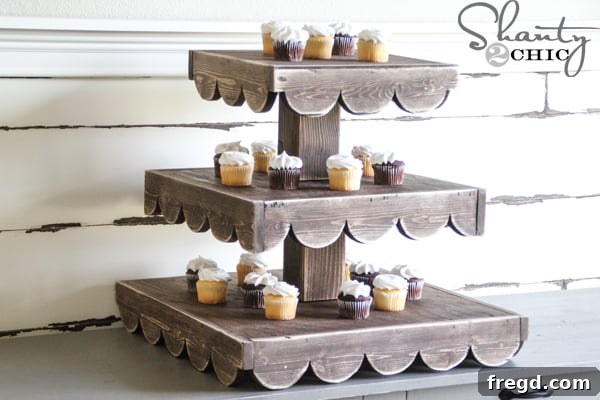
Build Your Own Stunning DIY Cupcake Stand: The Perfect Party Centerpiece
Are you ready to elevate your party hosting game and impress your guests with a unique, handmade creation? Look no further! Today, we’re diving into an incredibly fun and rewarding project: crafting your very own DIY cupcake stand. This versatile piece isn’t just a simple dessert display; it’s a statement, a customizable centerpiece that brings a touch of personalized charm to any event. Whether you’re planning a birthday bash, an elegant wedding reception, a casual get-together, or a festive holiday celebration, a homemade cupcake tower offers unparalleled style and functionality.
Gone are the days of drab, store-bought displays that lack personality. Imagine a beautiful, multi-tiered stand, perfectly matching your party theme, proudly showcasing your delicious cupcakes or other treats. This project is not only satisfying to build but also an excellent way to add a bespoke element to your decor without breaking the bank. We absolutely love hosting parties, and we’ve found that this project perfectly encapsulates our desire for unique, stylish, and practical party solutions. Plus, its timeless design means it’s fantastic year-round!
Why Choose a DIY Cupcake Stand for Your Next Event?
Opting to build your own cupcake stand comes with a multitude of benefits that extend far beyond simply having a place to put your desserts. It’s about creativity, economy, and making a lasting impression.
- Unleash Your Creativity: A DIY project offers endless possibilities for customization. You choose the materials, colors, and finishes to perfectly complement your event’s theme and aesthetic. From rustic farmhouse chic to sleek modern elegance, your stand can be truly unique.
- Cost-Effective Solution: Pre-made cupcake stands, especially those of good quality, can be surprisingly expensive. Building your own often allows you to achieve a high-end look at a fraction of the cost, making it a smart choice for budget-conscious planners.
- Impress Your Guests: There’s something inherently charming and impressive about homemade decor. Guests will appreciate the effort and personal touch you’ve put into creating such a beautiful display, often sparking conversations and admiration.
- Versatility Beyond Cupcakes: While designed for cupcakes, this stand is incredibly versatile. Use it to display mini appetizers, delicate pastries, fresh fruit, party favors, or even small gifts. It transforms into whatever you need it to be!
- A Sense of Accomplishment: There’s immense satisfaction in looking at something you’ve built with your own hands. This project is not overly complex, making it perfect for both seasoned DIY enthusiasts and beginners looking for a rewarding craft.
- Durable and Reusable: Unlike many disposable party supplies, a well-built DIY cupcake stand can be used again and again for countless future celebrations, making it an eco-friendly choice.
Planning Your DIY Cupcake Stand Project
Before you even pick up a tool, a little planning goes a long way. Thinking through the design, materials, and necessary tools will ensure a smooth and enjoyable building experience.
Choosing Your Materials: The Foundation of Your Stand
While various materials can be used for a DIY cupcake stand (cardboard, PVC, acrylic), for a durable, beautiful, and customizable piece like the one pictured, wood is an excellent choice. It offers stability, a classic aesthetic, and is easy to work with. Common wood types like pine or poplar are great for beginners due to their affordability and ease of cutting and finishing. Consider the thickness and type of wood based on the size and number of tiers you envision for your homemade dessert display.
Design Considerations: Tiers, Height, and Stability
The beauty of a multi-tiered cupcake stand lies in its visual appeal and ability to display many treats. Think about:
- Number of Tiers: How many cupcakes do you need to display? Most stands feature 2, 3, or even 4 tiers.
- Tier Sizes: Each tier should be progressively smaller than the one below it to create a pleasing conical shape. Ensure enough space for cupcakes on each level.
- Height Between Tiers: Allow ample vertical space for cupcakes, especially if they have elaborate frosting or toppers. Approximately 4-6 inches is usually ideal.
- Overall Stability: This is crucial! The base should be wide and sturdy enough to support the weight of all tiers and cupcakes without wobbling.
- Aesthetics: Will your stand be rustic, modern, whimsical, or elegant? Let this guide your material selection and finishing choices.
Essential Tools You’ll Need
For a basic wooden cupcake stand, you won’t need an elaborate workshop. Here’s a list of common tools that will be useful:
- Measuring Tape and Pencil: For accurate marking.
- Saw: A miter saw, circular saw, or even a handsaw can work for cutting wood to size. A jigsaw is great for cutting circular tiers.
- Drill: For creating pilot holes and assembling parts.
- Sander or Sandpaper: To smooth edges and prepare the wood for finishing.
- Wood Glue: For strong, lasting joints.
- Clamps: To hold pieces securely while glue dries.
- Safety Glasses and Gloves: Always prioritize safety!
Safety First!
Whenever you’re working with power tools, always wear appropriate safety gear, including safety glasses to protect your eyes. Read your tool manuals, understand how to operate them safely, and always work in a well-ventilated area.
Building Your Rustic Elegance Cupcake Stand: A General Overview
While detailed step-by-step instructions are best found in dedicated plans (which we’ll link to shortly!), here’s a general idea of the building process for a multi-tiered wooden cupcake stand:
- Measure and Cut: Start by accurately measuring and cutting your wood pieces. This typically involves cutting circular or square tiers for the display levels and dowel rods or square posts for the supports between tiers.
- Sand and Smooth: Once cut, thoroughly sand all wood pieces. Pay special attention to edges and any rough spots to ensure a smooth, splinter-free finish. This also prepares the wood for painting or staining.
- Assemble the Base: Securely attach the largest tier to a stable base. This is often the most critical step for overall stability.
- Attach Supports: Using wood glue and possibly screws (countersunk for a clean finish), attach the vertical support pieces (dowels or posts) to the center of each tier.
- Stack and Secure Tiers: Carefully stack the tiers, ensuring each support piece is securely attached to the tier above and below it. Use glue for permanent assembly. For added strength, you can use a long threaded rod running through the center of all tiers, secured with nuts.
- Apply Finish: Once the glue has fully dried and the stand is stable, apply your chosen finish. This could be paint, wood stain, or a clear protective sealant. Allow ample drying time according between coats and before use.
For detailed, easy-to-follow instructions, including precise measurements and cutting lists, we’re thrilled to offer you comprehensive plans absolutely FREE!
You can get the FREE Printable Plans HERE!
Making It Your Own: Customization Ideas for Your Cupcake Tower
This is where your DIY cupcake stand truly shines! Personalization allows you to tailor it perfectly to any celebration.
- Paint and Stain Options:
- Classic White or Cream: Elegant and timeless, perfect for weddings or sophisticated parties.
- Bold Colors: Match your party’s theme with vibrant hues – think pastel for baby showers or bright primary colors for a child’s birthday.
- Wood Stain: For a rustic, natural look, choose a dark walnut, light oak, or distressed grey stain.
- Metallic Finishes: Gold, silver, or rose gold spray paint can add a touch of glamor and luxury.
- Decorative Embellishments:
- Ribbons and Lace: Wrap ribbons around the edges of tiers or posts for a soft, decorative touch.
- Fairy Lights: Small battery-operated LED fairy lights woven around the tiers create a magical glow.
- Flowers and Greenery: Artificial or fresh flowers can be strategically placed between tiers for a natural, elegant look.
- Themed Accents: Add mini banners, glitter, stencils, or small figurines to fit specific themes (e.g., snowflakes for winter, seashells for a beach party).
- Beyond Cupcakes: Don’t limit your creativity to just cupcakes. This stand can beautifully display:
- Mini desserts like macarons, cake pops, and cookies.
- Savory appetizers or finger foods.
- Small party favors for guests.
- Decorative elements like candles or small vases.
Showcasing Your Masterpiece: Styling Tips for Your Dessert Table
Once your DIY cupcake stand is complete and adorned, the final step is to arrange it beautifully on your dessert table. Presentation is key!
- Arranging Cupcakes:
- Start from the bottom tier and work your way up, placing cupcakes evenly.
- Consider alternating cupcake flavors or frosting colors for visual interest.
- Leave a little space between cupcakes for easy grabbing and to prevent squishing frosting.
- Complementary Decor:
- Surround the base of your stand with complementary decor like platters of cookies, bowls of candy, or decorative tablecloths.
- Use varying heights on your dessert table to create dynamic visual appeal – consider adding smaller stands or risers for other treats.
- Lighting:
- Ensure good lighting over your dessert table to highlight your beautiful display. Natural light is best, but subtle spotlights or fairy lights can also enhance the ambiance.
Maintenance and Care for Your DIY Cupcake Stand
To ensure your homemade cupcake stand lasts for many celebrations to come, proper care is essential. After each use, wipe down the stand with a damp cloth to remove any food residue. Avoid harsh chemicals that could damage the finish. If your stand is painted, be mindful of scratching. Store it in a dry, safe place where it won’t be easily knocked over or damaged.
Start Building Your Dream Party Centerpiece Today!
We hope this guide has inspired you to embark on your own DIY cupcake stand project. It’s more than just a functional item; it’s a canvas for your creativity and a testament to your personal style. Imagine the delight on your guests’ faces when they see your beautifully crafted, custom-made dessert display. With our free printable plans, achieving this stunning party piece is easier than you think!
So, gather your tools, unleash your inner craftsman, and get ready to build something truly special. Download the plans, and let the building begin. We can’t wait to see what you create!
Happy Building!