
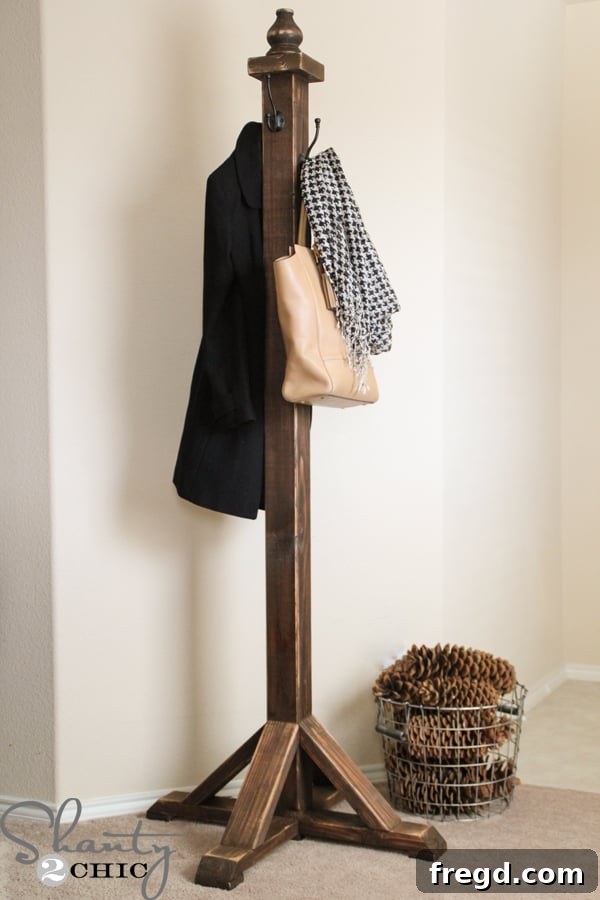
DIY Rustic Wooden Coat Rack: A Simple & Stylish Entryway Solution for Your Home
Welcome to Day 12 of our exciting “12 Days of Christmas” series! As the festive season approaches, with less than two weeks until Christmas, we’re thrilled to share our final project with you. We hope you’ve been following along with all the creative ideas on Instagram and Facebook, getting inspired to add a handmade touch to your holiday preparations and home decor.
Today, we’re showcasing a project we absolutely adore, and it holds a special place in our hearts because it was inspired by a thoughtful request from one of our amazing readers, Juanita. We put a lot of love into this one, and we sincerely hope it lives up to her expectations!
Why a DIY Coat Rack is a Must-Have for Your Home
With the holiday season comes a flurry of guests, and as winter settles in, so do bulky coats, scarves, and hats. What better way to welcome friends and family into your home than with a charming, functional, and easily accessible spot for them to hang their outerwear? A freestanding coat rack is not just a practical solution for entryway organization; it’s also a statement piece that can enhance your home’s aesthetic.
Inspired by the need for both style and utility, we embarked on creating this handsome wooden coat rack. The best part? This project is incredibly budget-friendly, costing approximately $30 in materials, and it’s surprisingly quick and easy to build. Whether you’re a seasoned DIY enthusiast or just starting your woodworking journey, this project is perfect for adding a touch of rustic elegance and much-needed organization to your space. Say goodbye to piles of coats on chairs and hello to a beautifully organized entryway!
Essential Materials for Your DIY Coat Rack
Before diving into the construction, gathering your materials is key. We’ve streamlined the list to ensure this project remains accessible and affordable. Here’s everything you’ll need to bring this functional piece of furniture to life:
- 1 piece of 4×4 wood @ 8ft.: This will serve as the main vertical post of your coat rack, providing the core structure.
- 1 piece of 2×4 wood @ 10ft.: From this, you’ll cut the angled legs and sturdy braces that support the main post.
- 1 furniture foot: This decorative element will be the finial at the very top, adding a touch of sophisticated charm.
- 1 scrap piece of 2×6 (approx. 5 1/2″): Used to create the square top platform where the furniture foot will be mounted.
- 1 scrap piece of 1×3 (approx. 16″): These smaller pieces will form the base feet of the legs, providing additional stability.
- 4 pretty hooks: Choose hooks that complement your home’s decor, as these will be the functional hangers for coats and accessories.
Step-by-Step Construction Guide: Building Your Sturdy Coat Rack
1. Preparing the Main Post
The foundation of your freestanding coat rack begins with the central vertical support. We meticulously cut our 8-foot 4×4 post down to a precise length of 6 feet. This measurement offers an ideal height for hanging various types of coats and jackets, ensuring they don’t drag on the floor while maintaining the overall stability and aesthetic balance of the finished piece. Always double-check your measurements before making any cuts to ensure accuracy.
Safety First! As with any woodworking project, personal safety is paramount. Before operating any power tools, always ensure you’re wearing appropriate protective gear. Eye protection, such as safety glasses or goggles, shields your eyes from flying debris, while a dust mask or respirator protects your lungs from sawdust. Taking these precautions, like Whit demonstrates with her 3M™ Safety Products, makes for a safer and more enjoyable DIY experience. Never compromise on safety!
2. Crafting the Sturdy Base: Legs and Feet
The stability of your coat rack heavily relies on its legs. From the 10-foot 2×4, we carefully cut four identical leg pieces. Each piece was cut at a 45-degree angle, with the measurement taken from the straight edge to the long point, measuring 13 1/2 inches. This specific angle and length provide the necessary spread and balance for a sturdy base, preventing the rack from tipping over even when loaded with heavy coats.
To further enhance the base, we created small ‘feet’ from our scrap 1×3 piece. We cut four pieces, each measuring approximately 3 1/2 inches. *Important Tip: It’s crucial to measure the actual width of your 2×4 lumber. Lumber dimensions can vary slightly, so cutting these foot pieces to perfectly match the width of your 2×4 legs will ensure a flush and professional finish. Measure twice, cut once!
3. Assembling the Foundation
Before attaching the legs, precise marking is essential. Lay one of the 1×3 feet flush with the bottom of one side of the 4×4 main post. Mark the point on the 4×4 where the top edge of this foot aligns. Repeat this process on all four sides of the 4×4. These marks will serve as critical guides for positioning your legs, ensuring they are attached at the correct height to accommodate the thickness of the feet you’ve just created.
Now, let’s bring some pieces together! Take your 1×3 foot pieces and attach them to the mitered (angled) end of each 2×4 leg. We achieved a strong bond using Gorilla Glue wood glue, reinforced with our trusty Ryobi Airstrike nailer. Ensure the edges of the foot and the leg are perfectly flush for a seamless look.
For invisible and incredibly strong joints, we utilized our Kreg Jig. On the straight, un-mitered end of each leg, we drilled two 1 1/2-inch pocket holes. Pocket holes create angled pilot holes that allow screws to pull two pieces of wood tightly together, forming a very robust connection without visible screw heads on the outside surface of your project. This technique is a game-changer for clean, professional-looking furniture.
That step was surprisingly simple, wasn’t it? For clarity, we’ve even highlighted the perfectly drilled pocket holes in the accompanying image. They’re ready for secure attachment!
Recall those marks we made on the 4×4? Now it’s time to use them! Align the straight edge of each leg with the corresponding mark on the 4×4. This precise alignment ensures that once all legs are attached, the feet will sit perfectly flush with the bottom of the main post, providing a level and stable base. Secure each leg to the 4×4 using Gorilla Glue wood glue and 2 1/2-inch Kreg pocket hole screws, driving them firmly into the 4×4. The combination of glue and screws creates an incredibly strong and durable joint.
Once the first leg is firmly in place, simply follow the exact same steps for the remaining three sides of the 4×4. Take your time to ensure each leg is aligned correctly and securely fastened, forming a balanced and robust base for your coat rack.
4. Adding Stability and Style with Braces
To add both structural integrity and a decorative touch, we’ll now craft the braces. From your remaining 2×4, cut four pieces, each 13 inches long, measured from long point to long point. Crucially, both ends of these pieces should be cut at a 45-degree angle, but not parallel. This means the angles should create a trapezoidal shape, allowing them to fit snugly between the main post and the legs, providing excellent diagonal support and enhancing the rustic charm of the design.
With your braces cut, it’s time to attach them. Apply a generous amount of Gorilla Glue wood glue to the angled ends of each brace. Position the braces so that they connect the main 4×4 post to each of the 2×4 legs. Secure them firmly in place using your Ryobi Airstrike nailer. The combination of glue and nails creates a powerful bond, significantly increasing the stability of the entire coat rack structure.
5. Designing the Top Finial
The top of our coat rack needs a sturdy platform for the decorative finial. We took a scrap piece of 2×6 and cut it to a 5 1/2-inch square. This dimension perfectly caps the 4×4 post, providing a solid and aesthetically pleasing surface for the final embellishment.
Attach this newly cut square top piece directly to the very top of your 6-foot 4×4 post. We used a combination of wood glue for a strong, lasting bond and 2 1/2-inch wood screws for robust mechanical fastening. Ensure it’s centered and flush for the best appearance.
To elevate the elegance of our coat rack, we sourced a beautiful furniture foot to serve as a decorative finial. This small detail adds a touch of classic charm and a polished finish to the entire piece. Selecting a foot that complements your desired style can truly personalize your project.
Attaching the furniture foot is straightforward. First, pre-drill a shallow pilot hole into the center of the 2×6 scrap top piece. The pilot hole should be slightly smaller than the width of the screw on the furniture foot to ensure a snug fit. Then, simply screw the furniture foot firmly into place. For extra security and longevity, we applied a layer of wood glue to the bottom of the furniture foot before screwing it down, ensuring a bond that will last for years. And just like that, the main construction phase of your DIY coat rack is complete!
The Finishing Touches: Prep, Stain, and Hardware
1. Essential Preparation for a Flawless Finish
Achieving a professional-looking finish is all about the preparation. We always make sure to fill any visible screw holes or imperfections with 3M Wood Filler, allowing it to dry completely. Once the filler is dry, we meticulously sand the entire piece using our 3M Advanced Abrasives. This crucial step smooths out any rough edges, removes sanding marks, and creates a perfectly even surface that will beautifully absorb the stain. Proper sanding ensures a flawless and professional appearance, which truly makes a difference in the final outcome. To demonstrate just how easy and effective this prep work is, we’ve put together a quick demo video for you:
2. Achieving a Rich Aesthetic with Stain
Once the prep work is complete and the surface is perfectly smooth, it’s time to bring out the natural beauty of the wood with stain. We opted for one of our favorite finishes: Rust-Oleum Dark Walnut stain. This rich, deep hue provides a classic and elegant look that complements a wide range of home decor styles, adding warmth and sophistication to the rustic design of the coat rack.
Using a foam brush, apply a single, even coat of the Dark Walnut stain over the entire wooden surface. Allow the stain to penetrate the wood for approximately 5 minutes. This dwell time allows the wood to absorb the pigment, creating a consistent and vibrant color. After 5 minutes, use a clean, lint-free cloth to gently wipe off any excess stain, ensuring an even tone and preventing blotchiness. This technique highlights the wood grain beautifully and ensures a smooth, professional finish.
3. Installing Functional and Decorative Hooks
No coat rack is complete without its hardware! We selected four elegant oil-rubbed bronze hooks, which perfectly complement the dark walnut stain and rustic aesthetic of our DIY piece. These hooks not only provide essential functionality for hanging coats but also add a touch of antique-inspired charm.
Carefully measure and mark the desired placement for each hook on the main 4×4 post. We chose to attach one hook to each of the four sides of the coat rack, ensuring ample hanging space and balanced weight distribution. Pre-drill small pilot holes before screwing in the hooks to prevent wood splitting and ensure a secure attachment. Once all four hooks are in place, your stylish and practical DIY coat rack is officially ready for use!
Your New DIY Coat Rack: Ready for Action!
Woohoo! What a fantastic, easy, and incredibly inexpensive DIY project! We hope you’re as thrilled with the result as we are. This rustic wooden coat rack is not only a testament to your crafting skills but also a highly functional addition that will keep your entryway tidy and welcoming throughout the year, especially during the busy holiday season. We always appreciate your support, so please don’t hesitate to share your creations and pin this project to inspire others in the DIY community!
Don’t forget, tomorrow is our highly anticipated big Giveaway day! All of the blogs participating in the “12 Days of Christmas” series will be offering something unique and special as a token of our appreciation. Make sure to check back to see what exciting prizes await!
Join the Community & Explore More DIY Inspiration
We encourage you to visit our incredibly talented friends who also participated in Day 12 of this festive series. Each of them brings a unique perspective and creative flair to their projects. Head over to their blogs to see what amazing things they’ve worked up, and be sure to tell them the Shanty Sisters sent you!
Michael of Inspired by Charm, known for his beautiful home decor and craft ideas.
Marianne of Songbird, who always shares delightful home tours and decorating tips.
Cassity of Remodelaholic, your go-to source for impressive remodels and creative projects.
KariAnne of Thistlewood Farms, whose rustic farmhouse style and clever crafts are always inspiring.
Donna of Funky Junk Interiors, a master of upcycling and creating unique pieces from reclaimed materials.
For more holiday inspiration and DIY projects, you can always check out all of our latest creations HERE!
Don’t forget to connect with 3MDIY.com on their Twitter account for more project ideas and product updates: 3M DIY Twitter Page
This post is a collaboration with 3M DIY. To keep up-to-date on projects, products, and sampling, visit 3MDIY.com.