
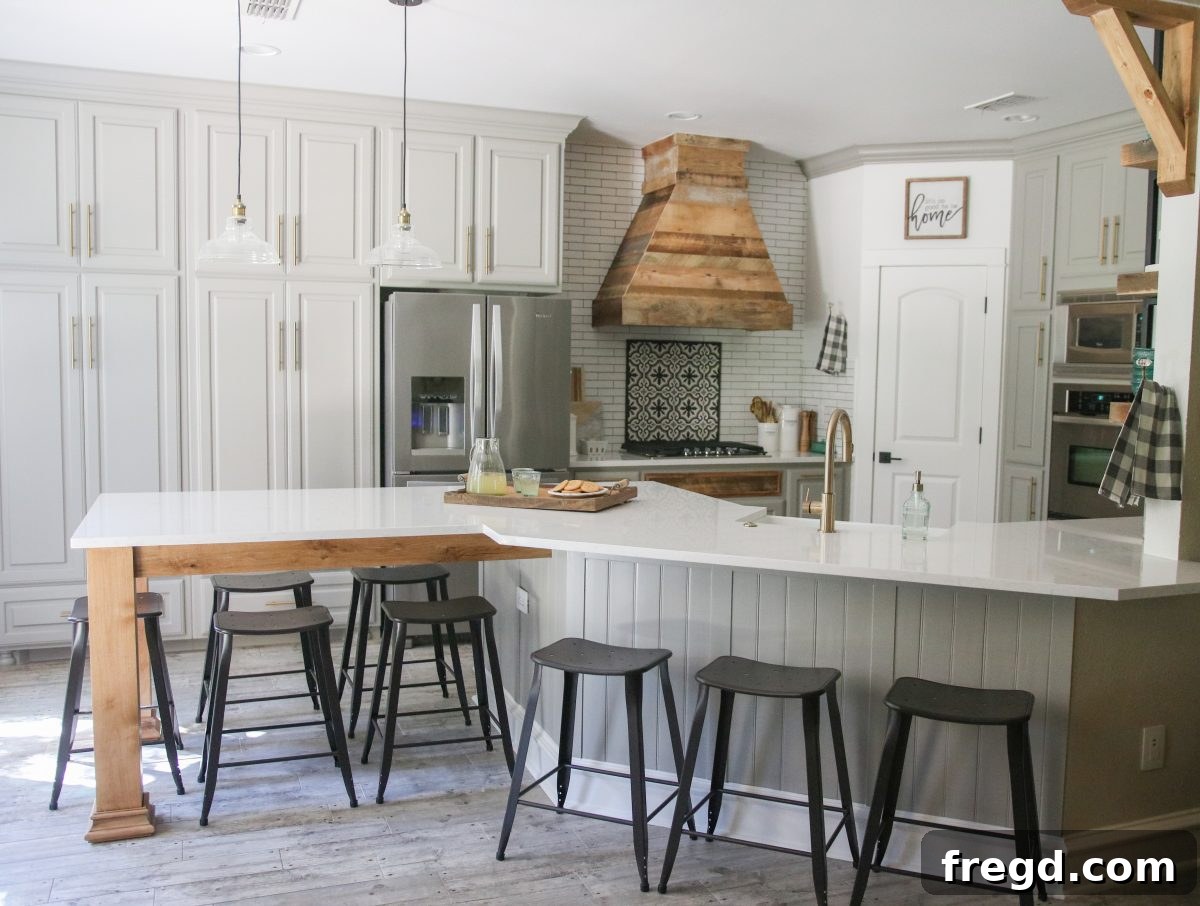
Good morning, friends! Today, I’m thrilled to share a journey that completely transformed the heart of my home: my kitchen. Like many of you, I’ve always dreamt of a kitchen that’s not only beautiful but also truly functional and reflective of my personal style. My recent renovation brought about numerous exciting changes, but perhaps the most dramatic and impactful was the area directly above my stove. Previously, this space was dominated by extensive cabinetry. While undeniably well-built and offering ample storage, I found myself rarely utilizing those particular cabinets. They felt bulky, somewhat outdated, and blocked the open, airy feel I craved for my kitchen. After much contemplation, I decided it was time for a significant change: to completely remove that old cabinetry and embark on building a brand-new, custom vent hood. The results, as you’ll soon see, have been nothing short of spectacular, perfectly aligning with the modern farmhouse aesthetic I adore. Join me as I reveal how this DIY Modern Farmhouse Vent Hood came to life, and how it utterly revolutionized my kitchen’s look and feel!
Embrace the Charm: Building Your Own Modern Farmhouse Vent Hood
Isn’t it incredible how a single design element can completely redefine a space? This project was an absolute joy to tackle, and the impact it had on my kitchen was immediate and profound. If you’re feeling inspired to undertake a similar transformation in your own home, you’re in luck! I’ve made the detailed plans for this project available to help you every step of the way. Click HERE for the FREE Plans! These comprehensive plans will guide you through the construction process, ensuring you have all the necessary information to achieve a professional and beautiful finish.
The Vision: Why a Modern Farmhouse Vent Hood?
Before diving into the construction details, let’s explore the aesthetic and functional reasoning behind this specific design choice. The modern farmhouse style has captivated homeowners for its ability to blend rustic warmth with contemporary clean lines. It strikes a perfect balance between cozy comfort and sophisticated simplicity. For my kitchen, I wanted a vent hood that would serve as a focal point, drawing the eye upwards and creating a sense of grandeur, yet still feel inviting and integrated into the overall design. Traditional metal range hoods often feel industrial and can sometimes dominate a space in a way that doesn’t align with a softer, more inviting aesthetic. A custom wooden vent hood, on the other hand, offers unparalleled opportunities for personalization, allowing you to match it perfectly with your existing cabinetry, trim, and overall kitchen decor. It transforms a utilitarian appliance into a statement piece of furniture, elevating the entire room’s design.
Planning Your Custom Vent Hood Project: Essential First Steps
Every successful DIY project begins with thorough planning, and building a custom vent hood is no exception. This isn’t just about aesthetics; it’s also about critical ventilation for your cooking space. Here’s what you need to consider before you even pick up a tool:
- Measure Accurately: This is paramount. You’ll need precise measurements of the width, depth, and height of the space above your stove, as well as the dimensions of your chosen vent insert. Account for any existing ductwork and ensure your new hood will adequately cover your cooking surface.
- Select Your Vent Insert: The actual ventilation unit that goes inside your custom hood is crucial. Research various options based on CFM (Cubic Feet per Minute) requirements, noise levels, and features like lighting and fan speeds. Ensure it fits within your desired hood dimensions.
- Material Selection: For a modern farmhouse look, wood is the primary material. Consider types like pine, poplar, or even plywood with a veneer for the main structure. Think about the finish – will you paint it white or a contrasting color, or perhaps stain it to highlight the wood grain?
- Tool Checklist: Gather all necessary tools beforehand. This typically includes a miter saw, circular saw, drill, level, measuring tape, stud finder, safety glasses, and hearing protection.
- Review Existing Ventilation: Understand your current ducting system. Will it need to be modified or extended? Ensuring proper airflow is not just about aesthetics but also about safety and air quality in your home.
The Construction Journey: From Demolition to Finishing Touches
Once your planning is complete, the exciting part begins! While the free plans provide detailed, step-by-step instructions, here’s an overview of the general process you can expect:
- Demolition: Carefully remove any existing cabinetry or structures above your stove. This often involves unscrewing cabinets, patching drywall, and ensuring the area is clear and ready for the new build.
- Framing the Structure: This is where the hood starts to take shape. You’ll build a sturdy internal frame using dimensional lumber, creating the basic box and angles of your desired design. Accuracy here is key for a professional look.
- Integrating the Vent Insert: Before enclosing the frame, install your chosen vent insert according to its manufacturer’s instructions. Ensure it’s securely mounted and properly connected to the ductwork. Test the fan and lights at this stage.
- Applying the Exterior Sheeting: Once the frame is solid and the insert is in place, you’ll apply your chosen wood panels (like plywood, MDF, or shiplap boards) to create the visible exterior of the hood. This is where the “farmhouse” elements truly begin to shine. You might add decorative trim, crown molding, or even corbels for an extra touch of charm.
- Finishing and Painting/Staining: This step brings your vision to life. Fill any nail holes, sand all surfaces smooth, and then apply your primer, paint, or stain. Multiple thin coats usually yield the best results. I opted for a crisp white paint, which beautifully contrasts with my kitchen’s other elements and creates a bright, clean look.
- Final Installation: Secure the finished hood to the wall studs, ensuring it is perfectly level and stable. Reconnect any electrical components for the vent insert’s fan and lights.
Transforming Your Kitchen: The Impact of a Custom Hood
The addition of this DIY Modern Farmhouse Vent Hood did more than just replace old cabinets; it completely revitalized my kitchen. The open space above the stove now feels expansive and uncluttered, making the entire kitchen appear larger and more inviting. The custom design adds a touch of bespoke elegance that simply can’t be achieved with off-the-shelf solutions. It serves as a beautiful focal point, anchoring the cooking area and drawing the eye with its thoughtful craftsmanship. Functionally, the new vent insert is far more efficient than my previous setup, effectively clearing cooking odors and steam, which means a fresher, cleaner kitchen environment. Aesthetically, it perfectly encapsulates the modern farmhouse style – warm, welcoming, yet incredibly chic and current.
Tips for Success and Troubleshooting Common Challenges
Embarking on a project of this scale can seem daunting, but with a few key tips, you can ensure a smooth process:
- Measure Twice, Cut Once: This age-old adage is especially true for custom carpentry. Mistakes can be costly in terms of both time and materials.
- Patience is a Virtue: Don’t rush. Take your time with each step, especially with cuts, sanding, and painting. The details truly make the difference.
- Seek Help When Needed: If you’re unsure about electrical wiring or connecting ductwork, don’t hesitate to consult a professional. Safety should always be your top priority.
- Embrace Imperfections: While aiming for perfection is good, remember that DIY projects often have a charming, handmade quality. Small imperfections can add character.
- Ventilation is Key: Ensure your vent insert is powerful enough for your cooking needs and that the ductwork is properly sealed and routed for optimal performance.
Common challenges might include precise angled cuts, ensuring a flush fit for the vent insert, and achieving a perfectly smooth painted finish. However, with careful planning and execution, these can be overcome. Sanding between paint coats and using high-quality paint will help achieve that coveted smooth finish.
Final Thoughts: A Worthwhile Renovation
This DIY Modern Farmhouse Vent Hood project was undoubtedly one of the most rewarding aspects of my kitchen renovation. It not only solved a functional problem but also infused my kitchen with character, warmth, and a distinct style that I absolutely love. The satisfaction of stepping back and admiring something you’ve built with your own hands is truly immense. If you’re looking to make a significant impact on your kitchen’s aesthetic and functionality without breaking the bank, a custom vent hood is an excellent project to consider. With the detailed plans provided, you have all the resources to create a stunning focal point in your own kitchen. I encourage you to take the leap, unleash your creativity, and transform your cooking space into the kitchen of your dreams!
Happy building, and I can’t wait to hear about your own kitchen transformations!