
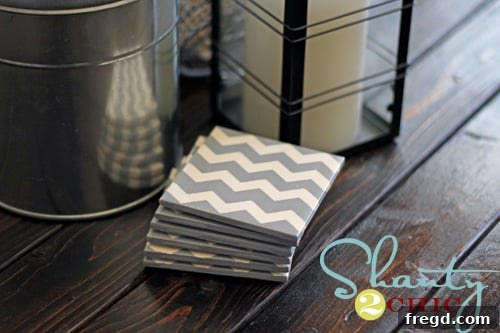
DIY Chevron Coasters: Elevate Your Home Decor with This Stylish & Affordable Craft Project
Are you tired of plain, uninspiring coasters cluttering your coffee table? Do you dream of adding a touch of personalized style to your living space without breaking the bank? Look no further! This super quick, incredibly affordable, and wonderfully rewarding DIY project will guide you through creating your own stunning chevron tile coasters. Not only are these handmade gems a fantastic way to refresh your home decor, but they also make for a thoughtful, custom gift idea that costs less than $5 to produce per set!
This tutorial is designed for crafters of all skill levels. With just a few basic materials and some creative flair, you’ll transform ordinary ceramic tiles into chic, functional art pieces that protect your surfaces and spark conversation. Let’s dive into the world of DIY and bring some handmade charm into your home!
Why Embrace DIY Coasters? The Allure of Handmade Home Decor
There’s something uniquely satisfying about creating something with your own hands, especially when it comes to home decor. DIY projects allow you to infuse your personal style into every corner of your living space, making it truly feel like yours. Beyond the aesthetic appeal, handmade items often carry a story and a sense of warmth that mass-produced products simply can’t match.
Coasters, though small, play a crucial role in protecting your furniture from unsightly water rings and heat damage. But why settle for boring, standard options when you can craft custom pieces that perfectly complement your interior design? DIY coasters offer unparalleled customization, allowing you to choose patterns, colors, and finishes that align perfectly with your existing decor or introduce a fresh, new accent. They are also an eco-friendly option, as you can often upcycle materials or choose sustainable supplies, reducing waste and contributing to a more mindful lifestyle.
My Inspiration: Weaving Chevron Chic into Everyday Living
My love affair with the chevron pattern is well-documented, especially after creating those fabulous Chevron Stocking Hangers. That timeless, zigzag design brings such a dynamic yet sophisticated feel to any item, and I was eager to extend its charm to another area of my home. For years, my coffee table had been home to a set of rather dull, black rubber coasters – perfectly functional, but entirely devoid of personality. It was high time for an upgrade, a transformation that would merge practicality with a dash of modern elegance. And so, the idea for DIY chevron tile coasters was born! These new coasters would not only serve their purpose admirably but also echo the stylish theme I adore, bringing a cohesive and polished look to my living area.
Gathering Your Supplies: Budget-Friendly Materials for Beautiful Coasters
One of the most appealing aspects of this project is its incredible affordability. You’ll be amazed at how little it costs to create such a high-end looking product. Here’s a detailed look at the materials you’ll need:
The Foundation: Ceramic Tiles
My journey to Home Depot led me to these fantastic 4×4 bone-colored ceramic tiles, priced at an astonishing $0.16 each! Yes, you read that right – sixteen cents! These plain, unassuming tiles are the perfect canvas for our creative endeavors. Their smooth surface provides an excellent base for painting, and their sturdy construction ensures durability. When selecting your tiles, consider both appearance and functionality. While I opted for bone-colored, you could choose white, black, or even subtly textured tiles depending on your desired aesthetic. Just ensure they are flat and relatively smooth for easy stencil application. You can find these at any local hardware store, often in the flooring or tiling section, where they are typically sold individually or in small bundles.
Protecting Your Surfaces: Felt Pads
To ensure your beautiful new coasters protect your furniture without scratching it, felt pads are an absolute must. I purchased a pack of self-adhesive felt pads for about $3.50. These small, unassuming additions are crucial for preventing any damage to your tabletops, and they also help the coasters stay put. Look for felt pads that are appropriately sized for the corners of your tiles. If you can’t find individual pads, you can buy a sheet of felt and cut out small squares yourself, attaching them with strong adhesive. Alternatives include cork dots or small rubber bumpers, all readily available in hardware stores or craft supply shops.
Creating the Pattern: Contact Paper Stencils
The magic of the chevron pattern comes alive with a stencil made from contact paper. I used my Silhouette cutting machine to precisely cut the chevron design onto contact paper. Contact paper is ideal for stenciling because it has a low-tack adhesive that sticks firmly enough to prevent paint bleed but peels off cleanly without leaving residue. If you don’t have a cutting machine, don’t worry! You can easily create a chevron stencil manually. Simply measure and mark your chevron pattern onto the contact paper using a ruler and pencil, then carefully cut it out with a craft knife or sharp scissors. For those who prefer even simpler methods, pre-made stencils are available at craft stores, or you can use painter’s tape to create various geometric patterns like stripes or plaid.
Adding Color: Acrylic Paint
For the vibrant pattern, I chose a lovely gray acrylic paint. Acrylic paints are perfect for this project because they are water-based, easy to clean up, dry relatively quickly, and come in an endless array of colors. The gray provided a sophisticated contrast against the bone-colored tile, creating a modern and elegant look. You can, of course, choose any color that speaks to your personal style – perhaps a vibrant teal, a subtle navy, or even a metallic gold for a touch of glamour. Small bottles of acrylic craft paint are very inexpensive and available at any craft store.
Sealing the Deal: Mod Podge
To protect your painted design from moisture and wear, several coats of Mod Podge are essential. Mod Podge is a versatile all-in-one glue, sealer, and finish. It creates a durable, water-resistant seal that will keep your coasters looking fresh for years to come. I recommend using a multi-surface or dishwasher-safe Mod Podge for maximum protection against condensation from beverages. Allow each coat to dry completely before applying the next to achieve a smooth, even, and highly protective finish. Alternatives include clear acrylic spray sealants or even a thin layer of epoxy resin for an ultra-glossy, extremely durable surface, though these options can be a bit more involved.
Essential Tools
- Small paint brush or foam brush: For applying paint and Mod Podge.
- Craft knife or scissors: For cutting contact paper (if not using a machine).
- Ruler and pencil: For manual stencil creation.
- Cleaning cloth and rubbing alcohol: For preparing the tile surface.
Step-by-Step Guide: Crafting Your Chevron Coasters
Now that you have all your materials ready, let’s get crafting! Follow these simple steps to create your own set of stylish chevron coasters.
Step 1: Prepare Your Tiles
Begin by ensuring your ceramic tiles are perfectly clean and dry. Wipe each tile with a damp cloth to remove any dust or debris, then follow up with a bit of rubbing alcohol to ensure there are no oily residues that could prevent the stencil or paint from adhering properly. A clean surface is key to a professional-looking finish.
Step 2: Apply the Chevron Stencil
Carefully peel the backing off your contact paper chevron stencil. Position the stencil precisely onto the center of each tile, ensuring the pattern is straight and evenly spaced. Once placed, use your fingers or a craft burnishing tool (like a credit card) to firmly press down all the edges of the contact paper. This is a critical step to prevent any paint from bleeding under the stencil, resulting in crisp, clean lines for your chevron pattern. Take your time here – a well-applied stencil makes all the difference.
Step 3: Paint Your Pattern
Using a small paint brush or foam brush, apply a thin, even coat of your chosen acrylic paint over the stencil. Two thin coats are always better than one thick coat, as thick coats are more prone to bleeding under the stencil and can take longer to dry. The most crucial tip for this step is to PEEL OFF THE CONTACT PAPER BEFORE THE PAINT DRIES! If you wait until the paint is fully dry, it may crack or pull away with the stencil, ruining your crisp lines. Gently peel back the contact paper immediately after applying the last coat of paint, while it’s still wet. This will reveal your perfectly sharp chevron pattern. Allow the painted tiles to dry completely, which usually takes about 30-60 minutes depending on paint thickness and humidity.
Step 4: Seal for Durability
Once the acrylic paint has fully dried, it’s time to seal your beautiful design. Apply a thin, even coat of Mod Podge over the entire painted surface of each tile. Use a clean brush for this step. The key to a durable and smooth finish is to apply several thin coats, allowing each coat to dry completely before applying the next. This prevents tackiness and ensures a strong, water-resistant seal. Depending on the Mod Podge type and humidity, each coat might take 15-30 minutes to dry. Aim for at least 2-3 coats for optimal protection, ensuring full coverage over the painted areas. Once the final coat is applied, allow the coasters to cure for at least 24 hours (or even 72 hours for maximum durability) before exposing them to moisture.
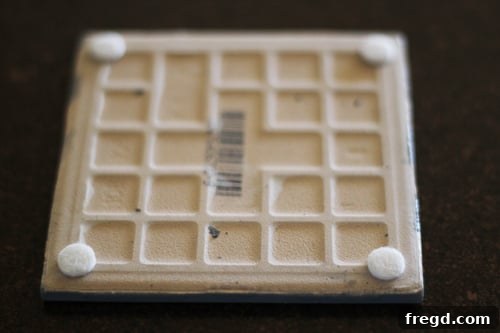 Finish off with a felt pad in each corner.
Step 5: Add Felt Pads
The final touch! Flip your coasters over and attach a self-adhesive felt pad to each of the four corners. These pads provide a soft buffer between your coaster and your furniture, preventing scratches and ensuring the coasters stay in place. If your felt pads aren’t self-adhesive, a dab of strong craft glue will do the trick.
The Finished Masterpiece: Where Style Meets Functionality
ummmm LOVE:))) There’s nothing quite like the feeling of stepping back and admiring a project you’ve brought to life with your own hands. These DIY chevron coasters are a testament to how simple materials and a little creativity can yield truly stunning results. The crisp lines of the chevron pattern against the subtle bone-colored tile create a modern, chic aesthetic that instantly elevates any tabletop. Beyond their undeniable visual appeal, these coasters are incredibly functional, providing robust protection against condensation and heat, keeping your precious furniture pristine. They are a perfect blend of style and utility, proving that practical items can also be beautiful statement pieces in your home decor.
Admire the elegant pattern and smooth finish of your new handmade coasters. Each one is a small work of art!
Imagine these gracing your coffee table, ready for your morning brew or evening drink.
The subtle contrast of gray and bone adds a sophisticated touch to any setting.
Stack them up for easy storage or as a display of your crafting prowess.
See how effortlessly they blend into a stylish home environment.
A simple yet impactful detail for your everyday moments.
More Than Just Coasters: A Touch of Everyday Joy
These coasters offer more than just aesthetic appeal and functionality; they bring a little bit of joy into my daily routine. There’s something about starting the day, sitting down with my coffee, and placing it on one of these beautiful handmade coasters that gives me a false sense that I’m all put together. It’s a brief, peaceful moment of curated calm before the inevitable chaos of the day begins – quickly brought back to reality when we’re making a mad, screaming dash out the door because we’re running late for school! But it is nice while it lasts, offering a small, personal indulgence. That little moment of appreciating something I created brings a quiet satisfaction that resonates throughout my home. It’s a testament to how even the smallest DIY project can contribute to a more beautiful and personally fulfilling living experience.
Creative Variations & Customization Ideas
The beauty of DIY lies in its endless possibilities for customization. While the gray chevron on bone tile is a classic, don’t hesitate to experiment with different looks:
- Color Palette: Explore vibrant hues like turquoise, mustard yellow, or coral for a pop of color. Metallics like gold, silver, or rose gold can add a touch of glamour.
- Pattern Play: Instead of chevron, try stripes, polka dots, checkerboard, or even a simple initial monogram. You can also freehand organic shapes for a more artistic look.
- Tile Alternatives: Experiment with different tile types such as subway tiles, patterned tiles (and paint only certain sections), or even small wooden squares.
- Embellishments: Add a sprinkle of fine glitter to the paint or Mod Podge for sparkle. You could also decoupage small fabric swatches or printed paper onto the tiles before sealing.
- Different Finishes: For an ultra-glossy, highly durable, and heat-resistant finish, consider using epoxy resin instead of Mod Podge. This requires a bit more technique but results in a glass-like surface.
Gifting Inspiration: Thoughtful & Unique Presents
As mentioned, these DIY chevron coasters make an incredible gift, especially for those who appreciate handmade items. The fact that they are so budget-friendly means you can easily create multiple sets for various occasions. Imagine gifting a set for a housewarming, a birthday, a teacher’s appreciation gift, or as a thoughtful gesture during the holidays. To elevate your gift, consider tying a set of four or six coasters with a beautiful ribbon, perhaps adding a personalized tag. You could even pair them with a gourmet coffee mug or a specialty tea blend for a truly complete and luxurious present. Handmade gifts speak volumes, conveying care, effort, and a personal touch that store-bought items often lack.
Care and Maintenance for Your DIY Coasters
To ensure your beautiful handmade coasters last for years, a little care goes a long way. Simply wipe them clean with a damp cloth as needed. For stickier messes, a gentle soap and water solution can be used. Avoid abrasive cleaners or harsh scrubbing, which could damage the painted and sealed surface. While Mod Podge provides good water resistance, it’s best to avoid prolonged exposure to standing water or extreme heat (like placing a very hot pan directly on them) to maintain their integrity. With proper care, these stylish coasters will continue to protect your furniture and brighten your home for a long time.
Conclusion: Your Next Favorite DIY Project Awaits!
Creating these DIY chevron coasters has been one of my most enjoyable and rewarding crafting experiences. They perfectly marry my love for the chevron pattern with a practical need for stylish home accessories, all while being incredibly kind to the wallet. This project proves that you don’t need extensive skills or a huge budget to make a significant impact on your home decor. Whether you’re making them for yourself or as a heartfelt gift, the satisfaction of transforming simple tiles into chic, functional art is truly unmatched.
I hope this detailed guide inspires you to pick up some tiles and get creative. It’s an easy, fun project that yields beautiful results, and I promise you’ll love the outcome as much as I do. Thanks so much for stopping by and embarking on this creative journey with me!
Happy crafting!
~Ashley