
Build Your Dream DIY Farmhouse Crib: Rustic Charm on a Budget
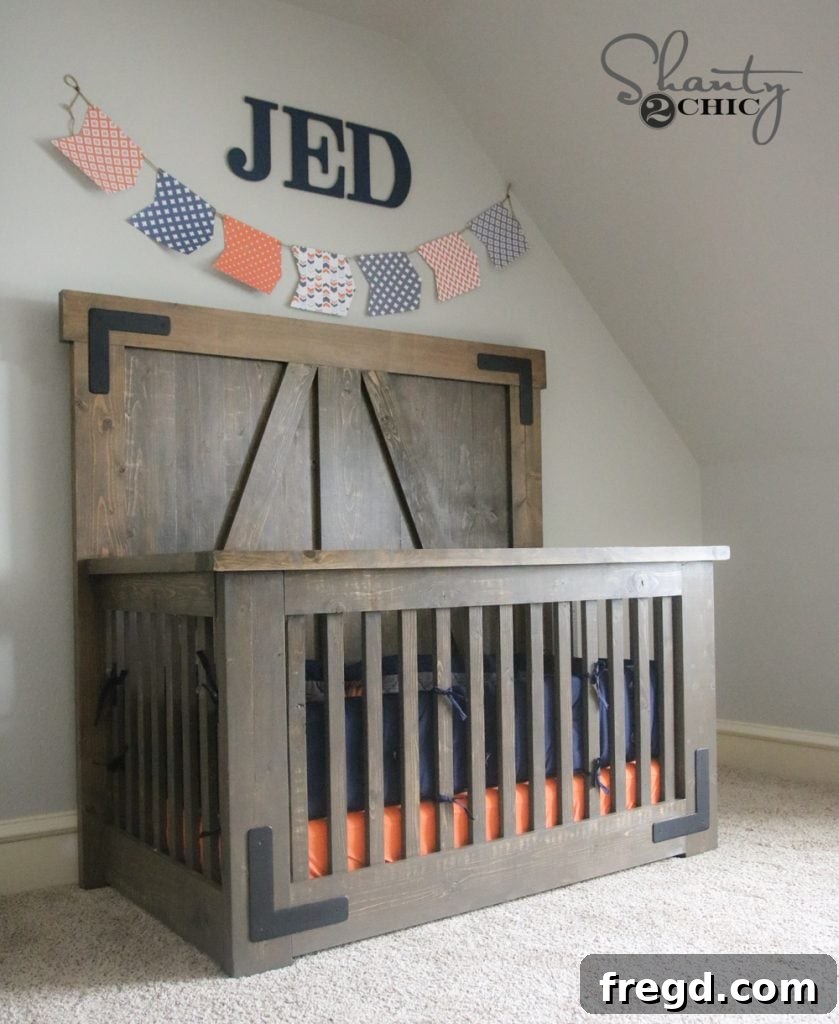
Are you dreaming of a nursery that exudes rustic charm and timeless elegance, but without the hefty designer price tag? Look no further! This comprehensive guide provides everything you need to build your very own **DIY Farmhouse Crib**, a beautiful, sturdy, and budget-friendly solution that will become the centerpiece of your little one’s room. Designed with both aesthetics and practicality in mind, this crib features a thoughtful low-profile build, perfect for shorter parents, and customizable height options to adapt as your baby grows. Its exquisite rustic finish, complete with charming barn-door trim, gives it a bespoke look straight out of a high-end catalog, all achievable for less than $300.
View this post on Instagram
The best part? This designer-look crib can be built by you, even if you’re a beginner DIYer, for under **$300**! We’ve made it incredibly easy with our detailed and **FREE crib plans**, which include step-by-step instructions, diagrams, and a full shopping list to guide you through every cut and joint. Get ready to create a masterpiece for your baby that’s both meaningful and budget-friendly.
Table of Contents
Why You’ll Love Building This Farmhouse Crib
-
Parent-friendly height: Say goodbye to back strain! This crib is thoughtfully designed with a low-profile build, making it incredibly easy for moms and dads of all heights to comfortably reach in and out without stretching or straining their backs. It’s about making those late-night comforting moments a little bit easier.
-
Budget-friendly build: Achieving a luxurious farmhouse aesthetic for your nursery doesn’t have to break the bank. By choosing to build this crib yourself, you bypass exorbitant retail markups and save significantly on costs, proving that designer style is accessible even on a tight budget. Get that high-end look without the expensive price tag.
-
Easy to customize: Your baby’s nursery should be as unique as they are. This DIY crib offers incredible flexibility for customization. Want it a bit taller to fit your specific needs or room dimensions? Simply adjust the length of the legs and side panels according to your preferences, ensuring a perfect fit for your space and family.
-
Authentic rustic charm: The signature barn door trim isn’t just an accent; it’s the heart of this crib’s farmhouse appeal. This distinctive detail, along with the natural wood finish, infuses your nursery with a cozy, inviting, and authentically rustic feel, creating a warm environment for your little one.
Step-by-Step DIY Farmhouse Crib Tutorial
Embarking on a DIY project for your baby is a rewarding experience. Follow these detailed steps to construct a safe, beautiful, and durable farmhouse crib that you’ll cherish for years.
1. Download the Free Plans
Your journey begins with preparation. Before making any cuts or purchases, download our **free printable crib plans**. These comprehensive plans include detailed diagrams, precise cut lists for all wood pieces, and a material breakdown, ensuring you have all the information necessary to start your project confidently. Taking the time to review these plans thoroughly will prevent errors and save time in the long run.
2. Build the Headboard (Back Panel)
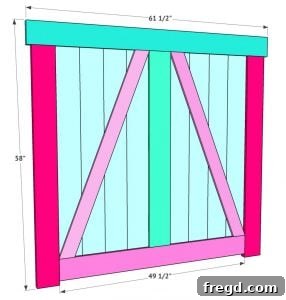
The headboard sets the tone for your crib’s rustic aesthetic. Start by joining several **1×6 boards** together using a Kreg Jig. This method creates strong, hidden joints that are essential for the crib’s structural integrity and clean appearance. Once the panel is formed, frame it with 2×6 and 2×4 boards. For a refined, cleaner look that echoes custom furniture, we recommend ripping these larger boards down slightly to achieve your desired dimensions, typically around 5 inches for 2x6s and 3 inches for 2x4s, as indicated in the plans. This attention to detail will elevate the overall finish of your crib.
3. Add the Barn Door Trim
This is where the crib truly comes to life with its iconic farmhouse character. Carefully cut your trim pieces according to the plans. Apply wood glue to the back of each trim piece, then secure them in place with finish nails. The combination of glue and nails provides a strong bond and a polished finish. This simple step instantly transforms the crib, giving it those sought-after rustic barn door vibes that define the farmhouse style.
4. Build the Side Panels
The side panels require precision for safety and aesthetics. Begin by drilling **3/4″ pocket holes** on the appropriate edges of your frame pieces, as specified in the plans. These pocket holes will be used to attach the panels securely. Assemble your side frames using wood glue and pocket-hole screws for maximum strength. Once the frames are solid, carefully attach the 1×2 slats, ensuring even spacing for baby safety. Use wood glue and finish nails, making sure that your pocket holes are strategically covered by the slats or other trim for a seamless finish. Remember, you’ll need to create two identical side panels for your crib.
For the bottom board of the side panel, mark where your slats will line up. This simple trick helps ensure perfect alignment when you nail them in.
Attach this bottom board to the outside bottom trim piece using a generous amount of wood glue and 1″ Spax screws for extra holding power.
Now, attach the 1×2 crib slats. Apply wood glue to each slat and secure them in place with 1.25″ finish nails. Notice how the slats are perfectly positioned to cover the pocket holes, contributing to the crib’s clean, finished appearance.
Here is one side panel fully finished. Remember, you’ll need to construct two of these for your crib.
5. Construct the Front Panel
The front panel, like the sides, requires careful attention to detail for both safety and visual appeal. It includes both the structural frame and the decorative slats. First, build the bottom section of the front panel by attaching two boards, similar to how you constructed the side panels. Then, attach the front legs to these bottom boards using pocket-hole screws. Ensure all joints are tight and square for a stable foundation. Add the evenly spaced slats, double-checking your measurements and spacing carefully before securing them with wood glue and finish nails. Consistency in spacing is paramount for crib safety.
Next, drill pocket holes in your top board for the front panel. As with the side panels, be mindful of your spacing to ensure these pocket holes will be concealed by later additions or carefully filled.
Attach this top board to the top of each leg using 1.25″ pocket-hole screws, creating a sturdy upper frame for the front panel.
Align the entire top frame precisely onto the top front rail piece. Secure it firmly with wood glue and 1.25″ pocket-hole screws. This step ensures a robust and seamless connection.
The top rail of the front panel should have a slight overhang of 1.5 inches on each side, adding to the finished look and feel of the crib.
Finally, add your front slats, securing them with wood glue and 1.25″ finish nails. Pay close attention to achieving consistent and safe spacing between each slat.
6. Install the Mattress Support
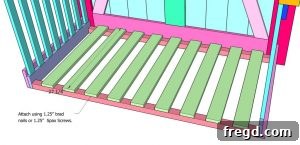
Now it’s time to prepare for the mattress. Install sturdy cleats to the inside of the front and back panels of the crib. These cleats will serve as the support for the mattress base. Secure them firmly using **2″ Spax screws**, ensuring they are perfectly level and strong enough to bear the weight of the mattress and your baby. Once the cleats are in place, lay 1×4 boards across them to form the solid mattress base. Make sure these boards are spaced evenly and securely fastened for optimal support and safety. You will see pocket holes where the sides attach to the front and back panels, which are then covered.
You can clearly see where the pocket holes are used to attach the side panels to the front and back, ensuring a strong connection for the overall structure.
7. Stain and Protect Your Crib
Once construction is complete, it’s time to bring out the natural beauty of the wood and protect your crib for longevity. Start by thoroughly sanding every surface until it’s perfectly smooth to the touch, which is crucial for baby safety. We highly recommend Varathane Briarsmoke stain for its rich, smoky hue that perfectly complements the farmhouse aesthetic 🌫️. Apply the stain according to the manufacturer’s instructions. After the stain has dried completely, apply several coats of a durable polyurethane finish. This protective layer is essential for durability, making the crib resistant to wear and tear, and simplifying cleanup. Ensure you use a baby-safe, non-toxic sealant and allow it to fully cure in a well-ventilated area before placing the crib in the nursery.
For more tips on achieving a flawless stain, check out our YouTube video on how to stain wood!
8. Add Optional Hardware Details
To truly elevate the custom look of your DIY farmhouse crib, consider adding decorative hardware. These small details can make a significant impact on the overall style. We partnered with **Tyler of Wayne Works** to create custom hardware, and he truly delivered. The L-brackets, with their slightly rounded edges, add a softer, more refined touch while reinforcing the farmhouse aesthetic 🤎. Such custom touches transform a great DIY project into an unforgettable piece of furniture. You can find similar custom hardware from skilled artisans to complete your crib’s unique look.
📥 Get Your Free DIY Farmhouse Crib Plans Today!
Ready to bring this beautiful crib to life? We’ve made it incredibly simple to get started. Click the link below to immediately access your **FREE printable crib plans**. These comprehensive plans include detailed step-by-step diagrams, precise cut lists, and a full material breakdown, taking the guesswork out of your project. Don’t wait to create a cherished piece of furniture for your little one!
➡️ Download the Free Farmhouse Crib Plans Here!
🛠 Pro Builder Tips for Your Crib Project
Here are some additional tips from experienced builders to ensure your DIY crib project is a success:
-
Sand Everything Smooth 🪵➡️🧸: This cannot be stressed enough when building baby furniture. Little baby fingers are incredibly sensitive and can find splinters fast! Use progressively finer grits of sandpaper to achieve an exceptionally smooth finish on all surfaces, especially slats and edges. This is crucial for your baby’s safety and comfort.
-
Always Test Your Crib Mattress Fit: Before applying any finishes or making your final assembly, dry-fit your crib mattress into the completed frame. This ensures that your dimensions are accurate and that the mattress fits snugly and safely, without leaving any gaps that could pose a hazard.
-
Consider a Convertible Crib Design: Many DIY builders incorporate additional hardware or design modifications to make the front panel removable. This thoughtful feature allows the crib to convert into a toddler bed or even a daybed as your child grows, extending its usability and value for years to come.
-
Save Your Arms! Use a Quality Orbital Sander with a Dust Attachment: Sanding is a significant part of this project. Investing in a **quality orbital sander with an effective dust attachment** will not only make the job easier and faster but also significantly reduce airborne dust, keeping your workspace cleaner and safer.
❤️ Final Thoughts on Your DIY Farmhouse Crib
Building your own DIY Farmhouse Crib is more than just a woodworking project; it’s an act of love. This crib isn’t just a piece of furniture—it’s a keepsake, a handmade treasure that will hold countless precious memories for years to come 💕. By taking on this project, you not only save money and gain the satisfaction of crafting something with your own hands, but you also get to customize every detail to perfectly match your nursery’s style and create something truly unique and special for your little one. Imagine the joy of telling your child, “Daddy/Mommy built this just for you!”
Ready to embark on this incredibly rewarding journey? **Download the free plans and start building your dream crib today!**

DIY Farmhouse Crib (Free Plans) – Recipe Overview
Tools Required
- Miter Saw (for precise cuts)
- Pocket-hole Jig (e.g., Kreg Jig for strong, hidden joints)
- Drill/Driver (for screws and drilling)
- Brad Nailer (for trim and slats)
- Orbital Sander + Dust Collection (for smooth, safe finishes)
- Essential Measuring Tools: Clamps, Tape Measure, Carpenter’s Square
Supply List
- 1×6 boards (for headboard/back panel)
- 2×6 boards (for trim; rip to ~5″ width for a refined look)
- 2×4 boards (for frame components; rip to ~3″ width)
- 1×4 boards (for sturdy mattress support slats)
- 1×2 boards (for side and front slats)
- Pocket-hole screws (1¼″ and 2″ sizes)
- 2″ brad nails & Wood Glue
- 2″ structural screws (e.g., Spax, ideal for mattress cleats)
- Stain & Polyurethane (e.g., Varathane Briarsmoke for stain, and a baby-safe polyurethane sealant)
- Optional decorative hardware
Instructions
-
Download & Review Plans: Begin by grabbing the free printable plans. Take your time to carefully study the cut list, layout diagrams, and all pocket-hole locations for accurate construction.
-
Build the Headboard: Join your 1×6 boards using pocket holes. Then, frame this panel with ripped 2×6 boards (to approx. 5″ width) and ripped 2×4 boards (to approx. 3″ width).

-
Add Barn-Door Trim: Apply wood glue and use a brad nailer to attach the decorative barn-door trim pattern onto the headboard for that distinctive farmhouse look.
-
Assemble Side Panels: Drill 3/4″ pocket holes as indicated in the plans. Glue and screw the side frames together, then securely attach the 1×2 slats with consistent, safe spacing using wood glue and finish nails. Remember to make two of these.
-
Build the Front Panel: Construct the lower front frame using pocket holes, attaching the legs securely. Then, add evenly spaced 1×2 slats to complete the front panel assembly.
-
Install Mattress Supports: Fasten sturdy cleats to the inside of the front and back panels using 2″ structural screws. Lay 1×4 slats across these cleats to form a strong, flat platform for the crib mattress.
-
Finish: Thoroughly sand all wood surfaces until smooth. Apply your chosen stain (Briarsmoke recommended for farmhouse style) and seal the entire crib with a baby-safe polyurethane for durability and protection. Allow all finishes to fully cure in a well-ventilated area.
-
Optional Hardware & Final Assembly: Add any decorative hardware for a personalized touch. Dry-fit all panels and confirm the crib mattress fits perfectly before the final assembly in the nursery.



Keywords:
- DIY Farmhouse Crib
- Free Crib Plans
- Rustic Baby Furniture DIY
- Build Your Own Crib
- Low-Profile Crib Tutorial
- Affordable Nursery Furniture
- Handmade Crib Project