
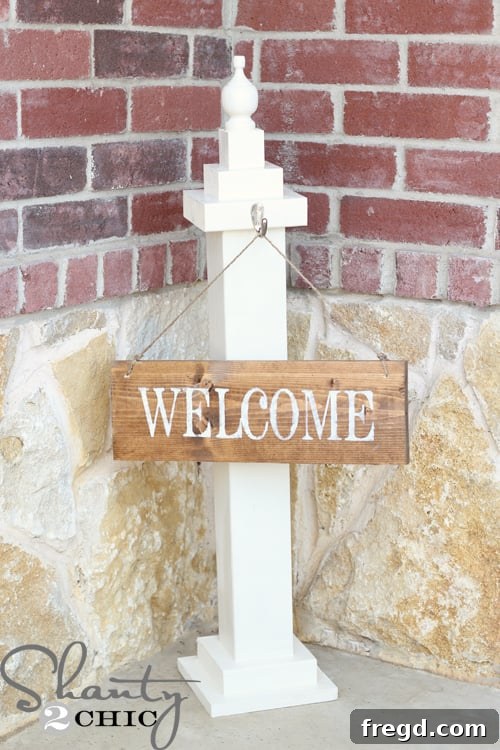
DIY Rustic Welcome Sign: An Easy & Affordable Project to Enhance Your Home’s Curb Appeal
We are absolutely thrilled to unveil our newly revamped website, designed with you in mind! Our primary goal is to provide a more seamless and engaging experience, making it easier than ever for you to discover inspiring projects and creative ideas. We sincerely hope you find the updated navigation intuitive and delightful.
To celebrate our fresh look, we’re kicking things off with an incredibly simple and budget-friendly project: a charming DIY Welcome Sign. This piece can be completed in approximately an hour, making it perfect for both seasoned crafters and aspiring builders eager to dive into the world of DIY.
The Inspiration Behind Your Next Favorite Porch Project
The inspiration for this specific “Welcome Sign” project came from a wonderful friend and neighbor. She envisioned a custom sign for her front porch that echoed the rustic elegance of the DIY Pillars I had crafted previously. Naturally, I couldn’t resist the challenge and, while making one for her, decided it was an absolute must-have for my own home too!
This project stands out for its remarkable simplicity. It demands very few tools, making it an ideal entry point if you’ve been yearning to start building and adding personal touches to your home. It’s perfect for beginners, offering a sense of accomplishment without requiring advanced skills or a full workshop setup. Whether you’re looking to boost your home’s curb appeal, create a thoughtful handmade gift, or simply explore your creative side, this DIY Welcome Sign is an excellent choice.
Embark on Your DIY Journey: Step-by-Step Guide to Crafting Your Welcome Sign
Follow these straightforward steps to create your very own custom welcome sign. We’ll guide you through each stage, from gathering materials to adding the final protective coat, ensuring a successful and enjoyable DIY experience.
Gathering Your Materials: What You’ll Need
One of the beauties of this project is its flexibility with materials. I was fortunate enough to utilize various wood scraps I already had in my garage, which kept the cost incredibly low. However, if you need to purchase new lumber, a few standard boards will provide enough material to create several of these charming signs, making it a highly cost-effective endeavor even when buying fresh supplies. Always remember to check the scrap bins at your local hardware store – you might find perfect pieces for an even lower price!
Wood Cuts Required:
- 2 pieces of 2×6 wood, each cut to 5.5 inches
- 1 piece of 1×8 wood, cut to 7.5 inches
- 1 piece of 4×4 wood, cut to 25 inches
- 1 piece of 2×4 wood, cut to 3.5 inches
- 1 wooden block (often found in craft stores like Hobby Lobby, choose a size appropriate for your finial)
- 1 wooden finial (available at hardware stores like Lowe’s, select a style that complements your aesthetic)
Additional Supplies:
- Strong Wood Adhesive: We highly recommend Gorilla Glue for its exceptional strength and durability, ensuring your sign remains sturdy.
- Spray Paint: Rust-Oleum Heirloom White (Satin finish) is a fantastic choice for a classic, elegant look. Feel free to explore other colors or finishes that match your home’s decor.
- Wood Stain: Rust-Oleum Early American stain offers a rich, warm tone for the welcome sign board.
- Stenciling Supplies: A stencil of your chosen word (e.g., “WELCOME,” “HOME”) can be created with a Silhouette machine or purchased from a craft store. You’ll also need a foam brush and cream-colored paint for stenciling.
- Jute Twine: For a rustic hanging element for your sign.
- Protective Finish: Rust-Oleum Polyurethane (Gloss or Satin) is essential to protect your sign from the elements, especially if it will be displayed outdoors.
- Decorative Hook: A small hook to attach your welcome sign to the main pillar structure.
Tools You’ll Need: Simple & Accessible
One of the reasons this project is so beginner-friendly is the minimal tool requirement. You don’t need an elaborate workshop to achieve beautiful results.
- Hand Saw: If you don’t own a power saw, a simple hand saw is perfectly adequate and an inexpensive tool for making these few cuts. It’s a great way to start building without a large investment.
- Electric Drill: A cordless drill, such as the Ryobi 18-Volt Lithium drill, is incredibly versatile and a staple for many DIY projects. It will be used for pre-drilling holes.
- Drill Bit Set: To match the size needed for your finial and later for the jute twine.
- Measuring Tape and Pencil: For accurate marking and cutting.
- Clean Cloth: For wiping excess stain.
- Safety Glasses: Always protect your eyes when cutting or drilling.
Step-by-Step Assembly of the Welcome Sign Pillar
1. Prepare the Wooden Finial Top
Begin by pre-drilling a pilot hole directly into the center of your purchased wooden block. This hole will serve as the anchor for your finial. Ensure you use a drill bit that is slightly smaller than the screw portion of your finial to create a snug and secure fit. A steady hand and a good quality drill, like my favorite Ryobi 18-Volt Lithium drill, make this step quick and easy.
Once the hole is pre-drilled, carefully screw the finial into place. Twist it firmly until it’s secure and upright. This piece will form the decorative top of your welcome sign pillar, adding a touch of classic charm.
2. Assemble the Pillar Base with Wood Glue
Now, it’s time to assemble the main structure of your welcome sign pillar. For this project, we’re relying solely on the incredible strength of wood glue, specifically Gorilla Glue, which creates an exceptionally sturdy bond without the need for screws or nails in the main stack. This simplifies the process greatly for beginners.
Start with the 1×8 inch wood piece as your base. Apply a generous dab of Gorilla Glue to the exact center of this block. Ensure even coverage to maximize adhesion. Place this block on a flat, protected surface.
Carefully center one of the 2×6 inch wood pieces on top of the 1×8, pressing down firmly. Apply another dab of glue to the center of this newly placed 2×6.
Next, place the prominent 4×4 inch wood piece directly on top of the 2×6, aligning it precisely. This forms the main shaft of your pillar. Apply a dab of glue to the very top center of the 4×4.
Follow this by adding the second 2×6 inch wood piece, centering it on the 4×4. Press down firmly to ensure good contact, and then apply another dab of glue to its center.
Now, place the 2×4 inch wood piece on top of the second 2×6, applying glue as before. This piece serves as a transition to the finial top.
Finally, carefully place the pre-assembled finial top (the wooden block with the finial screwed in) onto the 2×4, ensuring it’s perfectly centered. Press down firmly and allow the entire structure to dry completely according to the glue manufacturer’s instructions. While the glue is drying, you can apply gentle pressure or use clamps to ensure maximum adhesion. This patient waiting period is crucial for the stability of your welcome sign.
3. Painting the Pillar Base
Once the glue has fully cured and your pillar structure is solid, it’s time to add a beautiful finish. I opted to spray paint this piece with my favorite Rust-Oleum Heirloom White in a satin finish. This color provides a timeless, elegant look that complements a wide range of decor styles. For best results, apply multiple thin, even coats, allowing sufficient drying time between each. Typically, two coats are sufficient to achieve full, opaque coverage. Spray painting in a well-ventilated area is always recommended.
Creating Your Personalized Welcome Sign Board
While your pillar base is drying, you can get started on crafting the actual “Welcome” sign board. This separate component will be attached to the pillar later.
1. Cut and Stain the Sign Board
For the sign board, cut a piece of 1×6 wood to 16 inches in length. This size offers ample space for your welcome message while maintaining good proportions with the pillar. After cutting, lightly sand the edges to smooth any rough spots.
Next, apply a coat of your chosen wood stain. I used another one of my favorites, Rust-Oleum Early American stain, which imparts a rich, classic wood tone that contrasts beautifully with the Heirloom White pillar. Apply one even coat of stain, let it penetrate the wood for about 5-10 minutes, and then wipe off any excess with a clean, lint-free cloth. This technique helps to achieve a uniform finish and enhances the wood’s natural grain. Allow the stain to dry completely.
2. Stenciling Your Message
Now for the personalized touch! I utilized my Silhouette cutting machine to create a custom “WELCOME” stencil. If you don’t own a cutting machine, don’t worry – you can find a wide variety of excellent pre-made stencils at your local craft store that will work just as well. Secure your stencil firmly onto the stained wood board to prevent any paint from bleeding underneath. Using a foam brush, gently dab a cream-colored paint (or any contrasting color you prefer) all over the stencil. Apply the paint in thin layers, allowing each to dry slightly before adding the next, to achieve crisp lines. Once dry, carefully peel off the stencil to reveal your perfectly painted message.
3. Adding the Jute Twine Hanger
To prepare your sign for hanging, pre-drill a small hole in each of the top corners of the sign board. Ensure these holes are large enough to comfortably thread your jute twine through but not so large that they compromise the integrity of the wood. Measure carefully to ensure they are evenly spaced and aligned.
Thread a strand of jute twine through each pre-drilled hole, bringing the ends to the front. Tie a secure knot at the front of the sign with each end, creating a rustic, decorative loop for hanging. Trim away any excess twine to achieve a neat finish. The natural texture of the jute twine adds to the charm of your handmade welcome sign.
4. Protecting Your Finished Sign
To ensure your beautiful welcome sign withstands the elements, especially if it will be displayed outdoors, it’s crucial to apply a protective finish. I used one coat of Rust-Oleum Polyurethane over the entire sign board. This creates a durable clear coat that guards against moisture, UV rays, and general wear and tear, preserving the vibrancy of your paint and stain for years to come. Apply according to the product instructions, ensuring even coverage and allowing for proper drying time.
Final Assembly and Display
With both your pillar base and your welcome sign board complete and fully dried, it’s time for the grand finale! Simply attach a cute hook to the top 2×6 section of your painted pillar. The exact placement will depend on the size of your hook and the desired hanging height of your sign. I found a lovely and affordable hook at Lowe’s for around $3, demonstrating that decorative touches don’t have to break the bank. Hang your personalized welcome sign from this hook, and step back to admire your handiwork!
The Value of DIY: Cost-Effective & Rewarding
Wasn’t that incredibly easy? The satisfaction of creating something beautiful with your own hands is truly unmatched. By utilizing wood scraps I already had on hand, I was able to complete this entire project for just $3 (the cost of the hook!). Even if you need to purchase all the lumber and supplies new, the total cost would typically be around $15. What’s more, that modest investment will likely provide enough materials to craft several welcome signs, allowing you to create gifts for friends and family or experiment with different finishes. Don’t forget our earlier tip: always check the scrap bins at your local hardware store for hidden gems and even greater savings!
This DIY Welcome Sign is more than just a decorative piece; it’s a testament to the fact that beautiful, custom home decor doesn’t require a hefty budget or advanced carpentry skills. It’s a perfect project for anyone looking to add a personal, inviting touch to their front porch, entryway, or garden. The blend of the classic white pillar with the stained “Welcome” sign offers a timeless aesthetic that will complement almost any home style.
We absolutely love seeing your creations! As always, we deeply appreciate your pins and every other way you choose to share our projects and inspire others. Your support helps our community grow and encourages more people to discover the joy of DIY.
Thank you so much for stopping by and being a part of our creative journey!
~Ashley