
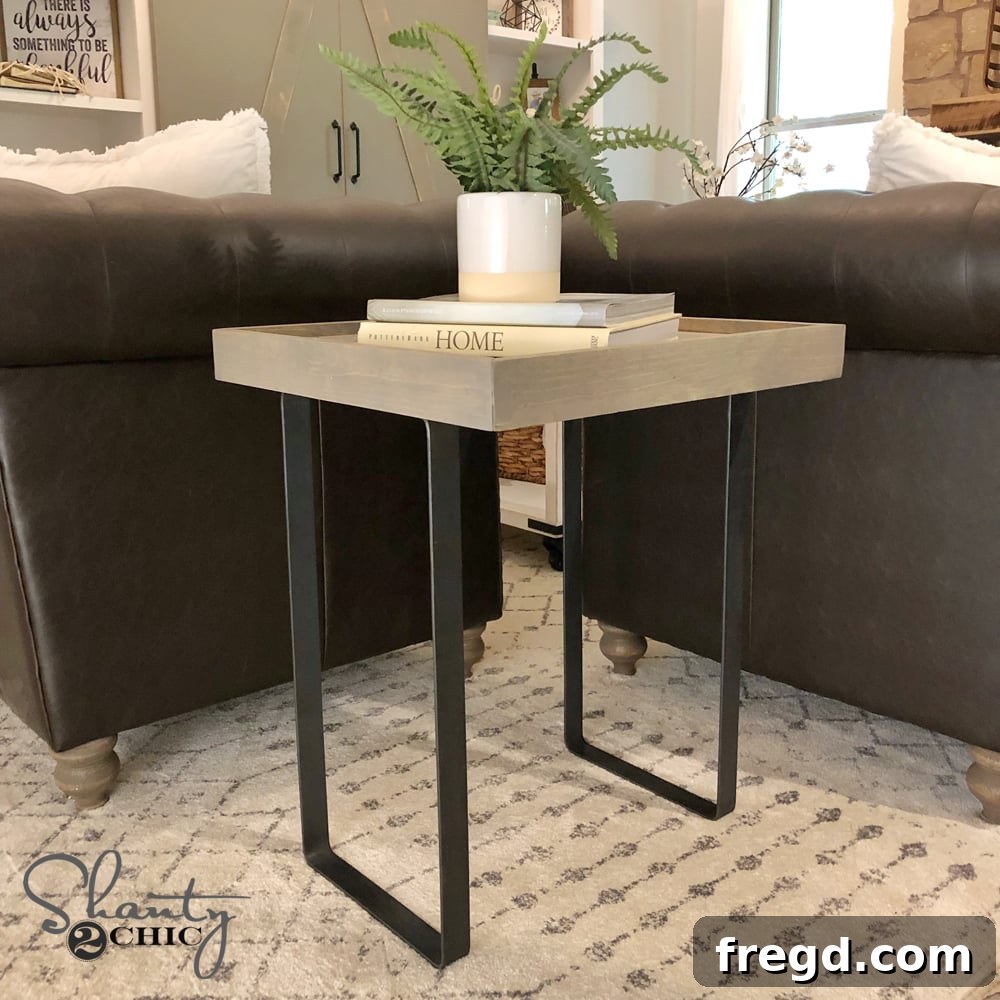
Craft Your Own Stunning Modern Rustic End Table: A DIY Guide for Under $80
Are you searching for the perfect blend of contemporary style and rustic charm to elevate your home decor? Look no further! This comprehensive guide will walk you through building a gorgeous Modern Rustic End Table for an incredibly budget-friendly cost, often under $80, including stylish metal legs. This project is not just about saving money; it’s about the satisfaction of creating a unique piece that perfectly complements your living space. Dive into the world of DIY furniture and discover how rewarding it can be to craft something beautiful with your own hands. This versatile table can serve as an elegant bedside companion, a chic living room accent, or even a functional entryway piece, adding character and warmth to any room.
We’ve meticulously designed this project to be accessible for DIY enthusiasts of all skill levels, offering clear instructions and helpful tips to ensure your success. From precise cuts to final assembly, every step is detailed to make the process enjoyable and straightforward. Imagine the compliments you’ll receive on your custom-built furniture, all while knowing you achieved it without breaking the bank. Let’s embark on this creative journey together and transform simple lumber into a masterpiece!
Witness the creation process in action! Our step-by-step video tutorial provides a visual guide to complement the written instructions, making your building experience even smoother. Before we jump into the exciting world of woodworking, let’s talk about those crucial components that give our table its distinctive character: the legs. We carefully selected sturdy and stylish metal legs to complete the modern rustic aesthetic. The specific dimensions for our project were 24 inches in height and 12 inches in length, striking the perfect balance between stability and visual appeal. You can find the exact legs we used for this project and replicate the look by following this convenient link:
Click Here to Find the Perfect Table Legs!
For those who prefer a printed guide or a detailed schematic, we’ve got you covered! You can easily download and print the complete, free plans for this DIY Modern Rustic End Table. These plans include precise measurements and diagrams, serving as an invaluable resource throughout your build. Having a physical copy can be incredibly helpful when you’re in the workshop, allowing you to quickly reference details without needing to switch between screens.
Download Your FREE PLANS by Clicking HERE!
Now, with our materials in hand and inspiration flowing, let’s gather our tools and begin the exciting process of bringing this stunning Modern Rustic End Table to life!
Essential Materials & Tools for Your DIY Project
Crafting this beautiful end table requires a careful selection of materials and a few essential tools. While the specific list is concise, understanding the purpose of each item will contribute to a smoother build and a professional finish. We’ve focused on readily available and affordable components to keep your budget in check without compromising on quality or aesthetics. The core of our table relies on common lumber sizes, offering both structural integrity and a clean base for our decorative elements.
Materials List:
- Project Panel: This forms the main tabletop surface. The size will dictate the overall dimensions of your table.
- 1×2 Boards: Used for the foundational frame beneath the chevron pattern.
- 1×3 Boards: These will be crafted into the stylish trim that gives the table its distinctive “tray” look.
- Wood Glue: A strong adhesive is crucial for bonding wood pieces together, ensuring longevity and stability.
- 1.25” Brad Nails: Used in conjunction with wood glue to secure components, offering immediate holding power while the glue dries.
- Table Legs: As mentioned, we opted for 24″ height and 12″ length metal legs to achieve the modern rustic look.
- Screws: Appropriate screws for attaching your chosen table legs securely to the finished tabletop.
- Wood Filler (Optional): For filling any small gaps or nail holes for a perfectly smooth finish.
- Sandpaper (various grits): Essential for smoothing surfaces and preparing the wood for finishing.
- Wood Stain, Paint, or Sealant (Optional): To protect the wood and customize the final appearance.
Tools You’ll Need:
- Miter Saw: Indispensable for making precise 45-degree angle cuts for the chevron pattern and trim.
- Brad Nailer: Makes quick work of attaching boards with brad nails, providing strong and discreet fastening.
- Measuring Tape: Accuracy is key in woodworking; a reliable measuring tape is paramount.
- Pencil: For marking cuts and placement points.
- Safety Glasses: Always protect your eyes when working with power tools.
- Hearing Protection: Recommended when using saws and nailers.
- Orbital Sander (Optional, but recommended): For achieving a super smooth finish quickly.
- Clamps (Optional): Can be very helpful for holding pieces together while glue dries.
Step-by-Step Guide: Building Your Modern Rustic End Table
Let’s transform these raw materials into a stunning piece of furniture. Follow these detailed steps closely, taking your time with each stage to ensure precision and a high-quality finished product. Remember, patience and attention to detail are your best allies in any woodworking project.
Step 1: Preparing the Base Panel
Begin by establishing a solid foundation for your tabletop. The project panel will serve as the core, providing a stable surface for the decorative chevron pattern. Take your 1×2 boards and attach them to the underside of this project panel. Apply a generous bead of wood glue along the edges of the 1x2s before securing them with 1.25-inch brad nails. Two of these boards should be positioned flush with the outer edges of the project panel, creating a clean frame. The third 1×2 board should be carefully centered on the panel, providing additional support and a central anchor point. Ensure these boards are securely fastened, as they will bear the weight of the chevron pattern and provide structural integrity to your table.
Step 2: Crafting the Chevron Pattern (Initial Cuts)
Now for the visually striking chevron pattern, the signature feature of our modern rustic design. This pattern is achieved through simple yet precise 45-degree angle cuts on each end of your wooden pieces. While exact measurements are provided in the free plans, it is highly recommended to “measure and cut as you go” for this particular step. Wood can have slight variations, and cutting pieces one by one, fitting them as you progress, will ensure a much tighter and more professional-looking inlay. We found it most efficient to cut several full-length pieces first, as shown in the image below, and then use the scraps from these longer pieces to fill in the smaller, triangular sections. This approach minimizes waste and streamlines the cutting process.
Step 3: Continuing the Chevron Design
With the initial cuts made, begin laying out your chevron pattern on one side of your prepared project panel. Carefully fit each piece, ensuring the 45-degree angles align perfectly to form the distinctive V-shape of the chevron. This stage is a dry fit, meaning you are placing the pieces without glue or nails yet. This allows you to make any necessary minor adjustments to your cuts or arrangement before permanently securing them. Take your time to achieve a tight, consistent pattern, as the quality of your dry fit will directly impact the final appearance of your tabletop.
Step 4: Completing the Chevron Inlay
Once you’ve completed the main sections of the chevron pattern, you’ll notice smaller, triangular gaps along the edges of the panel. This is where your foresight in using scrap pieces comes into play. Carefully measure and cut these smaller filler pieces, ensuring they also have precise 45-degree angle cuts to perfectly complete the pattern. Remember, even these small pieces are crucial for a seamless and polished look. The beauty of the chevron lies in its continuous, interlocking design, so paying attention to these details will make a significant difference in the finished product. This step highlights the efficiency of utilizing all your lumber, minimizing waste and maximizing your budget.
Step 5: Securing the Chevron Pattern
After you have meticulously dry-fit all the patterned boards and are satisfied with the layout and tightness of the joints, it’s time to permanently attach them. Apply wood glue to the back of each chevron piece and carefully place it back onto the project panel, following your dry-fit arrangement. Once positioned, secure each piece with 1.25-inch brad nails. The combination of wood glue and brad nails provides a robust bond, ensuring your beautiful chevron pattern will remain intact and durable for years to come. Wipe away any excess glue immediately with a damp cloth to prevent it from drying on the surface, which can interfere with staining or finishing later.
Step 6: Attaching the Decorative Trim
Now, let’s add the finishing touch that elevates this end table to a truly custom piece: the trim. We’re using 1×3 boards for this purpose, carefully chosen to create a substantial edge. To achieve a clean, polished, and professional look, we recommend adding a 45-degree miter cut to each corner of your trim pieces. This creates a seamless joint where the trim boards meet, eliminating visible end grain. When attaching the trim, ensure the base of each trim board is flush with the bottom of the project panel. This strategic placement will create a slight overhang on the top edge, giving your table a sophisticated “tray” appearance, which is both aesthetically pleasing and subtly functional.
Step 7: Finishing the Trim Application
With the first trim piece in place, proceed to measure and cut the remaining trim boards to size. Remember to maintain those precise 45-degree miter cuts at each corner for a continuous, clean frame. Once cut, apply wood glue to the back of each trim board and position them carefully against the outside edges of the panel, ensuring the flush alignment with the bottom of the project panel is consistent. Secure each trim piece using brad nails, just as you did with the chevron pattern. Work your way around all four sides until the entire tabletop is neatly framed. This final step in the tabletop construction adds significant visual weight and structural integrity, truly defining the table’s character.
Final Touches: Legs, Finishing, and Personalization
Congratulations, your tabletop is complete and looking fantastic! Now, you’re ready for the grand finale: attaching the legs. Carefully turn your tabletop upside down on a soft, protective surface to avoid scratching your newly crafted piece. Position the legs in each corner, ensuring they are evenly spaced and aligned. Use appropriate screws to securely fasten the legs to the underside of the project panel and the 1×2 support frame. Double-check that all screws are tight and the legs are stable before turning the table upright. If you decided to add pulls to the sides during the trim installation, this piece would also make the cutest tray!
Before moving to finishing, take some time to sand your entire table. Start with a medium-grit sandpaper (e.g., 120-grit) to smooth out any rough spots or imperfections, then move to a finer grit (e.g., 220-grit) for a silky-smooth surface. A thorough sanding will ensure any stain or paint you apply goes on evenly and beautifully. After sanding, wipe down the table with a tack cloth to remove all dust. Now, you can personalize your table with your chosen finish. A clear sealant will highlight the natural beauty of the wood, while a dark stain can enhance its rustic appeal, and a fresh coat of paint can introduce a modern pop of color. The possibilities are endless, allowing you to truly make this piece your own.
Share Your Masterpiece!
You’ve poured your time, effort, and creativity into building this incredible Modern Rustic End Table. Don’t keep your accomplishment to yourself! We absolutely love seeing your DIY projects come to life. Share your finished build with our vibrant community of makers. Tag us on social media and use the hashtag #shanty2chic when you post photos of your new end table. It’s inspiring to see how different finishes and personal touches can transform the same plans into unique pieces of art. We can’t wait to celebrate your craftsmanship and see the amazing results!
Building your own furniture is an incredibly rewarding experience, offering not just a functional piece for your home but also a profound sense of accomplishment. This DIY Modern Rustic End Table project empowers you to create custom decor that reflects your personal style, all while adhering to a modest budget. Enjoy the process, take pride in your craftsmanship, and revel in the beauty of your handmade furniture for years to come!