
Welcome, fellow DIY enthusiasts and home improvement seekers!
Transform Your Garage: Build the Ultimate Mobile Lumber and Scrap Wood Storage Cart
A few weeks ago, a nagging thought sparked a significant project in my home – it was finally time to tackle the garage. Often the most underutilized and cluttered space, my garage had become a chaotic repository, especially for an ever-growing collection of lumber and scrap wood. After an intense two weeks of hard work, I am absolutely thrilled with the transformation. It feels like I’ve gained valuable square footage, and along the way, I discovered some truly amazing products and techniques that I’m eager to share with you.
Before any organization could begin, a thorough clean-out was essential. My primary adversary? The formidable, ever-expanding pile of scrap wood that seemed to consume half the garage floor. It was an obstacle to productivity, a tripping hazard, and a constant source of frustration. I knew I needed a dedicated, efficient solution, and that’s precisely what I set out to create.
Introducing the Shanty DIY Garage Storage Cart: Your Workshop’s New Best Friend
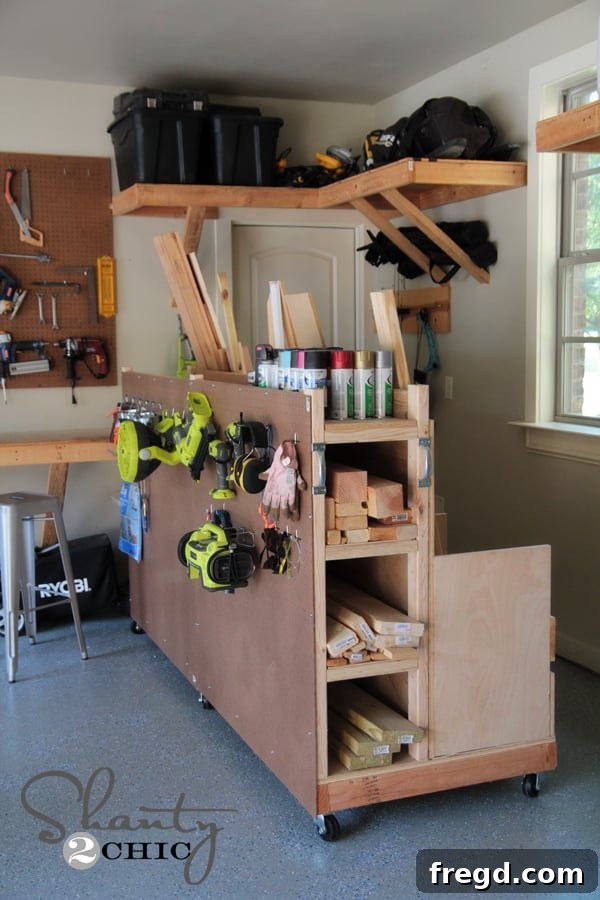
Behold! The answer to my garage woes: my custom-built Shanty Garage Storage Cart! Seriously, I absolutely adore this creation. This isn’t just a simple cart; it’s a comprehensive mobile organization station designed to maximize space and efficiency. It masterfully combines several essential storage needs into one compact, rollable unit.
Key Features of Your New Workshop Essential:
- Dedicated Scrap Wood Storage: Say goodbye to scattered wood pieces. This cart provides multiple compartments to neatly store various sizes of scrap wood, making them easily accessible and visible.
- Long Board Organization: Tame those unwieldy long boards! Integrated vertical storage ensures your full-length lumber is kept tidy, preventing warping and making selection a breeze.
- Full-Sheet Pegboard for Tools: One side features a generous pegboard panel, offering instant access to your most-used hand tools, measuring tapes, and safety gear. No more rummaging through drawers!
- Convenient Top Shelf: A sturdy shelf on top is perfect for housing frequently used items like spray paints, stains, adhesives, or even small power tools, keeping them within arm’s reach.
Can I get a resounding “woohoo” for reclaimed garage space and unparalleled organization?
Get Started Today: Download Your FREE Printable Plans!
Ready to build your own game-changing storage cart? You’re in luck! We’ve made it incredibly easy to get started. Simply click the button below to download the FREE printable plans for this versatile cart. A huge thank you to Jay from Jay’s Custom Creations for meticulously transforming all of Shanty2Chic’s original designs into these reader-friendly printable plans. Jay is truly “too legit to quit” when it comes to woodworking plans! Be sure to check out his site for an impressive collection of his own fantastic woodworking projects and plans.
Step-by-Step Guide: How I Built This Essential Garage Organizer
Now, let me walk you through the construction process of this amazing mobile storage cart. With these detailed instructions, you’ll be well on your way to a more organized and efficient workshop.
1. Constructing the Sturdy Base Frame
The foundation of any robust build is a strong frame. I began by creating the base frame for the entire cart, using durable 2x4x8 lumber for all components. This ensures maximum stability and longevity for a unit that will carry significant weight. Careful measurement and square cuts are essential here to ensure your cart rolls true and stands straight.
*Note: While the photographed frame might appear slightly different due to a tricky shot during my build, rest assured, the construction method and dimensions are identical to what you’ll need. I simply added an extra 29-inch piece to my specific frame for enhanced structural support when constructing the cart.*
2. The Power of the Kreg Jig: Precision Pocket Holes
For assembling this entire project, my Kreg Jig was an absolute indispensable tool. For those unfamiliar with this woodworking marvel, a Kreg Jig allows you to drill angled pocket holes into wood, creating incredibly strong and concealed joints when combined with pocket hole screws. It’s a game-changer for speed and strength in woodworking projects.
If you’re wondering, “What the heck is a Kreg Jig?”, I highly recommend checking out our quick video explaining its function and benefits. You can find that HERE.
I utilized both 1 1/2-inch and 2 1/2-inch pocket holes for all the corner joints and internal connections throughout the frame, ensuring a super strong and stable assembly, as shown here.
3. Installing the PureBond Plywood Base
Once the base frame was complete, I covered it with a substantial 3/4-inch PureBond Plywood sheet. PureBond is an incredible choice for plywood due to its formaldehyde-free composition, making it healthier for your home and the environment. Its beautiful finish and superior strength have made it our top choice for all plywood projects. It’s a win-win in terms of aesthetics and performance!
To save time and ensure precision, I had the helpful team at Home Depot cut this base piece to 32 inches by 8 feet. The remaining 16-inch piece from this sheet was cleverly repurposed for the internal dividers, minimizing waste.
4. Building the Long Board Storage Rack
With the plywood base in place, the next crucial step was to construct the dedicated storage rack for my longer lumber pieces. These frames were meticulously crafted from 2x3x8 boards. I built three identical frames, designing them to be securely attached to the plywood base using more pocket hole screws. The placement of these frames is flexible, allowing you to customize the width of your storage slots, but ensure all three are aligned for even support. Mine are spaced approximately 12 inches apart, providing ample room for various board widths.
5. Adding the Back Plywood Panel
After securing the long board racks, I attached another piece of PureBond plywood to the back of these three frames. This back panel not only provides structural integrity but also serves as the mounting surface for the pegboard on the opposite side. I used durable wood screws driven through the plywood directly into the back of the frames to ensure a rock-solid attachment. This piece was cut to 40 inches by 8 feet by Home Depot, and again, the leftover 8-inch scrap was set aside for a later use in the project.
6. Installing the Functional Pegboard
On one side of the cart, I installed two 4×4 sheets of pegboard. While a full 4×8-foot sheet might seem ideal, fitting it into my Suburban with five kids was a challenge, so two smaller pieces worked perfectly! Pegboard is a phenomenal tool organization solution, allowing you to hang frequently used items for quick access. I attached these sheets securely to the frame using wood screws paired with small washers, which help prevent the screw heads from pulling through the pegboard holes, ensuring a lasting hold.
7. Creating the Scrap Wood Dividers
The next step was to craft the crucial dividers for efficient scrap wood organization. I cut five pieces of 3/4-inch PureBond Plywood, each precisely measured at 16 inches by 24 inches. These will form the individual compartments for different sizes and types of scrap wood, keeping everything separated and easily identifiable.
To attach these dividers securely, I again turned to my Kreg Jig, using 3/4-inch pocket holes and 1 1/4-inch pocket hole screws. Each divider was firmly fastened into both the main plywood base and the back plywood panel, creating a robust structure for holding heavy wood scraps.
8. Adding Front Retainers for Wood Containment
To prevent the wood scraps from sliding out of their compartments, I added front retaining strips. For this, I utilized an 8-foot scrap piece from one of the PureBond sheets, paired with a 1x6x8 board. These pieces act as a barrier, keeping all your organized lumber safely within the dividers. I secured these with a combination of strong Gorilla Wood Glue and finish nails for a clean, durable hold.
9. Enhancing Long Board Shelves with Glide Strips
For the long board storage sections, I added clever strips of 1/4-inch PureBond plywood to create a smooth, low-friction shelf surface. While these might typically be too thin for a standalone shelf, their purpose here is ingenious: they facilitate easy sliding of the long boards. Since I’ll primarily be storing 8-foot pieces, the weight is evenly distributed across the entire length, and the thin strips ensure boards can be effortlessly slid in and out without snagging or struggling.
10. Installing the Durable Top Shelf
To crown this organizational masterpiece, I installed a top shelf using particle board. This was the most cost-effective option available, and its inherent strength makes it perfectly suited for holding my “extra goodies” – from paint cans to tools. It provides a robust and expansive surface for additional storage or even a temporary workspace.
11. Adding Casters for Ultimate Mobility
A truly indispensable feature of this cart is its mobility. I initially installed four heavy-duty 250lb casters, one on each corner. However, after a quick test, I realized that for optimal maneuverability, especially when fully loaded with lumber, adding a couple more casters to the center would make a significant difference. I’m so glad I made this decision! For an extra investment of about $10, this “baby” now glides effortlessly across the garage floor, even when packed to the brim with wood. This mobility is a game-changer for clearing space or moving the workspace around.
12. Finishing Touches: Practical Pull Handles
To complete the cart and make it even more user-friendly, I added a set of robust pull handles on each side, positioned conveniently near the top. These handles are fantastic for guiding the cart. I found them at Lowe’s in the outdoor hardware aisle; they’re actually marketed as gate pulls, which speaks to their durability and ergonomic design.
13. The Grand Finale: Loading Up and Enjoying the Organization!
The absolute final and most satisfying step was loading up this magnificent storage cart! Witnessing all my previously scattered lumber and scrap wood find its designated place was incredibly rewarding. The transformation from chaos to organized efficiency is truly remarkable.
The Impact: A Game-Changer for My Workshop and Home
So, what do you think? For me, this DIY Mobile Lumber and Scrap Wood Storage Cart has been an absolute lifesaver. Quite literally, I’m no longer tripping over rogue pieces of wood! More importantly, I can now instantly see all my scraps and available lumber, which significantly boosts my efficiency and reduces waste on projects. It’s transformed my garage from a cluttered storage area into a functional, inviting workspace. Did I mention how much I love it? Good, just checking!
This project has not only decluttered my garage but also revolutionized my workflow. The ability to easily move all my lumber and tools around means I can adapt my workspace for any project, big or small. No more wasting time searching for that perfect piece of scrap or the right tool; everything has its place and is readily accessible. It’s truly empowering to have such a well-organized and flexible setup.
Don’t Wait: Grab Your Free Plans and Start Building!
Remember, you can download or print the full set of FREE plans by clicking HERE! These detailed plans will guide you through every step, ensuring your build is as smooth and successful as possible.
Thank you so much for stopping by and taking the time to explore this project. I sincerely hope I’ve explained everything thoroughly, but please don’t hesitate to reach out if you have any questions at all. Your feedback is always welcome! I would absolutely love for you to pin this project and share it with your friends and fellow DIYers using the sharing buttons below. Let’s inspire more people to conquer their garage clutter!
Have a fantastic and productive weekend!
~Whitney