
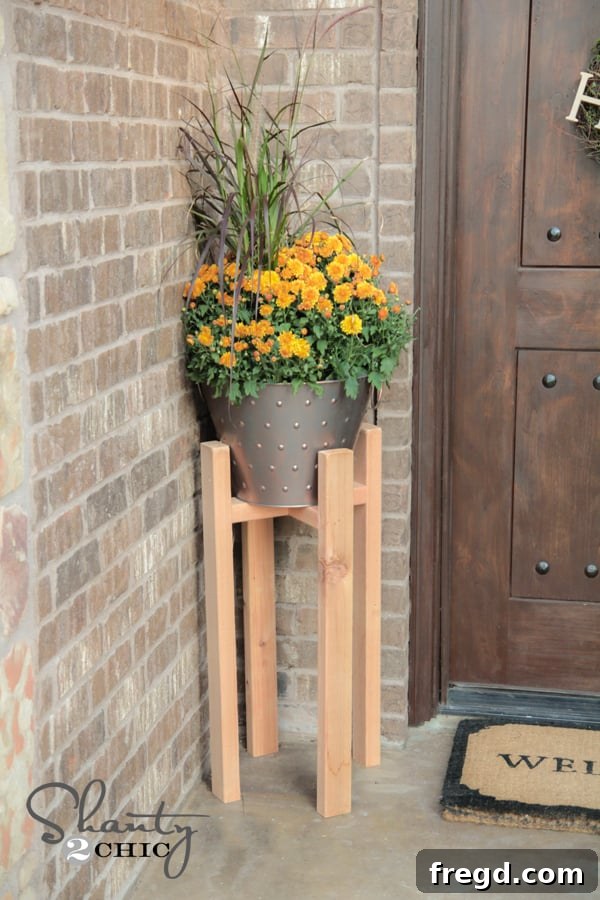
Build Your Own Stylish DIY Plant Stand: Free Plans & Easy Steps
Are you looking for a simple yet incredibly rewarding DIY project that adds a touch of natural elegance to your home or patio? Get ready to unleash your inner craftsman because today, we’re diving into building a beautiful and functional DIY Plant Stand! This project is designed to be straightforward, fun, and surprisingly affordable, making it perfect for both seasoned woodworkers and enthusiastic beginners.
Why Build a DIY Plant Stand?
There’s something uniquely satisfying about creating something with your own hands, especially when it enhances your living space. These adorable plant stands are not only incredibly cute but also serve a fantastic purpose by elevating your greenery, allowing plants to get better light, and adding vertical interest to any room or outdoor area. Beyond their aesthetic appeal, building your own plant stand offers several compelling advantages:
- Cost-Effective: Compared to buying commercially available plant stands, crafting your own can save you a significant amount of money. The cost of wood for one stand can be surprisingly low, often under $10!
- Customizable: Forget trying to find a stand that perfectly fits your pots or matches your decor. With DIY, you have complete control. You can modify the dimensions to fit any pot size, choose your preferred wood type, and apply any finish you desire – from natural cedar to a vibrant paint color.
- Simple & Rewarding: This project uses basic woodworking techniques and tools, making it accessible for beginners. The Kreg Jig makes joining wood incredibly easy, transforming what might seem daunting into a quick and enjoyable build.
- Personal Touch: Add a unique, handmade element to your home decor that reflects your personal style. It’s a great conversation starter and a testament to your creativity.
So, are you ready to transform a few pieces of wood into functional art for your beloved plants? Let’s gather our tools and materials and get started on this fantastic journey!
Essential Tools & Materials for Your DIY Plant Stand
Before we dive into the construction, let’s make sure we have everything we need. This project primarily relies on a few key tools, notably the Kreg Jig, which makes pocket hole joinery a breeze. For those new to woodworking, don’t be intimidated; these tools are user-friendly, and we’ll guide you through their use.
Required Tools:
- Kreg Jig: An absolute game-changer for simple and strong wood joints. We’ll be using it extensively for pocket holes. If you’re new to Kreg Jigs, they are designed to create angled holes for screws, making sturdy, concealed joints. You can find our favorite model HERE on Amazon!
- Miter Saw: Essential for making precise cuts. A 12-inch miter saw offers versatility, but even a smaller, portable option like the 18V Ryobi Miter Saw works wonderfully, especially if you have limited workshop space or already own Ryobi 18V tools. If you don’t own one, most hardware stores like Home Depot offer cutting services.
- Cordless Drill: An 18V Ryobi drill (or any comparable model) is perfect for drilling pocket holes and driving screws.
- Measuring Tape & Pencil: For accurate measurements and markings.
- Safety Glasses: Always protect your eyes when working with power tools!
- Wood Clamps (optional but recommended): To hold pieces steady during assembly, ensuring accurate joints.
Materials List for One Plant Stand:
- 2.5″ Pocket Hole Screws: These are specifically designed for Kreg Jig joinery and provide excellent strength.
- 2 – 2x3x8 Cedar Posts: We recommend using Western Red Cedar Fence Rails, like these from Home Depot. Cedar is an excellent choice for plant stands due to its natural resistance to rot and insects, making it ideal for both indoor and outdoor use. Plus, it has a beautiful natural aroma and appealing grain.
- Gorilla Wood Glue: For extra strong joints, especially where pieces meet.
- Your Favorite Pots: Have your pots on hand to measure and customize your stand’s dimensions for a perfect fit. Copper-colored pots can add a lovely contrast to the cedar!
Step-by-Step Guide: Building Your Cedar Plant Stand
Now that we have all our tools and materials ready, let’s get down to the exciting part – building! Follow these steps carefully to construct your sturdy and stylish plant stand.
Step 1: Making Your Precise Cuts
Accuracy in cutting is key to a professional-looking finish. Using a miter saw will make this step quick and precise. Always double-check your measurements before making any cuts. If you’re new to using a miter saw, take your time, and always keep safety in mind. Wear your safety glasses and keep your hands clear of the blade.
For those without a miter saw, don’t despair! Many hardware stores, like Home Depot, offer cutting services. Just bring your cut list, and they can cut your cedar posts to size for you.
Cut List for One Plant Stand:
- 4 pieces at 30 inches: These will form the main vertical legs of your plant stand.
- 2 pieces at 5.5 inches: These short pieces will create the crucial “X” support at the base of your pot.
- 1 piece at 12 inches: This longer piece will also contribute to the “X” support, spanning the width of the stand.
Once all your cuts are made, set them aside. It’s helpful to label them if you’re new to this, so you don’t confuse the pieces during assembly.
Step 2: Preparing for Pocket Holes with the Kreg Jig
The Kreg Jig is truly the star of this project, simplifying the joinery process immensely. If you’re unfamiliar with it, a Kreg Jig allows you to drill angled holes (pocket holes) into one piece of wood, which then connects to another piece using special screws, creating a very strong and secure joint. For a visual demonstration, you can check out our video HERE to see how it works!
For this project, we’ll be making 1.5-inch pocket holes. Here’s how to set up and use your Kreg Jig:
- Set the Jig: Adjust your Kreg Jig to the correct setting for 1.5-inch stock thickness.
- Position the Wood: Line up your 2×3 cedar pieces in the Kreg Jig. Ensure they are firmly clamped in place to prevent any movement during drilling.
- Drill the Holes: Use the Kreg bit that comes with your jig and your cordless drill to make the pocket holes.
Here’s where to place your pocket holes on each piece:
- 12-inch piece: Drill two pocket holes on each end. These will be used to attach the 5.5-inch pieces.
- 5.5-inch pieces: Each of these two shorter pieces will need four pocket holes. Drill two holes on one face of the wood, and two on the opposite face. It’s crucial that these don’t overlap. They should fit side-by-side on the face of the wood, allowing for strong, secure attachment from multiple angles.
Step 3: Assembling the X-Brace Support
The “X” brace is the central support structure that will hold your plant pot. We’ll assemble this part first. This design is not only sturdy but also highly adaptable to different pot sizes, allowing you to easily place or remove your plants.
- Position the Pieces: Take your 12-inch piece and one of your 5.5-inch pieces. Center the 5.5-inch piece on the 12-inch piece, forming a “T” shape.
- Attach with Screws: Using your drill and 2.5-inch pocket hole screws, secure the 5.5-inch piece to the 12-inch piece through the pocket holes you drilled earlier.
- Complete the “X”: Now, take the second 5.5-inch piece. Position it parallel to the first 5.5-inch piece, but on the opposite side of the 12-inch piece, also centered. Again, attach it securely with 2.5-inch pocket hole screws. You should now have a robust “X” shape that will cradle your pot. Ensure all connections are tight and flush.
Step 4: Attaching the Legs and Final Assembly
With the “X” brace complete, it’s time to bring your plant stand to its full height by attaching the four 30-inch leg pieces. This step requires a bit of measuring to ensure your pot sits perfectly.
- Determine Pot Placement: First, decide where you want your pot to sit on the stand. This measurement will depend on the size of your pot and how high you want your plant to be. For standard pots, around 6 inches from the top of the legs (or from the bottom, depending on your preferred look) is a good starting point. Hold your pot against a leg to visualize the ideal spot.
- Mark the Legs: Once you’ve determined your desired height, use your measuring tape and pencil to mark a clear line on each of the four 30-inch leg pieces. This line will serve as your guide for attaching the “X” brace, ensuring it is level and consistent across all legs.
- Attach the First “X” Brace Side: Apply a small amount of Gorilla Wood Glue to the end of one leg of your “X” brace where it will meet a 30-inch leg. Align the “X” brace leg precisely with the marked line on one of the 30-inch leg pieces. Secure it in place using 2.5-inch pocket hole screws through the pre-drilled holes in the “X” brace.
- Attach the Opposite “X” Brace Side: Repeat the process for the opposite side of the “X” brace, attaching it to another 30-inch leg. At this point, you’ll have two legs connected by the “X” brace. Ensure these two legs are parallel.
- Complete the Frame: Now, attach the remaining two 30-inch legs to the open ends of your “X” brace. Again, use wood glue and 2.5-inch pocket hole screws, carefully aligning each leg with your marked lines. As you attach the last two legs, periodically check for squareness to ensure your stand is stable and doesn’t wobble. Clamps can be incredibly useful here to hold pieces steady while you drive screws.
Take a moment to admire your work! You’ve just constructed the basic frame of your beautiful plant stand. The combination of pocket hole screws and wood glue creates incredibly strong joints, ensuring your stand will support your plants reliably for years to come.
Finishing Touches & Customization Options
The construction is complete! Now comes the truly creative part: deciding on the finish. One of the greatest benefits of building your own furniture is the freedom to customize it to perfectly match your aesthetic. Whether you prefer a rustic, modern, or colorful look, your plant stand can reflect your unique style.
We opted to keep our cedar plant stand raw, embracing the natural beauty and warm tones of the cedar wood. The raw cedar has a rustic charm and will develop a lovely silvery-grey patina over time if exposed to the elements, making it ideal for outdoor use. However, you have many options:
- Natural Look (Sealed): If you love the raw cedar look but want to protect it from moisture and wear, apply a clear exterior-grade sealant or spar urethane. This will preserve the wood’s natural color while offering protection, especially if the stand will be outdoors.
- Staining: Staining is a popular choice to enhance the wood grain and achieve a specific color. From light oak to rich mahogany or even a trendy grey wash, stains come in a vast array of shades. Apply a pre-stain conditioner first for a more even finish, then follow with your chosen stain and a protective topcoat.
- Painting: For a bold statement or to match existing decor, paint is an excellent option. Prime the cedar first to ensure good paint adhesion and prevent bleed-through from the wood’s natural tannins, then apply two coats of your chosen paint color. Matte, satin, or gloss finishes can all create different effects.
- Distressed/Antiqued Finish: For a shabby-chic or vintage look, you can distress your painted or stained stand by lightly sanding edges and corners after the finish has dried.
Remember to let any finishes dry completely according to the manufacturer’s instructions before placing your pots and plants on the stand.
Bringing Your Plant Stand to Life: Decorating & Plant Choices
Once your plant stand is built and finished, it’s time for the most enjoyable step: filling it with beautiful greenery! We filled ours with vibrant mums, hoping to usher in some cozy Fall weather. Mums offer a burst of color, perfect for seasonal transitions, but the possibilities are endless.
- Indoor Plants: For an indoor stand, consider trailing plants like Pothos or Philodendrons that will gracefully cascade over the edges, or upright varieties like Snake Plants or ZZ Plants for a minimalist look.
- Outdoor Plants: If your stand is destined for the porch or patio, choose plants that thrive in your local climate. Succulents, herbs, or seasonal flowers like petunias and impatiens are all fantastic choices. Cedar’s natural durability makes it an excellent material for outdoor use, standing up well to moisture and sun.
- Mix and Match: Don’t be afraid to experiment with different pot sizes and plant varieties to create an appealing arrangement. The “X” brace design of this stand is incredibly versatile, accommodating various pot shapes and sizes with ease.
- Location, Location, Location: Place your finished plant stand in a spot where it can truly shine and where your plants will thrive. Near a sunny window, in a cozy reading nook, or as a welcoming accent on your front porch – the choice is yours!
Conclusion: Enjoy Your Handmade Masterpiece!
And there you have it! A simple, fun, and incredibly rewarding DIY project completed. You’ve successfully built a beautiful, custom plant stand that will add charm and greenery to any space. This project proves that with a few basic tools and some cedar, you can create something truly special and budget-friendly.
We hope you enjoyed following along with these free woodworking plans and feel inspired to take on more DIY challenges. There’s a wonderful sense of accomplishment that comes with building things yourself, and we believe everyone can experience that joy!
Share Your Creation!
We would absolutely LOVE to see your finished DIY plant stands! Please share your projects with us on social media and tag us, or drop a comment below. Your creativity inspires us and our community!
Connect With Us
Got questions or need a little extra guidance? Don’t hesitate to ask! We’re here to help you every step of the way. Share this project with your friends and family by pinning it or sharing on your favorite platforms.
Happy building!
~Whitney