
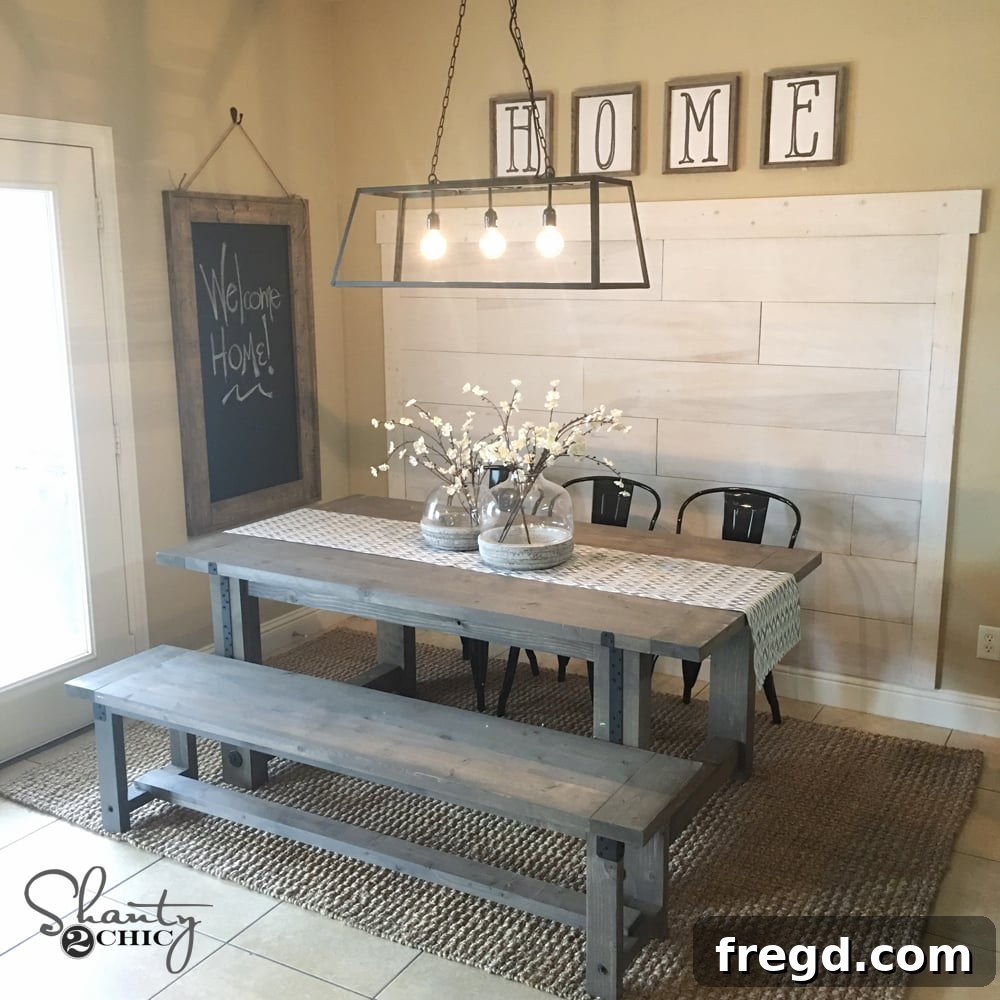
Welcome to another exciting DIY adventure! Today, we’re thrilled to unveil a stunning home transformation that will inspire you to pick up your tools. We recently had the pleasure of giving our friend Rachel’s kitchen nook a complete facelift, turning a plain wall into a captivating focal point with a beautiful DIY Plank Wall. This space is a central hub for her family, and our goal was to infuse it with both much-needed functionality and undeniable charm. The results speak for themselves, creating a warm, inviting, and truly personalized area perfect for gathering. Get ready to witness the full transformation and discover how you can achieve a similar look in your own home!
Upon surveying Rachel’s kitchen nook, we immediately noticed the large, unadorned wall that stretched across the space. It was a blank canvas, practically begging for a creative treatment to add character and depth. This expanse of emptiness presented the perfect opportunity to introduce a design element that would not only enhance the aesthetic but also define the entire dining area. We envisioned a feature that would complement the home’s style while offering a touch of rustic elegance.
To bring our vision to life, we needed a material that offered both quality and ease of use. Our immediate choice for this “House Crash” project was PureBond Plywood, a brand we’ve trusted and utilized for the past four years. Their products consistently deliver exceptional results, and we’ve become firm believers in the myriad benefits they offer to DIY enthusiasts and professional builders alike. This collaboration was a natural fit, allowing us to showcase the versatility and beauty of their plywood in a real-world application.
For those unfamiliar, PureBond Plywood is a premium plywood product distinguished by its hardwood veneer facing. This unique construction allows you to create substantial and impactful pieces using beautiful wood species that would typically be cost-prohibitive in solid lumber form, all while significantly reducing expenses. Beyond its economic advantages, PureBond Plywood boasts impressive environmental credentials. It’s proudly manufactured in America from sustainably sourced wood, and critically, it’s formaldehyde-free. This commitment to sustainability and healthy living spaces makes it an outstanding choice for any home improvement project, especially those involving indoor applications. We absolutely adore working with it for its reliability and aesthetic appeal.
For Rachel’s kitchen nook, we opted for two sheets of 1/2″ birch hardwood plywood. Birch provides a beautiful, light grain that’s perfect for achieving a whitewashed finish, allowing the natural wood texture to shine through. We purchased these sheets from The Home Depot, and for convenience, we had the friendly staff there pre-cut both boards into manageable 9-inch wide planks. This simple step saved us valuable time and effort at the job site, making transport and initial handling much easier. Having the planks pre-cut ensured consistency and a head start on the project, allowing us to focus on the installation.
Crafting Your Own DIY Plank Wall: A Step-by-Step Guide
Creating a captivating plank wall is an achievable DIY project that can dramatically alter the feel of a room. Our detailed guide, featuring the superior quality of PureBond Plywood, will walk you through each stage of the process, ensuring a smooth and successful transformation. This section provides a comprehensive look at the materials needed and the precise steps involved in constructing a durable and beautiful plank wall.
Essential Supplies for Your Plank Wall
For a wall of this size and scope, ensuring you have all the necessary supplies before you begin is crucial. Here’s a breakdown of what you’ll need to replicate our DIY plank wall project:
- Two sheets of 1/2″ birch hardwood PureBond Plywood (pre-ripped into 9-inch wide planks).
- 1×4 pine boards for side trim.
- 1×6 pine board for top trim.
- Panel adhesive (heavy-duty construction adhesive).
- 1.5″ finish nails.
- Nail gun (pneumatic or cordless).
- Miter saw or circular saw (for cutting planks and trim to length).
- Tape measure.
- Pencil.
- Level (a long level is highly recommended).
- Pennies (or other small, uniform spacers).
- Linen White Chalked paint (from Home Depot).
- Water for thinning paint.
- Paintbrush.
- Clean rags for wiping paint.
Planning and Preparation: Laying the Foundation for Success
While the beauty of a plank wall lies in its seemingly simple construction, proper planning is paramount. You can customize the length and height of your plank wall to suit any space, but for Rachel’s large wall, which lacked a natural stopping point leading into the kitchen, we decided on an 8-foot width. This dimension provided a substantial backdrop without overwhelming the area. We also determined to finish the wall at a height of 54 inches above the existing baseboards, ensuring a balanced and visually appealing scale. Using a pencil, a reliable level, and a tape measure, we carefully drew precise vertical lines on the wall to mark our starting and stopping points, creating a clear boundary for the entire project. Accuracy at this stage prevents headaches later on.
Installation: Attaching the Planks with Precision
We began the installation process by cutting one of our 9-inch wide planks to a 4-foot length. This half-length board served as our starting piece for the first row, positioned directly above Rachel’s existing baseboards. It is absolutely critical to ensure this initial board is perfectly level, as any deviation here will compound and throw off every subsequent plank. We used a trusted level to double-check its alignment before permanent attachment. To secure each plank, we applied a generous, continuous line of panel adhesive to the back of the board, followed by 1.5-inch finish nails driven in with our nail guns. The adhesive provides a strong, long-lasting bond, while the nails offer immediate hold and reinforcement.
With the initial 4-foot board securely in place and perfectly level, we proceeded to complete the first row. This involved measuring the remaining distance from the ends of the installed board to the vertical lines we had drawn on the wall, carefully cutting the additional planks to size, and then attaching them using the same adhesive and nailing method. Once the first full row was completed, establishing a perfect baseline, we began working our way upwards, building the plank wall row by row.
Expert Tips for a Flawless Plank Wall
Throughout the installation process, a few key techniques can significantly improve the final look and longevity of your plank wall:
~ Utilize Pennies as Spacers: A simple yet effective trick is to use pennies (or any uniform small spacer) between each row of boards. This creates a tiny, consistent gap that serves multiple purposes. Firstly, it allows for the natural expansion and contraction of the wood due to changes in humidity, preventing buckling or warping over time. Secondly, these subtle gaps add definition to each plank, enhancing the overall aesthetic and giving the wall a more authentic, dimensional feel.
~ Stagger Joints for Strength and Aesthetics: To ensure both structural integrity and a visually appealing pattern, it’s crucial to avoid lining up the vertical joints from one row to the next. We achieved this by staggering our planks with each new row. For instance, we often started a new row with a 4-foot board, ensuring its end joint did not align directly with a joint in the row below. This creates a stronger, more harmonious plank wall that looks professionally installed.
We continued this systematic process, meticulously working our way up the wall, attaching each plank with adhesive and finish nails, and maintaining consistency with our spacers and staggered joints.
As you progress upwards, remember to consistently check for level not only horizontally but also vertically along the sides of your plank wall. Even minor misalignments can become more noticeable with each successive row. A quick check with your level can save you from potential adjustments later.
For Rachel’s wall, we installed a total of seven rows of planks, reaching our desired height of 54 inches above the baseboards. With the main planking complete, it was time to add the finishing touches that truly elevate the project: the trim. We carefully cut the 1×4 pine boards to the exact length of the finished plank wall height on each side. These side trim pieces were then attached with the same combination of panel adhesive and finish nails, neatly framing the planked section and giving it a polished, built-in appearance.
To cap off the plank wall, we selected a 1×6 pine board for the top trim piece. This wider board was intentionally cut to extend approximately an inch beyond the side trim on both ends, creating a subtle overhang. This design choice adds a refined, finished look to the top edge of the wall, giving it a substantial and elegant crown. Like all other components, this top trim piece was securely fastened with both panel adhesive and finish nails, ensuring its stability and seamless integration with the rest of the structure.
The Art of Whitewashing: Achieving a Timeless Finish
With the construction complete, it was time for the final touch that would truly define the character of Rachel’s plank wall: a beautiful whitewashed finish. This technique offers a soft, inviting aesthetic that highlights the natural grain of the PureBond plywood without completely obscuring it. To achieve this, we mixed Linen White Chalked paint from Home Depot with an equal amount of water. It’s crucial to stir this mixture thoroughly until the paint is completely dissolved and consistent, creating a thin, translucent wash.
Once the whitewash was prepared, we applied it to the planks using a paintbrush, working in small sections. Immediately after brushing it on, we used a clean rag to gently rub off any excess paint. This process allows the wood grain to show through beautifully while imparting a soft, airy white hue. We absolutely adore the subtle elegance of this whitewashed effect; it makes the distinct grain of the PureBond plywood truly pop, adding texture and warmth that perfectly complements the overall kitchen nook design.
After allowing the whitewash to thoroughly dry, the transformation was complete. It was time for the exciting final step: decorating! We carefully curated a selection of adorable decor items and stylish furnishings to dress up the rest of the space. The new DIY plank wall provided the perfect backdrop, anchoring the kitchen nook with its inviting texture and character. The previously plain area now feels cozy, functional, and brimming with personality, a true testament to the power of thoughtful design and a little DIY magic. Here’s a look at the beautifully finished space!
Shop the Look & Get the Plans:
Inspired by Rachel’s stunning kitchen nook transformation? You can find many of the decorative elements and free building plans to create a similar look in your own home. Explore the links below to discover where to purchase specific items and access detailed instructions for companion DIY projects:
Enhance your space with this cozy rug, available HERE!
Brighten your nook with this stylish light fixture, found HERE!
Add a touch of greenery with these elegant vases, discover them HERE!
Complete your table setting with this charming table runner, available HERE!
Find these comfortable and stylish chairs HERE!
Download the free “HOME” printables to personalize your decor HERE!
Get the free plans for the DIY Industrial Farmhouse Table featured in this nook HERE!
Access the free plans to build the matching Industrial Farmhouse Bench HERE!
Find the free plans for the beautiful DIY Hanging Chalkboard HERE!
This DIY plank wall project not only revitalized Rachel’s kitchen nook but also demonstrated how a single, well-executed design element can redefine an entire space. With the reliability of PureBond Plywood and a methodical approach, anyone can achieve this kind of custom, high-end look. We encourage you to tackle your own blank walls and infuse your home with the unique character and warmth that only a DIY project can provide. Happy building!