
Craft Your Own Rustic Charm: The Easy Jute Twine Monogram DIY
Hello fellow craft enthusiasts and home decor lovers! We recently had a blast exploring all the incredible Rust-oleum Revamps, and the creativity flowing through our community was truly inspiring. If you missed out on those fantastic projects, feel free to scroll down later to catch up on the fun. But for now, let’s dive into an equally delightful and effortlessly chic project that I’m incredibly excited to share with you: my very own Jute Twine Monogram! If you’re anything like me, you’ve fallen in love with the natural texture of jute twine and the timeless appeal of monograms. Combine the two, and you have a DIY decor piece that’s a guaranteed winner from the moment you start envisioning it – easy, customizable, and perfectly on-trend for adding rustic elegance to any space.
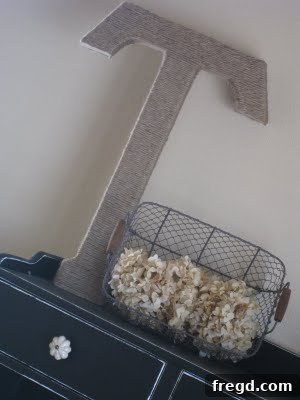
The charming finished look of our DIY Jute Twine Monogram, a perfect blend of natural texture and personalized style.
Why Jute Twine and Monograms? The Perfect Pairing for Rustic Home Decor
The allure of jute twine is undeniable in the world of DIY and home decor. Its earthy tones and robust, tactile texture bring a touch of natural warmth and rustic elegance to any space. Beyond its aesthetic appeal, jute is an incredibly versatile and affordable material, making it a dream for budget-friendly crafting. It’s not only sustainable but also remarkably easy to work with, instantly transforming ordinary items into pieces brimming with character and charm. Whether your style leans towards bohemian chic, modern farmhouse, or a cozy cottage aesthetic, jute fits seamlessly into a multitude of decor styles, adding an organic touch that feels both timeless and current.
Monograms, on the other hand, offer a timeless way to personalize your home and express your identity. They represent individuality, warmth, and a comforting sense of belonging. Whether it’s the initial of your family name, a loved one, or even a cherished word that holds special meaning, a monogram adds a unique, bespoke touch that mass-produced decor simply can’t replicate. It transforms a house into a home by infusing it with personal history and sentiment. Combining these two powerful elements – the natural beauty and textural richness of jute with the personal significance of a monogram – creates a truly special and heartfelt piece that speaks volumes about your style and creative spirit.
The simple beauty of natural jute twine, poised to be transformed into a personalized decorative piece.
Gather Your Crafting Essentials: What You’ll Need for Your Jute Monogram
One of the most appealing aspects of this DIY project is its accessibility. The required materials are minimal, inexpensive, and readily available. You might even discover some of these items already tucked away in your craft stash, and the rest can be easily sourced from any local craft store. Remember, smart shopping—like utilizing coupons and focusing on sale items—can significantly save you money!
- Cardboard or Wooden Letter: I personally began my project with a sturdy cardboard letter, which I picked up from Jo-Ann Fabrics for approximately $4. These letters are available in a delightful array of sizes and fonts, allowing you to select one that perfectly complements your desired aesthetic and the dimensions of your designated space. Cardboard letters are wonderfully lightweight and exceptionally easy to manipulate, making them ideal for beginners. However, if you prefer a more substantial feel and a slightly heavier piece, a thin wooden letter can also serve as an excellent base. Pro-tip for savvy shoppers: Always keep a vigilant eye out for coupons, sales, or clearance events at craft stores to maximize your savings and make your crafting even more budget-friendly!
- Jute Twine (4-ply recommended): A large, good-quality roll of 4-ply jute twine is absolutely perfect for this craft. The term ‘ply’ indicates the number of individual strands twisted together to form the twine, which directly influences its overall thickness and inherent strength. A 4-ply twine offers an ideal balance; it provides excellent coverage over the letter’s surface without appearing overly bulky or being too thin to create that desired rustic texture. You’ll likely need a generous amount, so opting for a larger, economical roll is advisable.
- Hot Glue Gun and Plenty of Glue Sticks: Your reliable hot glue gun will quickly become your indispensable crafting companion for this project. Before you begin, ensure your glue gun is in good working order and that you have a substantial supply of glue sticks on hand. Hot glue is an excellent adhesive choice because it forms a strong, quick-drying bond, which is crucial for effectively securing the jute twine and preventing it from unraveling or shifting.
- Sharp Scissors: A pair of sharp, high-quality scissors will be absolutely essential for making clean, precise cuts in the jute twine. Dull scissors can fray the twine, making your finish less neat.
- Optional, but Recommended: Consider having a craft knife or X-Acto knife on hand for navigating any particularly tricky spots or for trimming excess glue, a thimble or silicone finger protectors to shield your fingers from the heat of the hot glue (especially during prolonged crafting sessions), and a clear acrylic sealer if you wish to add an extra layer of durability and protection to your finished monogram.
The simple yet effective tools for transforming a plain letter into a beautiful, textured monogram.
Your Comprehensive Step-by-Step Guide to Crafting a Jute Twine Monogram
Now, let’s get to the most exciting part – the actual crafting! While this project is remarkably straightforward in its concept, achieving that beautifully clean, professional, and enduring finish does require a touch of patience and a keen eye for detail. Trust me when I say that the effort and time invested in careful execution are absolutely worth the stunning and satisfying result you’ll achieve!
- Prepare Your Workspace Thoughtfully: Before you embark on your creative journey, take a moment to set up your crafting area. Lay down a protective covering, such as old newspaper, parchment paper, or a dedicated craft mat, to shield your surfaces from any errant hot glue drips or stray twine fibers. Ensure you have ample lighting to clearly see your work, and arrange all your essential materials within easy and comfortable reach.
- Anchor the Twine Securely: To begin, apply a small, discreet dab of hot glue to an inconspicuous spot on your cardboard letter. A good starting point is typically on the back of the letter or along one of its bottom edges, where it will be less visible. Firmly press one end of your jute twine into this glue. This initial anchor point is absolutely crucial for establishing a tidy, seamless start to your wrapping process and preventing the twine from slipping.
- Initiate the Wrapping Process with Precision: Once your initial twine end is securely fastened, gently but firmly begin wrapping the jute twine around your cardboard letter. The paramount goal here is consistency. Maintain steady tension on the twine as you wrap, meticulously ensuring that each new layer of twine snugs up closely and evenly against the preceding one. The aim is to leave absolutely no visible gaps of the underlying cardboard, creating a dense, uniform jute surface.
- Glue Every Wrap (or Every Few Wraps) for Durability: This step is the secret sauce to achieving that coveted “finished clean look” and ensuring your monogram lasts. Rather than simply wrapping and hoping the twine stays put, you need to actively secure it with hot glue. Apply a thin, consistent line of hot glue along the edges and sides of the letter as you progress with your wrapping. For broader, flatter surfaces, a small spot of glue every few wraps should suffice to hold the twine in place. However, when navigating edges, intricate curves, and sharp corners, it’s vital to apply glue more frequently. This ensures that the twine adheres firmly to the letter’s entire surface and steadfastly maintains its intended shape. Pay meticulous attention to both the front and back edges of the letter, making sure the twine wraps smoothly and completely over them.
- Mastering Corners and Curves: Navigating Intricate Shapes:
- Straight Edges: For straight sections, focus on keeping your wraps consistently tight and applying a thin bead of glue precisely along the edge for maximum adherence.
- Sharp Corners (e.g., in an ‘L’, ‘T’, ‘Z’): These require a bit more finesse. You might find it helpful to make very small, strategic snips in the twine on the backside of the corner to help it lay flat. Alternatively, you can wrap one section up to the corner, trim and glue that piece, and then begin a new piece of twine for the perpendicular section. This creates cleaner transitions.
- Smooth Curves (e.g., in an ‘S’, ‘C’, ‘O’): Patience is key here. Apply tiny dots of glue more frequently to gently guide the twine smoothly around the curve. This prevents the twine from forming awkward angles, bulging outwards, or creating noticeable ridges.
- Inner Sections and Holes (e.g., in an ‘A’, ‘R’, ‘P’, ‘B’): For letters that feature enclosed spaces or inner cut-outs, it’s generally best to wrap the outer perimeter of the letter first. Once that’s complete, carefully cut a separate, appropriate length of twine to wrap the inner edges of these sections. It can often be easier to pre-measure and cut specific lengths of twine for these smaller, more intricate areas, rather than trying to wrap continuously.
- Continue Wrapping Until Fully Covered: Diligently work your way around the entire letter, making certain that every single inch of the cardboard base is completely and uniformly covered with the jute twine. Resist the temptation to rush through this phase; consistent and deliberate application is paramount for achieving a truly professional and aesthetically pleasing finished look.
- Flawless Finishing Off: Once your letter is entirely covered and you’ve reached the end of your wrapping, carefully cut the twine, leaving a small, manageable tail. Apply a final, firm dab of hot glue to the back or another inconspicuous spot on the letter, and press the end of the twine firmly into the glue to secure it permanently. Finally, take a moment to meticulously trim any excess twine ends or wispy glue strings to ensure a flawlessly clean and polished finish.
Witnessing the beautiful, consistent texture emerge as you carefully wrap the jute twine around the letter.
The intricate detail and consistent wraps are essential for creating a truly polished and professional-looking monogram.
Tips for a Flawless Finish and Long-Lasting Rustic Beauty
Even though the fundamental process of crafting a jute twine monogram is elegantly simple, incorporating these expert tips will significantly elevate your creation from merely good to absolutely gorgeous. These pointers will not only ensure a flawless finish but also guarantee that your rustic home decor piece stands the test of time, becoming a cherished item for years to come.
- Embrace Patience: As we’ve emphasized, this isn’t a race or a project to be rushed. Take your time with each and every wrap, meticulously ensuring that it is tight, evenly spaced, and properly secured with glue. Hurrying through the steps is the quickest way to end up with an uneven appearance, visible gaps, or a less durable finish.
- Maintain Consistent Tension: This is a critical factor for achieving a professional outcome. Maintain a steady, firm tension on the jute twine as you wrap it around the letter. This consistency is absolutely crucial for creating a smooth, uniform appearance across the entire surface and, vitally, for preventing the twine from loosening, sagging, or unraveling over time.
- Use Glue Generously (But Wisely): Don’t be timid with the hot glue, especially when you’re working around intricate edges and sharp corners where the twine needs extra adherence. However, strive for precision; avoid applying excessive globs of glue that could potentially seep through the twine, hardening into unsightly, visible spots. Thin, even lines or small, strategically placed dots of glue are always the most effective approach.
- Protect Your Fingers: Hot glue, as its name suggests, can get quite hot! If you plan to work on a larger letter or anticipate a longer crafting session, it’s highly advisable to use a thimble or invest in silicone finger protectors. These simple tools will shield your fingers from burns and discomfort, allowing you to craft more comfortably and safely.
- Consider a Pre-Paint Base Coat: If your chosen cardboard letter is a dark color, or if you aspire to achieve a particular underlying tone for your monogram, you can lightly paint the letter before you begin wrapping. A coat of paint in a color similar to your jute twine (or even a contrasting hue for a unique effect) helps to effectively conceal any tiny gaps that might inadvertently peek through the twine layers, creating a more cohesive look.
- Clean Up Stray Glue Strings: Hot glue guns are notorious for leaving behind those fine, wispy glue strings. Once your entire project is completely dry, take a moment to gently pull off these annoying strands. For stubborn ones, a hairdryer set on a low heat setting can sometimes melt them away without damaging the twine, ensuring a truly pristine and professional final finish.
“I simply adore the rich, natural texture this project achieves!”
The intricate, natural texture of the jute truly transforms this monogram into a captivating statement piece.
Beyond the Basic: Customization Ideas for Your Unique Jute Monogram
While a simply jute-wrapped monogram possesses a wonderfully charming and minimalist appeal on its own, the true beauty of this DIY project lies in its endless potential for customization. There are countless creative ways to personalize your monogram and make it uniquely yours, perfectly reflecting your individual style and home decor theme. Don’t be afraid to let your imagination run wild and explore these exciting possibilities!
- Enchanting Floral Embellishments: Elevate your monogram with a touch of natural beauty by attaching small faux flowers, delicately dried flowers, or even artificial greenery. These can be artfully placed on one corner, cascading down a side, or strategically tucked into the twine. Imagine the serene elegance of lavender sprigs or the timeless charm of small, rustic roses.
- Elegant Ribbon Accents: Introduce an element of contrast or a subtle pop of color by weaving a complementary ribbon through the jute twine. Burlap ribbon would enhance the rustic feel, while a delicate lace ribbon could add a touch of vintage charm. Alternatively, tie a beautifully crafted bow at the top or side of the letter, which can also serve as a convenient hanger for your monogram.
- Painted Tips or Distressing for Character: For a chic, shabby style, consider lightly distressing the edges of your finished monogram with a touch of white or a soft pastel paint. This technique creates a weathered, aged look that enhances its rustic appeal. For a more modern, eye-catching effect, you could dip just the very tips or a small section of the letter into a vibrant contrasting paint for a trendy color-blocked design.
- Glimmering Glitter or Metallic Touches: If you desire a hint of sparkle and glamour, apply glitter glue sparingly to specific areas of your monogram, highlighting its texture. Alternatively, a light mist of metallic spray paint on a small section can introduce a sophisticated sheen without overpowering the natural jute.
- Textural Beads or Buttons: Hot glue small wooden beads, faux pearls, or even vintage buttons onto the surface of the jute. This adds wonderful dimension, intriguing tactile interest, and a unique personality to your personalized decor piece.
- Craft Full Words or Meaningful Phrases: Why stop at a single initial? Extend your creativity by crafting multiple jute-wrapped letters to spell out an entire word that resonates with you, such as “HOME,” “LOVE,” “FAMILY,” or your actual family name. Displaying a full word creates a truly impactful and heartwarming focal point in any room.
Perfect for injecting a personalized and warmly rustic touch into any room, enhancing its character and charm.
The inherent simplicity of the design ensures this monogram is incredibly versatile, adapting to various decor themes.
Displaying Your Rustic Masterpiece: Where Does it Truly Belong?
Once your beautifully crafted jute twine monogram is complete and the glue has fully dried, the next delightful step is discovering the absolute perfect spot to showcase your handmade treasure! Its inherently versatile, rustic charm means that it can effortlessly complement almost any room or existing decor style within your home. I’ve thoroughly enjoyed experimenting with different placements for mine, but I’ve found that I particularly love it propped elegantly next to my basket of dried hydrangeas, where it creates a serene, natural, and truly inviting vignette.
Here are some inspiring ideas for displaying your personalized jute creation, ensuring it takes pride of place and adds that special touch to your living space:
- A Welcoming Entryway Statement: Place it prominently on a console table, a small shelf, or a decorative tray in your entryway to greet guests with a warm, personal, and stylish touch that immediately feels like home.
- Living Room Focal Point: Position your monogram on a bustling bookshelf, atop a cozy mantelpiece, or as a charming centerpiece on a coffee table. It will serve as a warm, inviting, and conversation-starting accent that anchors the room.
- Bedroom Sanctuary Enhancement: Integrate it into your personal haven by placing it on a nightstand, a dresser, or hanging it above your bed. This adds a soft, personalized, and deeply cozy feel to your private retreat.
- Gentle Nursery Decor: A jute monogram makes for a wonderful, natural, and gender-neutral element in a baby’s room. Consider incorporating soft pastel ribbons or tiny felt flowers to customize it for a nursery.
- An Artful Gallery Wall Addition: Seamlessly integrate your handmade monogram into a larger gallery wall arrangement. It will provide textural contrast and a personal touch amongst framed photographs, prints, and other rustic pieces.
- Versatile Seasonal Decor: This project is wonderfully adaptable! Easily change its look for various holidays or seasons by adding small, removable embellishments. Think mini pumpkins or autumn leaves for fall, delicate pinecones or faux cranberries for winter, or fresh spring blooms for warmer months.
- The Ultimate Thoughtful Gift: Beyond personal use, these personalized jute monograms make incredibly heartfelt, unique, and memorable gifts. They are perfect for weddings, housewarmings, birthdays, baby showers, or any occasion where you want to give a truly custom and handmade present.
My cherished display spot: nestled amongst dried hydrangeas, adding a touch of serene, natural elegance to my living space.
The Enduring Joy of DIY: Crafting More Than Just Home Decor
Engaging in delightful DIY projects like this Jute Twine Monogram offers so much more than the tangible reward of a beautiful new piece of home decor. It’s a wonderful opportunity to unleash your innate creativity, to consciously step away from the relentless digital world, and to immerse yourself in a tactile, deeply rewarding activity. There’s an immense and unparalleled satisfaction that comes from creating something beautiful and functional with your own hands, knowing that it is unique, made with care, and truly reflects your personal aesthetic and spirit.
Furthermore, DIY projects are often incredibly cost-effective. They empower you to achieve sophisticated, high-end looks for your home without the hefty price tag often associated with boutique decor. Beyond the financial benefits, crafting provides a genuine sense of accomplishment, a relaxing and meditative escape from daily stresses, and an invaluable chance to add truly custom, heartfelt touches to your living space. So, gather your supplies, put on your favorite music or podcast, and wholeheartedly enjoy the therapeutic and fulfilling process of bringing this charming rustic monogram to life! It’s a small project with a big impact, both on your home and on your well-being.
Conclusion: Your Next Rustic Home Decor Project Awaits!
The Jute Twine Monogram project is a wonderful testament to how simple, natural materials, combined with a little creativity and patience, can transform an ordinary object into an extraordinary and deeply personal piece of home decor. It’s a craft that is not only easy and affordable to undertake but also endlessly customizable, allowing you to infuse your unique personality into every fiber. The result is a charming piece that brings a wonderful touch of rustic elegance and warmth to any setting.
Thank you so much for stopping by today and taking the time to explore this delightful DIY project with me. I sincerely hope this comprehensive guide inspires and empowers you to confidently create your very own beautiful jute twine monogram. Don’t hesitate to share your wonderful creations with us – we absolutely adore seeing what amazing things you craft and the unique ways you personalize them!
Wishing you all a fantastic, wonderfully creative, and incredibly crafty weekend ahead!