
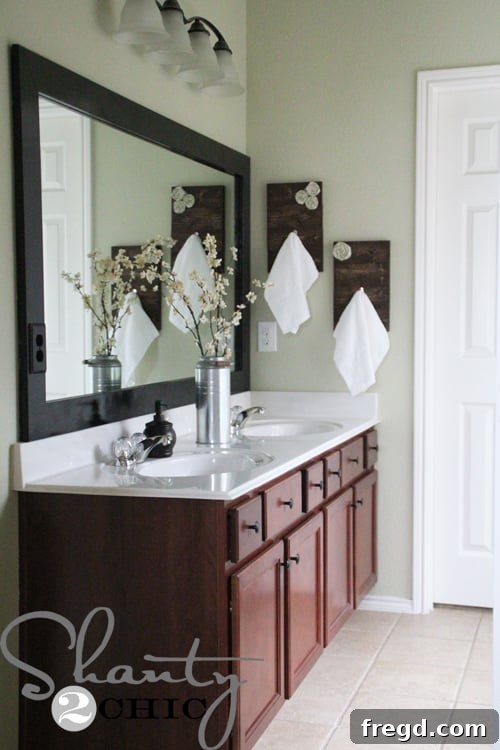
Welcome back, fellow DIY enthusiasts and home decor lovers! We hope you all had a delightful and memorable Easter celebration with your loved ones. Our family certainly did, though it came with an unexpected twist – flash floods forced our annual Easter egg hunt indoors! Imagine the joyous chaos of seventeen little munchkins scrambling for eggs within the confines of a single home. It was a whirlwind of energy, laughter, and a truly unforgettable day, even if capturing a perfectly composed photo of the youngest generation felt like a mission impossible!
Amidst all the holiday excitement and family fun, I managed to carve out some much-needed time for a quick, impactful DIY project. This wasn’t just any project; it was something I’d been yearning to tackle for ages, a small but significant upgrade that promised to bring both functionality and charm to one of our most used spaces.
Transform Your Bathroom: Easy & Affordable DIY Towel Hooks
Every homeowner knows the struggle of finding stylish yet practical solutions for everyday dilemmas. For me, it was the master bathroom. We faced a persistent challenge: a complete lack of a dedicated spot for hand towels. They often ended up draped over the counter, which, let’s be honest, is far from ideal. Not only do they take longer to dry, leading to potential mildew issues, but they also contribute to a cluttered, less polished look in an otherwise serene space. I envisioned something that would not only solve this practical problem but also add a touch of handcrafted elegance to our bathroom decor. And thus, the inspiration for these charming and incredibly affordable DIY towel hooks was born!
I saw this as the perfect opportunity to embrace my creative side and “shanty something up,” as we like to say! The goal was simple: create functional and aesthetically pleasing towel hooks without breaking the bank. The result? Two beautiful, rustic-chic towel hook units for a grand total of just $10! If you’re looking for an impactful, budget-friendly bathroom upgrade, you’ve come to the right place. Let’s dive into how you can recreate this project and bring a touch of personalized charm to your own home.
Materials and Tools: Building Your Budget-Friendly Towel Rack
One of the most appealing aspects of this project is its simplicity and affordability. You won’t need an extensive workshop or expensive exotic lumber. Most of the materials can be found at your local hardware store, and if you’re like me and have a stash of wood scraps, you might even reduce the cost further!
What You’ll Need:
- Wood: A 1×4 furring strip (typically around $1.50 per strip at your hardware store). Furring strips are excellent for budget projects, offering a rustic look when stained. If you have scrap wood lying around, this is a fantastic way to utilize it. For each towel hook unit, you’ll need four pieces of wood. Since we’re making two, you’ll need eight pieces in total.
- Wood Joinery System: A Kreg Jig (or an alternative method like 1×2 support strips and nails). The Kreg Jig makes pocket holes for strong, concealed joints, resulting in a cleaner finish closer to the wall.
- Wood Stain: Rust-Oleum Dark Walnut stain (or your preferred wood stain/paint color).
- Hooks: Small silver hooks (I found mine at Lowe’s for about $3.50 each). You’ll need two hooks for each unit, totaling four hooks for two units.
- Fabric (Optional): Leftover Waverly fabric or any fabric of your choice for decorative rosettes.
- Wood Glue: For added stability if using pocket holes, or as the primary adhesive if nailing.
- Hot Glue Gun & Sticks: For attaching fabric rosettes.
Tools You’ll Need:
- Saw: Miter saw or circular saw for precise cuts (a hand saw with a miter box can work for smaller projects).
- Drill: Essential for drilling pocket holes (if using a Kreg Jig) and attaching the hooks.
- Sander: Orbital sander or sanding block with various grits (120-grit for initial sanding, 220-grit for finishing).
- Measuring Tape & Pencil: For accurate measurements and marking cuts.
- Safety Gear: Safety glasses and gloves are always recommended when working with power tools and stains.
Step-by-Step Guide: Crafting Your DIY Towel Hooks
This project is designed to be completed in about an hour, not including drying time for the stain. It’s perfect for a weekend afternoon or even a quick evening project.
Step 1: Cut Your Wood Pieces
Begin by cutting your 1×4 furring strip into precise pieces. For each towel hook unit, you’ll need four pieces, each measuring 8.5 inches in length. Since I was creating two units, I cut a total of eight pieces at 8.5 inches each. Accuracy in this step is crucial for the overall neatness of your finished product. Double-check your measurements before making each cut, and ensure all cuts are straight to allow for seamless assembly.
Step 2: Assemble the Boards with Pocket Holes
This is where my trusty Kreg Jig comes into play. If you’re unfamiliar, a Kreg Jig allows you to drill angled “pocket holes” into one piece of wood, enabling you to join it to another piece with screws, creating incredibly strong and discreet joints. For this project, I used it to attach the four 8.5-inch boards together for each unit, forming a solid panel. The beauty of pocket holes is that the screws are hidden, giving your project a very clean and professional finish.
Alternative Method: If you don’t own a Kreg Jig, don’t worry! You can still achieve a sturdy assembly by nailing 1×2 strips of wood from the back of your joined 1×4 pieces. This method is effective, but be aware that the finished towel rack will sit slightly further out from the wall due to the added thickness of the backing strips. Ensure you use appropriate wood glue in conjunction with nails for maximum durability.
Above, you can see a clear picture of the pocket holes. They are strategically placed to ensure a strong bond between the boards.
Step 3: Sanding for a Smooth Finish
Once your boards are securely attached (four boards per unit), it’s time to sand them down. This step is crucial for achieving a smooth, professional finish and preparing the wood for staining. I focused on sanding the edges to remove any splinters or rough spots, and then smoothed the entire front surface of the assembled panel. Start with a medium-grit sandpaper (around 120-grit) to tackle any imperfections, and then follow up with a finer grit (220-grit) for a silky-smooth touch. Don’t rush this stage; thorough sanding will significantly enhance the final appearance and feel of your towel hooks.
Step 4: Stain Your Wood Panels
Now for the color! I opted for one coat of Rust-Oleum Dark Walnut stain. This rich, deep hue perfectly complements the rustic aesthetic I was going for and adds warmth to the bathroom space. Apply the stain evenly with a brush or cloth, following the wood grain. Allow it to penetrate for a few minutes before wiping off any excess. The beauty of stain is that it enhances the natural grain of the wood, providing depth and character. If you prefer a different look, you could choose a lighter stain, a painted finish, or even a whitewash technique to match your existing bathroom decor. Remember to allow adequate drying time as per the stain manufacturer’s instructions before proceeding to the next step.
Step 5: Attach the Towel Hooks
With the stain dry, it’s time to add the functional hardware. I selected these lovely small silver hooks, which I purchased at Lowe’s for approximately $3.50 each. Their simple design and metallic finish provide a subtle contrast to the dark wood. I attached each hook at the top of the second board from the bottom. This placement ensures easy access for hand towels and creates a balanced look on the panel. Use a drill to pre-drill pilot holes before screwing in the hooks to prevent splitting the wood, especially with furring strips which can sometimes be softer.
Adding a Personal Touch: Decorative Rosettes
Now for the really fun part – adding a little personality and flair to your newly crafted towel hooks! While the stained wood and metal hooks already look great, a decorative touch can elevate the entire piece and tie it into your existing decor.
Step 6: Create and Attach Fabric Rosettes
I had some beautiful Waverly fabric left over from decorating my master bedroom, and I absolutely adore its pattern and texture. I decided to incorporate it into my bathroom decor by creating a few flat-rolled rosettes. These little fabric flowers are incredibly easy to make, require no sewing, and add a soft, elegant counterpoint to the rustic wood.
If you’d like a detailed guide on how to make these charming embellishments, you can click HERE for a step-by-step tutorial. Once your rosettes are complete, simply use a hot glue gun to attach them onto each board of your towel hook unit. I placed mine strategically to enhance the visual appeal without overpowering the design. This step is entirely customizable – feel free to use different fabrics, ribbons, small decorative knobs, or even leave the wood plain for a more minimalist look. The goal is to make it truly yours!
Finally, hang your beautiful new hand towels on the hooks, and step back to admire your handiwork! It’s amazing how a simple, inexpensive project can make such a significant difference in both the functionality and aesthetics of a room.
The Finished Look: Rustic Charm Meets Practicality
The transformation is complete! Our master bathroom now boasts a pair of stylish, functional towel hooks that perfectly complement the existing decor. No more damp towels lying on the counter; instead, beautifully displayed hand towels are always within reach, adding to the room’s serene ambiance.
Why This DIY Project Is a Must-Try!
This entire project, from cutting the wood to attaching the final decorative touches, will likely take you about an hour of active work. And the best part? It costs approximately $10 to make two of these stylish and functional towel hook units! That’s an incredible value for a customized home decor piece that solves a real organizational need. This kind of budget-friendly, high-impact DIY project is exactly what we love to share.
Beyond the cost savings, there are numerous reasons to embark on this project:
- Customization: You have complete control over the wood finish, hook style, and any decorative elements, allowing you to perfectly match your home’s aesthetic.
- Functionality: Provides a dedicated, tidy space for hand towels, ensuring they dry properly and keeping your bathroom counters clutter-free.
- Skill Building: It’s a great beginner-friendly woodworking project that helps you gain confidence with basic tools and techniques.
- Personal Touch: There’s immense satisfaction in knowing you’ve created something beautiful and useful with your own hands.
- Versatility: While designed for hand towels, these hooks could also be adapted for keys, small bags, or even lightweight coats in an entryway.
We truly hope this detailed tutorial inspires you to roll up your sleeves and create your own set of DIY towel hooks. If you love this project as much as we do, we would absolutely LOVE for you to share it with your friends and followers! Please consider pinning these ideas to your favorite Pinterest boards below to help spread the word and inspire others.
Thank you so much for stopping by and spending some time with us. We appreciate your continued support and enthusiasm for all things DIY. Have a fantastic week filled with creativity and successful projects!
~Ashley