
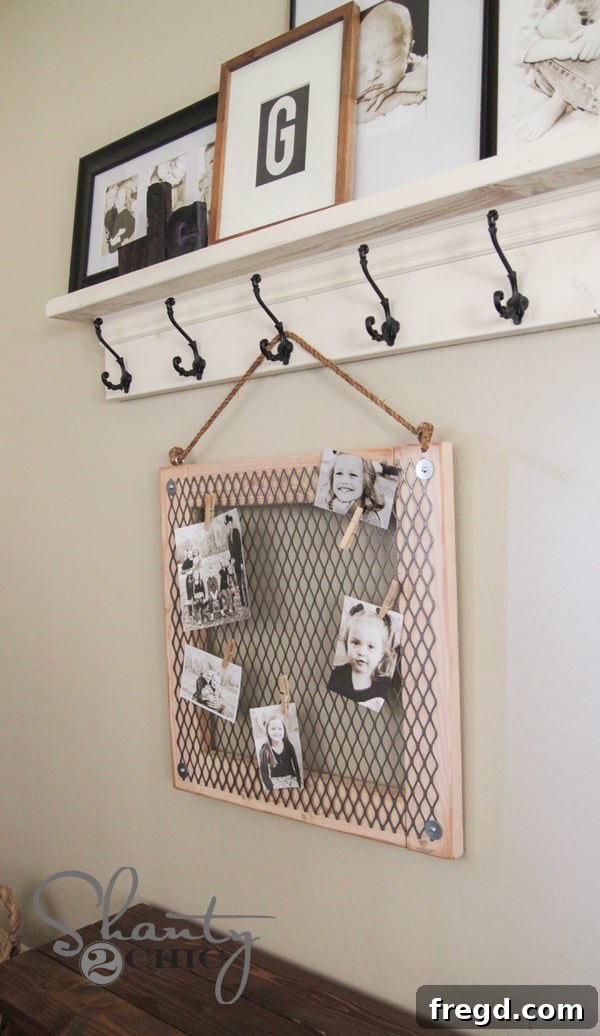
DIY Expanded Metal Memo Board: Organize and Elevate Your Space
Welcome, DIY enthusiasts and home decor lovers! We trust you had a fantastic weekend, perhaps even tackling a small project or two. Today, we’re diving into an exciting and versatile DIY creation that has captured many of your interests: an expanded metal memo board. You might recall the striking metal accent on my son’s shelf I showcased recently – that unique material is expanded metal. It’s incredibly adaptable, and I’m thrilled to demonstrate how to transform it into a functional and stylish memo board perfect for any room in your home. This project is not only simple to construct but also offers immense practical value, whether for organizing family notes, displaying cherished photos, or keeping track of important reminders. Let’s explore how to make this eye-catching piece!
Isn’t it just charming? This metal memo board perfectly blends rustic aesthetics with modern functionality. While initially crafted with my son in mind, its versatile appeal has me considering keeping it for myself! This project is wonderfully straightforward, making it ideal for beginners and seasoned DIYers alike. With just a few basic tools and a weekend afternoon, you can create a personalized piece that adds character and organization to your entryway, kitchen, office, or child’s room. Ready to bring this charming organizer to life? Let’s gather our materials and get started on this rewarding woodworking endeavor!
Gathering Your Materials and Tools
Before we dive into the construction, let’s make sure we have everything we need. One of the joys of DIY is often utilizing what you already have, and for this project, I was able to use scrap wood – a fantastic way to minimize waste and save on costs! However, if you don’t have scraps, new lumber works just as well. Here’s a comprehensive list of what you’ll need:
Materials:
- Two 2×4 boards (or suitable scrap wood equivalent)
- Expanded metal sheet (approx. 18″ x 25″ to fit the frame, but confirm dimensions after frame assembly)
- 1 1/2-inch pocket hole screws
- Washers (4 pieces, suitable for your chosen screws)
- Wood screws (4 pieces, to secure the expanded metal)
- Rust-Oleum Willow wood stain (or a similar whitewash effect stain)
- Dark walnut wood stain (or a similar darker, aging stain)
- Eye screws (2 pieces, for hanging)
- Rope (for hanging)
- Clothespins or small clips (for attaching items)
Tools:
- Miter saw or circular saw (for cutting wood)
- Kreg Jig pocket hole system
- Drill/Driver with appropriate bits (including a driver for pocket hole screws)
- Ryobi Corner Cat sander (or any orbital/detail sander)
- Sanding pads/paper (various grits, e.g., 120, 220)
- Stain rags or brushes
- Safety glasses and hearing protection
- Measuring tape and pencil
- Square (to ensure accurate angles)
- Ryobi SpeedLoad Wing Nut, Eye, and Hook Bolt Driver Bit Kit (optional, but highly recommended for eye screws)
Step-by-Step Guide to Building Your Memo Board
1. Cutting Your Wooden Frame Pieces
The foundation of our memo board is a sturdy wooden frame. You’ll need four pieces of 2×4 wood. Using a miter saw or circular saw, carefully cut two pieces to 19 inches in length and two pieces to 26 inches in length. Always measure twice and cut once, ensuring precise cuts for a snug fit. Remember to wear your safety glasses and hearing protection during this step.
2. Creating Pocket Holes with the Kreg Jig
This project is a perfect introduction to the Kreg Jig system, especially if yours is still in its box – it’s time to unleash its potential! The Kreg Jig makes joining wood incredibly simple, creating strong, hidden joints that give your projects a professional finish. For this step, set your Kreg Jig to make 1 1/2-inch pocket holes. You will add two pocket holes to each end of your two 19-inch pieces. These holes will allow us to attach the shorter pieces to the longer pieces, forming a rectangular frame. If you’re new to the Kreg Jig, don’t worry – it’s an inexpensive tool that’s remarkably easy to master, significantly simplifying the building process.
3. Assembling the Wooden Frame
Now, it’s time to connect the pieces and form your frame. Align the 19-inch pieces (with the pocket holes) between the 26-inch pieces, forming a rectangle. Ensure all corners are flush and square using a carpenter’s square. Secure these joints using 1 1/2-inch pocket hole screws with your drill/driver. Drive the screws firmly into the pocket holes, connecting the shorter sides to the longer sides. Repeat this process for all four corners, creating a strong and stable rectangular frame.
4. Smoothing and Shaping with Sanding
Once your frame is assembled, it’s essential to sand it for a smooth finish and to prepare it for staining. I used my Ryobi Corner Cat sander for this part, and I can’t recommend it enough. This compact sander uses the same 18V battery as my drill and is genuinely one of our favorite tools – it gets into tight spaces and makes quick work of corners. Use it to round out all the corners of your frame, giving it a softer, more finished look, and then smooth the entire surface. Start with a medium-grit sandpaper (around 120-grit) to remove any imperfections, then follow up with a finer grit (220-grit) for a silky-smooth surface, ensuring optimal stain absorption.
5. Achieving an Antiqued, Whitewashed Finish
Now for the artistic touch: staining! I decided to experiment with a new Rust-Oleum stain called Willow, which I absolutely adore for its ability to create a beautiful whitewashed, antiqued effect. First, apply a generous coat of the Willow stain to the entire wooden frame. This stain is fantastic because it dries in under an hour, allowing you to move quickly to the next step. Once the Willow stain has fully dried, take your sander again and gently distress the corners and edges of the frame. This technique removes some of the whitewash, revealing the natural wood underneath and enhancing the aged appearance. To deepen this antique look, apply a small amount of dark walnut stain and immediately wipe it off. This adds subtle depth and a rich, aged patina, giving your memo board a truly unique character.
6. Installing the Expanded Metal
This is where our memo board truly comes to life! Expanded metal is a fantastic material – sturdy, visually interesting, and perfect for clipping notes or photos. You can typically find sheets of expanded metal at your local Home Depot or other hardware stores. I found a suitable sheet for around $20. When handling expanded metal, always exercise caution as the edges can be quite sharp. I also picked up four decorative washers and a pack of screws that complement the rustic look.
To attach the metal, carefully center it over your stained wooden frame. Use your drill to drive the chosen screws through the washers and into each corner of the wooden frame, securing the expanded metal firmly in place. Ensure the metal is taut and evenly distributed before fully tightening all four screws.
7. Adding Hanging Hardware
While you could lean this beautiful memo board on a shelf or mantel, I decided to hang mine for greater visibility and versatility. For this, I used two eye screws inserted into the top corners of the frame. I was incredibly excited to discover this fantastic Ryobi bit for my drill recently. This affordable attachment makes screwing in eye bolts an absolute breeze, saving a significant amount of time and effort compared to wrestling them in by hand.
With the eye screws securely in place, all that’s left is to add a length of rope. Tie a knot at each end of the rope, securing it through the eye screws. This creates a stylish and functional hanging loop, completing your memo board!
Personalizing and Displaying Your Memo Board
Woohoo! Your expanded metal memo board is now complete and ready to be filled with life. To display your photos, notes, or cards, simply use inexpensive clothespins or small decorative clips. The open mesh of the expanded metal offers endless possibilities for arrangement and customization. You can easily switch out items to match seasons, moods, or current projects, making it a dynamic piece of decor.
This memo board is incredibly versatile. Hang it in your entryway to hold keys and quick notes, in the kitchen for recipes and grocery lists, in a home office for important reminders, or in a child’s room to display artwork and awards. Its rustic charm, enhanced by the unique staining technique and the industrial feel of the expanded metal, ensures it will be a conversation starter in any space.
Conclusion: Your Creative & Functional Masterpiece
We hope you’ve enjoyed this detailed guide on creating your very own expanded metal memo board. It’s truly a rewarding project that combines simple woodworking techniques with creative finishing touches to produce a functional and beautiful piece of home decor. Whether you’re a seasoned crafter or just starting your DIY journey, this project is designed to be accessible and enjoyable, yielding impressive results you’ll be proud to display. The unique character of the expanded metal, paired with the beautifully distressed wood frame, ensures your memo board will stand out. Don’t hesitate to customize it further with different stains, paints, or even by adding small hooks for keys or other light items.
Thank you so much for stopping by and sharing this creative journey with us! If you have any questions at all about the steps, materials, or tools used, please don’t hesitate to ask in the comments below. We love hearing from you and seeing your wonderful creations. We would also LOVE for you to share this project and PIN it with your friends and family on Pinterest – spread the DIY joy!
Happy Monday, and happy crafting!