
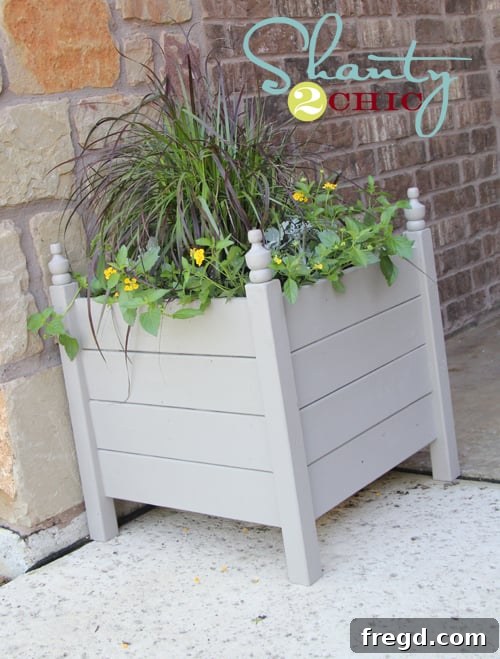
Hey there, fellow DIY enthusiasts! I am absolutely thrilled to share my latest home improvement triumph – a project I’ve been dreaming about for quite some time. For ages, I’ve envisioned adding beautiful, custom-made planter boxes to flank our front door, instantly boosting our home’s curb appeal and adding a welcoming touch. Knowing exactly who to turn to for expert guidance, I teamed up with the incredibly talented Ana White, and together, we conceptualized and brought to life these stunning and remarkably affordable square planter boxes!
The best part of this entire endeavor? These stylish outdoor planters cost me an astonishingly low $15 each to build! Yes, you read that right – sophisticated design and robust construction, all for a budget-friendly price. This project truly embodies the spirit of DIY: achieving premium results without the premium price tag. Get ready to transform your entryway!
Your Gateway to Stunning Planters: Accessing the Full Plans and My Essential Tool
For those eager to dive into this project, you can access the comprehensive, step-by-step plans directly from Ana White’s website. Her detailed instructions make the building process incredibly straightforward, even for those new to woodworking. Simply click HERE to find the full square planter box plans, complete with material lists and cutting diagrams. While Ana provides all the necessary details, I wanted to share a few personal tips and highlight a tool that made this project an absolute breeze for me.
My secret weapon for this build, and indeed for many of my woodworking projects, was my trusty Kreg Jig™. If you’ve been contemplating purchasing a pocket-hole jig, or if yours has been gathering dust in the garage, I wholeheartedly recommend this planter box project as the perfect initiation! It’s an excellent way to familiarize yourself with the Kreg Jig’s capabilities and experience firsthand how it simplifies joinery, allowing you to create strong, clean connections with ease. This project is straightforward enough for beginners yet satisfying for seasoned DIYers.
Mastering Pocket-Hole Joinery: Why the Kreg Jig is Indispensable for DIY
I often receive questions from readers wondering which Kreg Jig™ Ash and I personally use for our projects. We rely on the Kreg K4 Pocket-Hole System, which offers a fantastic balance of features and ease of use, making it ideal for a wide range of DIY tasks. You can find the exact kit we use HERE on Amazon. Beyond online retailers, Kreg Jigs are widely available at major home improvement stores like Lowe’s and Home Depot, as well as many other specialized woodworking suppliers. Investing in one of these tools will undoubtedly elevate your DIY capabilities, allowing you to tackle projects with professional-level joinery.
For those unfamiliar, a Kreg Jig is a pocket-hole system that creates incredibly strong joints by drilling an angled hole into one workpiece, then joining it to a second workpiece with a self-tapping screw. This method produces hidden fasteners, resulting in a clean, professional finish, which is perfect for furniture building, cabinet making, and, of course, these beautiful planter boxes. It’s user-friendly, precise, and significantly speeds up assembly time compared to traditional joinery methods. If you’re looking for a tool that offers both structural integrity and aesthetic appeal in your projects, the Kreg Jig is an absolute must-have.
Capturing the Process: A Glimpse into the Build
To give you a better idea of the construction process and the satisfying stages of bringing these planters to life, here are a few more snapshots from my workshop. These images highlight different angles and details of the build, from the initial assembly of the wooden frames to the elegant addition of the finials.
The Elegance of Details: Adding Finials to Your Planters
One of the design elements that truly elevates these planter boxes from simple containers to decorative statements are the finials I chose for the corners. These small, decorative accents add a touch of architectural elegance and sophistication. I sourced these particular finials from Lowe’s, where you can often find a variety of styles to match your personal aesthetic. They’re easy to install and make a significant difference in the finished look, giving the planters a polished and custom feel. Don’t underestimate the power of these subtle details to enhance your DIY projects!
The Unsung Heroes of DIY: The Importance of a Good Helper
Every successful DIY project often has an unsung hero: a good helper! Whether it’s a family member, a friend, or even a furry companion offering moral support, having an extra set of hands or just some cheerful company can make the building process much more enjoyable and efficient. There’s a unique satisfaction that comes from sharing the creative process and seeing a project come to life with someone by your side. So, grab a buddy – it always helps to have a good helper!
The Grand Reveal: Painting and Planting Your Way to Perfection
Once the construction was complete, it was time for the truly transformative step: painting and planting! I chose to paint my planter boxes the same beautiful color as our home’s exterior trim. This creates a cohesive and custom look that seamlessly integrates the planters into our home’s existing aesthetic. The specific color I used is a lovely Valspar shade called “Coastal Villa” – a perfect choice for an elegant and timeless finish that complements any outdoor setting.
After the paint dried, the real fun began: filling them with vibrant flowers! Choosing a mix of annuals and perennials that thrive in your climate and complement your home’s colors can make a dramatic difference. Ensure good drainage by adding a layer of gravel or broken pottery at the bottom before filling with quality potting soil. The sight of these freshly painted boxes overflowing with colorful blooms was incredibly rewarding. They instantly brought life, color, and a sense of inviting charm to our front porch, making a bold statement without breaking the bank.
Exceeding Expectations: The Impact of DIY Planters
I truly hope you love these planter boxes as much as I do! Honestly, I was pleasantly surprised by their substantial size. They turned out much bigger and more impressive than I had initially expected, which I absolutely adore! This larger scale means they make a much bolder statement at the front door, offering “more bang for your buck” in terms of visual impact and planting capacity. They feel incredibly robust and look far more expensive than their actual cost, proving that with a little effort and the right plans, you can create high-end decor on a shoestring budget.
These DIY planter boxes are not just containers for flowers; they are handcrafted pieces that add character, warmth, and a personal touch to your home’s exterior. They offer endless possibilities for seasonal decorating, allowing you to switch out plants and themes throughout the year to keep your entryway fresh and inviting. Imagine festive evergreens in winter or vibrant petunias in summer – the versatility is truly fantastic!
Ready to Create Your Own Masterpiece?
Don’t forget to head over to Ana White’s website to access the full plans for these easy-to-build square planters. She makes DIY approachable and rewarding for everyone. This project is a fantastic way to enhance your outdoor living space, improve your woodworking skills, and add significant value and beauty to your home.
Thank you so much for stopping by and sharing in my latest project! I’m always eager to inspire fellow DIYers to pick up their tools and create something wonderful. I would absolutely love for you to pin these planter boxes to your favorite Pinterest boards and share this project with friends and family using the sharing buttons below. Your support and enthusiasm mean the world to me!
Happy building, everyone!
~Whitney