
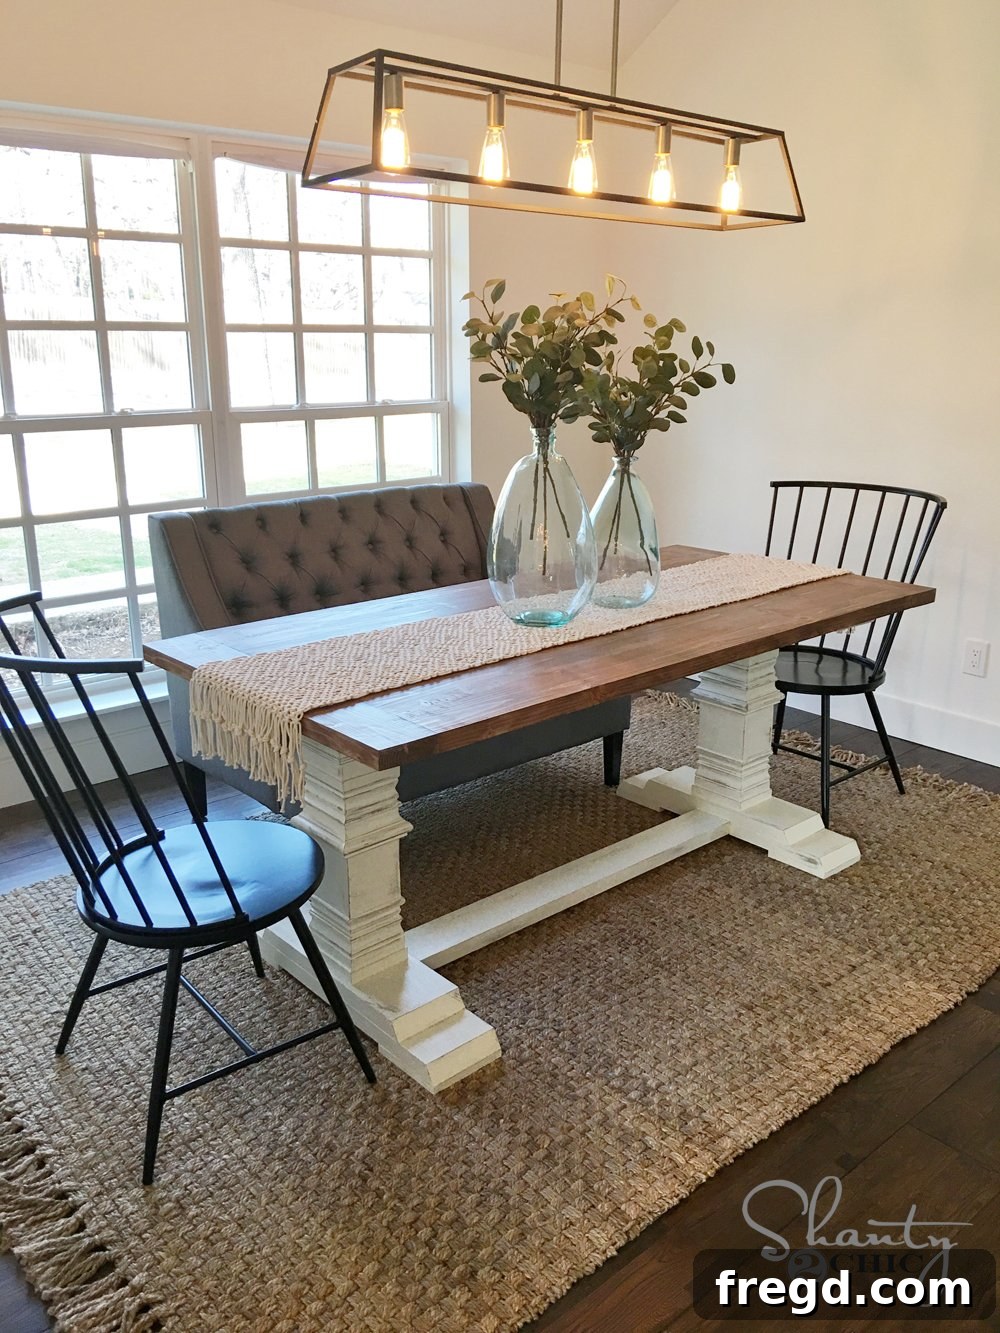
Welcome, woodworking enthusiasts and DIY lovers! We are absolutely thrilled to unveil the comprehensive plans for our latest masterpiece: a magnificent farmhouse pedestal dining table. If you’ve ever admired the grand, solid presence of a chunky pedestal table but recoiled at the often exorbitant price tag, then you’re in for a treat! We faced the same dilemma and decided to channel our passion for building into crafting our own stunning, budget-friendly version. The result? A truly beautiful and robust dining table that stands as a testament to the power of DIY.
This project comes with a special story, as it’s part of a larger transformation journey. Our wonderful friends, who also happen to be our production partners, recently relocated and purchased an older, charming ranch home. Over the past few months, they’ve poured their hearts into converting it into a breathtaking glam farmhouse – and it’s nothing short of spectacular! They’ve done an incredible job with the renovation, and now it’s our turn to help furnish their gorgeous new space with custom-built pieces. This pedestal dining table is Episode 2 in what we’re calling the “Alvarez series,” and we couldn’t be more excited to share it with you.
Before we dive into the detailed step-by-step instructions and plans, we highly recommend watching our in-depth DIY Farmhouse Pedestal Table video. It offers visual guidance, practical tips, and demonstrations that perfectly complement these written plans. You can access the video right HERE or find it embedded below on the page.
Witness the stunning transformation! This table is truly a showstopper.
DIY Farmhouse Pedestal Table – Comprehensive Plans & Guide
We’re thrilled to guide you through every stage of building this incredible farmhouse-style dining table. To ensure you have all the necessary blueprints at your fingertips, be sure to download and print the completely FREE PLANS by clicking HERE! These detailed plans include precise measurements, cut lists, and additional diagrams to make your building experience as smooth as possible.
As you embark on this exciting DIY journey, you might be curious about the specific products and tools we utilized to achieve this beautiful result. We’ve anticipated your questions and compiled a convenient list of all the ‘goodies’ that helped bring this vision to life:
- Elegant DINING CHAIRS
- Stylish AREA RUG
- Premium CHALK PAINT
- High-Quality CHALK PAINT BRUSH
- Durable STAIN for the Tabletop
- Chic LIGHT FIXTURE
- Decorative GLASS VASES
Getting Started: Essential Tools and Materials for Your Farmhouse Table
Before you even make your first cut, it’s crucial to gather all your materials and tools. This not only streamlines the building process but also ensures safety and efficiency. For this DIY farmhouse pedestal table project, you’ll primarily be working with dimensional lumber (2x8s, 2x6s, 1x8s), wood glue, and various screws. Key tools will include a table saw (or circular saw), miter saw, drill, pocket hole jig, tape measure, safety glasses, and hearing protection. Having everything organized will make each step much more enjoyable.
DIY Farmhouse Pedestal Table – Step 1: Crafting the Feet Assemblies
The foundation of your sturdy pedestal table begins with the feet assemblies. You will need to construct four identical feet assemblies. For this, we utilized 2×8 framing boards, which we precisely ripped down to a 7-inch width using our table saw. While ripping them isn’t strictly mandatory if you prefer a slightly different aesthetic, it significantly refines the profile of the feet. If you opt not to rip them, be aware that the overall dimensions of the base will be slightly wider. Each of these boards requires precise 30-degree angles cut at each end – accuracy here is key for a stable and aesthetically pleasing base.
Once your boards are cut, take the smaller, angled piece and center it atop each larger piece. This creates a robust foot. Secure these components together using a generous amount of high-quality wood glue, followed by 2.5-inch Spax screws or general wood screws. The combination of glue and screws creates an incredibly strong bond, crucial for supporting the weight of the table and ensuring longevity. Pay close attention to centering and alignment for a balanced final appearance.
DIY Farmhouse Pedestal Table – Step 2: Building the Leg Assemblies
With the feet assemblies complete, it’s time to move on to constructing the main leg structure of the pedestal. Begin by taking one of the six leg boards (these are typically 2×6 boards which we did NOT rip down, as their substantial size contributes to the desired chunky pedestal look and they will be concealed by trim later). Attach this first leg board to two of the previously built feet assemblies. Ensure it is perfectly centered on both feet, providing a balanced base.
For a strong, hidden connection, use ample wood glue between the leg board and the feet, then secure them with 2.5-inch pocket hole screws. These screws should be driven through pre-drilled 1.5-inch pocket holes. Pocket hole joinery is excellent for creating sturdy, concealed joints, which is ideal for the structural integrity of a heavy dining table. The robust nature of the 2×6 boards ensures a strong core for the pedestal, giving it that substantial, custom-built feel.
Next, attach the remaining two leg boards in a similar fashion. These boards will sit flush against the middle leg board you just installed. Again, apply a generous amount of wood glue along all mating surfaces before driving the 2.5-inch pocket hole screws through the 1.5-inch pocket holes. For optimal concealment and structural integrity, ensure that the pocket holes on these outer leg boards face outwards. This orientation allows them to be easily hidden by the decorative trim that will be added in a later stage. The careful application of wood glue between each leg board is paramount, as it significantly enhances the strength and rigidity of the entire pedestal structure, creating a solid, cohesive unit capable of supporting the tabletop for years to come.
DIY Farmhouse Pedestal Table – Step 3: Installing the Foot Pads for Stability and Style
Once your leg assemblies are robustly constructed, it’s time to add the footpads. These crucial components are crafted from 1×8 boards. The primary purpose of the footpads is twofold: they elevate the table slightly off the ground, preventing direct contact and potential damage, while also adding significant stability to the entire structure. Aesthetically, they contribute to the substantial, finished look of the pedestal base, making it appear grounded and well-proportioned. Each footpad should be carefully aligned and attached to the bottom of the leg assemblies. Secure them firmly using a combination of wood glue and 1.5-inch Spax screws or reliable wood screws. The glue provides an immediate bond and long-term strength, while the screws ensure a mechanical connection that can withstand daily use. Take your time to ensure all footpads are level and evenly spaced, as this directly impacts the overall balance and appearance of your stunning farmhouse dining table.
DIY Farmhouse Pedestal Table – Step 4: Attaching the Runners for Structural Integrity
With the core leg structure and footpads in place, the next vital step is to attach the runners. These components play a critical role in tying the entire pedestal base together, providing essential structural integrity and preventing any unwanted wobble. The runners are fashioned from 2×6 boards, which we meticulously ripped down to a 5-inch width to achieve a balanced and aesthetically pleasing proportion for the base. You’ll have two runners: a top runner and a bottom runner.
The top runner requires 1.5-inch pocket holes drilled on its upward-facing side. Conversely, the bottom runner will have 1.5-inch pocket holes drilled on its downward-facing side. This specific orientation of the pocket holes is crucial for discreetly attaching the tabletop later and for securely fastening the bottom runner to the leg assemblies without visible hardware. Both runners should be attached precisely to the center of each leg assembly. Utilize a generous application of wood glue to all contact surfaces before securing them with 2.5-inch pocket hole screws. The combination of glue and screws creates a joint that is incredibly strong and durable, ensuring that your farmhouse pedestal table will remain solid and stable for years of family gatherings and meals. Double-check your measurements and alignment during this step to ensure a perfectly square and robust base.
DIY Farmhouse Pedestal Table – Step 5: Constructing the Sturdy Tabletop
Now for the centerpiece of your dining room: the tabletop! This is where the beauty and functionality of your DIY farmhouse pedestal table truly come together. We crafted our tabletop using 2×6 boards, which, similar to our runners, were precisely ripped down to a 5-inch width. This consistent dimension across the table components contributes to a cohesive and professional look.
For most of the longer plank boards that form the main surface, you’ll need to drill 1.5-inch pocket holes along one long side. This allows for strong, hidden joints when assembling the planks side-by-side. Additionally, all longer plank boards will require 1.5-inch pocket holes on each of their short ends. These end-pocket holes are critical for attaching the breadboards, which provide a beautiful finished edge and prevent warping. Begin by assembling the main planks, applying wood glue generously along the edges where they meet, and then securing them with 2.5-inch pocket hole screws. Ensure a flat and tight fit to minimize gaps.
Once the main body of the tabletop is assembled, measure and cut your breadboards to size. These pieces cap off the ends of the table, adding a classic farmhouse touch. Attach them using the same 2.5-inch pocket hole screws driven through the end pocket holes of each plank. The combination of wood glue and pocket hole screws creates an incredibly strong and durable tabletop that will withstand years of use and enjoyment.
DIY Farmhouse Pedestal Table – Step 6: Final Assembly and Decorative Trim
With the tabletop complete and the pedestal base standing strong, it’s time for the final assembly. Carefully position the tabletop onto the base, ensuring it is perfectly centered. Attach the tabletop to the base using robust 3-inch Spax screws, coupled with a strong wood glue. Drive these screws through the top feet assemblies and the top runner, securing them firmly into the underside of the tabletop. This crucial step creates a rock-solid connection between the top and the base, preventing any movement or instability. Always pre-drill pilot holes to prevent splitting, especially when working with longer screws.
Now, prepare for the most creative and truly enjoyable part: adding the decorative trim! This is where you can infuse your personality and style into your DIY farmhouse pedestal table. The possibilities are truly limitless, allowing you to go as rustic or as ornate as your heart desires. Starting from the bottom, begin attaching various types of casing trims, baseboard moldings, and even chair rails around each leg of the pedestal. The goal is to gradually work your way upwards, completely concealing the raw 2×6 leg boards and transforming them into a beautifully sculpted pedestal.
Attach the trim using a combination of wood glue and a pin or brad nailer. The glue provides long-term adhesion, while the nails hold the trim securely in place as the glue dries. Remember, precision in cutting your angles (especially at corners) is key for a professional finish. Don’t be afraid to experiment with different profiles and layers to create depth and character. We highly recommend revisiting our video tutorial for invaluable tips and techniques on cutting and attaching trim with ease and accuracy.
And let’s admire her one more time! Isn’t this finished farmhouse pedestal table absolutely adorable? The trim work truly elevates the entire piece from functional furniture to a work of art. As mentioned, we primarily used a combination of base moldings, casings, and chair rails to achieve our desired look, but the beauty of this stage is its flexibility. Feel free to explore various trim profiles available at your local hardware store. For those looking to save a bit on cost without sacrificing style, primed MDF trim is an excellent, paint-ready option that offers fantastic value. Remember to consult our detailed video for expert tips on achieving clean cuts and seamless attachment for your trim pieces, ensuring a professional and polished finish.
Finishing Touches: Sanding, Staining, and Painting Your Masterpiece
Once your farmhouse pedestal table is fully assembled, including all the intricate trim work, it’s time for the critical finishing steps that will bring out its true beauty and protect it for years to come. Start with thorough sanding. Begin with a coarser grit sandpaper (e.g., 100 or 120-grit) to smooth out any rough spots, glue residue, or imperfections. Gradually work your way up to finer grits (e.g., 180 or 220-grit) for a silky-smooth surface. Pay special attention to the tabletop and any areas that will be frequently touched. Dust off the entire piece meticulously after each sanding pass.
Next, decide on your desired aesthetic. For a classic farmhouse look, staining the tabletop is a popular choice, allowing the natural wood grain to shine through. Apply your chosen stain (like the one we linked earlier) evenly, wiping off any excess according to the product’s instructions. For the pedestal base, painting often creates a beautiful contrast. Chalk paint, as we used, is fantastic for its ease of use and matte finish, often requiring minimal prep. Apply multiple thin coats for the best coverage and durability. Once the paint or stain is dry, it’s crucial to apply a protective topcoat. A durable polyurethane or a clear wax will seal the surface, protecting it from spills, scratches, and daily wear and tear. This final layer ensures your DIY farmhouse pedestal table remains stunning and functional for countless meals and memories.
Caring for Your Handcrafted Farmhouse Dining Table
To keep your newly built farmhouse pedestal dining table looking its best, a little routine care goes a long way. For general cleaning, simply wipe down the surfaces with a soft, damp cloth. Avoid harsh chemical cleaners, as they can damage the finish over time. For spills, act quickly to blot them up to prevent staining, especially on stained or painted surfaces. If you used a wax finish, occasional reapplication might be necessary to maintain its protective qualities and luster. With proper care, your DIY dining table will be a cherished centerpiece in your home for many years, a true testament to your craftsmanship and dedication.
We hope these detailed plans and guidance empower you to create your very own stunning DIY farmhouse pedestal dining table. This project not only saves you money but also provides immense satisfaction from building something beautiful with your own hands. Happy building!
Explore the complete list of our other inspiring Shanty2Chic dining table builds!