
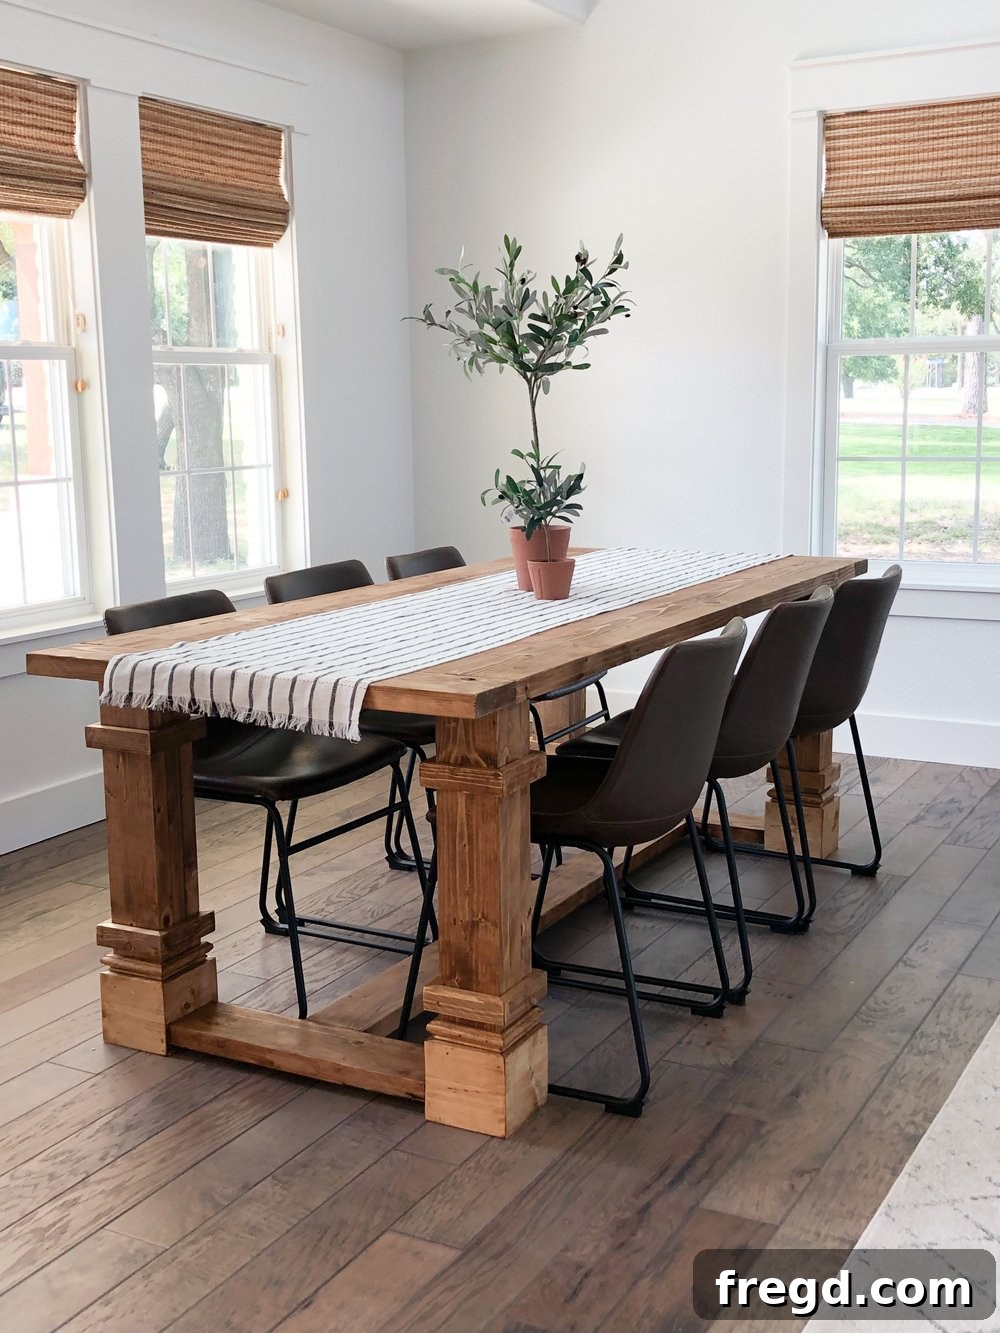
DIY Modern Farmhouse Dining Table: Crafting Your Dream Dining Centerpiece
Welcome, fellow DIY enthusiasts and home improvement adventurers! We’re thrilled to share an exciting update from our latest flip house project. As we round the final curve and prepare to list this beautiful home on the market, one of the standout features we’ve poured our hearts into is this magnificent **DIY Modern Farmhouse Dining Table**. This isn’t just any table; it’s a piece we believe truly captures the essence of modern farmhouse style – combining rustic warmth with clean, contemporary lines. In fact, among all the tables we’ve built over the years, this one might just be my absolute favorite. The satisfaction of crafting a custom piece that perfectly complements a space is unmatched, and we’re excited for you to experience that joy too!
Whether you’re furnishing a new home, upgrading your current dining area, or embarking on a flip house venture like us, a handcrafted dining table brings unparalleled character and a focal point to any room. Our detailed guide will walk you through every step of building this sturdy and stylish table, ensuring a rewarding building experience from start to finish. We’ve even added a link to free printable plans at the bottom of this post to make your journey even smoother. Let’s dive into how you can create your very own custom modern farmhouse dining table!
Essential Tools and Materials for Your Farmhouse Dining Table Project
Before you begin any woodworking project, gathering all the necessary tools and materials is crucial. Not only does this save time during the build, but it also ensures you have everything on hand to achieve a professional and durable finish. Investing in quality wood and reliable tools will pay off in the longevity and stability of your finished dining table.
Supply List:
- Wood:
- 13 pieces of 2x6x8 lumber (to be ripped down to 5″ wide for the tabletop planks)
- 3 pieces of 2x6x8 lumber (to be ripped down to 4″ wide for structural supports)
- 3 pieces of 1x2x6 pine or whitewood (for leg trim)
- 1 piece of 1x6x6 pine or whitewood (for leg bases)
- 1 piece of 1x6x4 pine or whitewood (for leg bases)
- 1 piece of 1.5″ wide casing (at least 96″ long, pine or similar)
- Fasteners & Adhesives:
- 1.5” pocket hole screws (for initial tabletop plank connections)
- 2.5” pocket hole screws (for breadboards and base assembly)
- 2.5” wood screws (for laminating leg pieces and final tabletop attachment)
- 1.25” brad or finish nails (for trim work)
- High-quality wood glue (waterproof if possible, for maximum durability)
- Tools:
- Miter saw or circular saw (for accurate cross-cuts)
- Table saw (essential for ripping boards to specific widths for planks and supports)
- Kreg Jig (the cornerstone for strong, concealed pocket hole joinery)
- Drill/Driver with appropriate bits (to drive screws and pre-drill if needed)
- Kreg Face Clamp (highly recommended for flattening tabletop boards during assembly)
- Tape measure and pencil
- Safety glasses and hearing protection (always prioritize safety!)
- Orbital sander with various grit sandpaper (from coarse to fine for a smooth finish)
- Brad nailer (for quick and clean trim attachment)
- Wood clamps (various sizes are helpful for holding pieces while glue dries)
- Finishing Materials:
- Wood stain (e.g., Varathane Wood Stain in Golden Oak, as used in this project)
- Polyurethane or other durable wood sealer (for protection and longevity)
- Clean rags or brushes (for stain and sealer application)
Step-by-Step Guide to Building Your Modern Farmhouse Dining Table
1. Crafting the Perfect Tabletop: The Foundation of Your Dining Table
The tabletop is the most prominent feature of your dining table, providing the surface for countless meals and memories. This section focuses on creating a sturdy and visually appealing plank top.
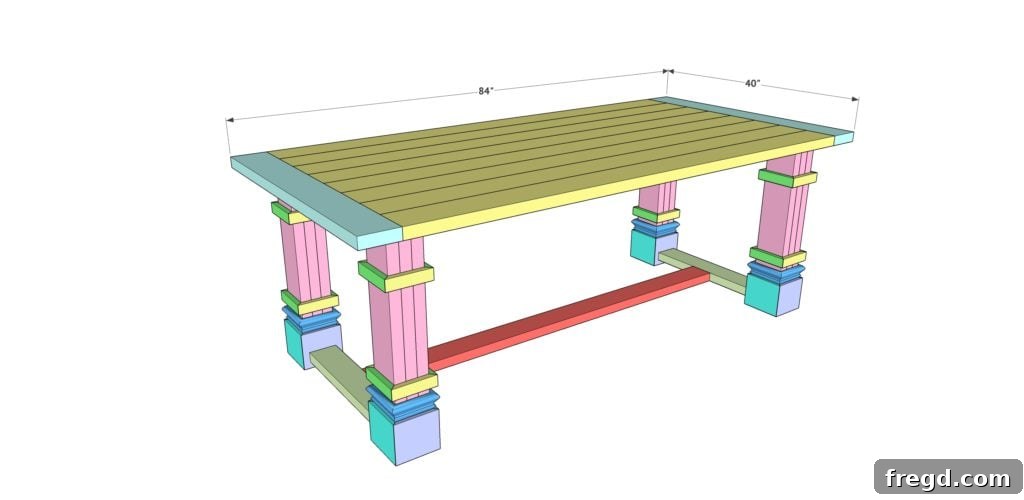
- Prepare the Planks: Begin by taking your 2×6 boards. For this modern farmhouse design, we’ll rip these down to a consistent 5 inches in width using a table saw. This step is critical for achieving the clean, uniform plank look that defines the style. Ensure all edges are smooth and straight.
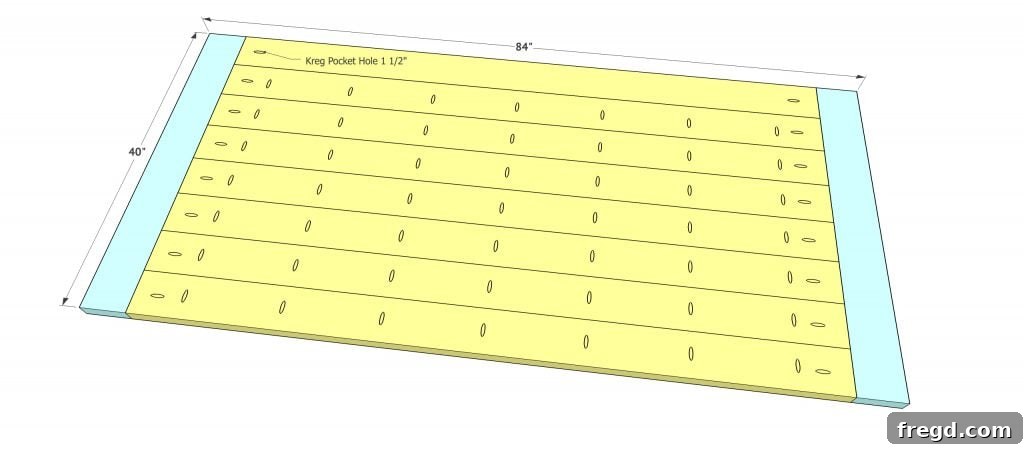
- Drill Pocket Holes: With your Kreg Jig, drill 1.5-inch pocket holes along one long side of all but one of your plank boards. Additionally, drill 1.5-inch pocket holes at both ends of each plank board. These strategically placed holes allow for strong, concealed joinery, preventing visible fasteners on your beautiful tabletop surface.
- Assemble the Main Tabletop: Apply a generous but even bead of wood glue along the long edges of the planks where they will meet. Using 2.5-inch pocket hole screws, firmly attach the plank boards together, working your way across the entire length of the tabletop. Take your time to ensure tight joints, clamping boards together as needed.
- Integrate the Breadboards: Once your main plank assembly is complete and the glue has dried, carefully align the boards on each end and mark the precise measurements for your breadboards. Breadboards are the shorter pieces that cap the ends of the tabletop, adding structural integrity, preventing warping, and enhancing the aesthetic. Attach these breadboards securely using wood glue and 2.5-inch pocket hole screws, ensuring they are flush with the main tabletop planks.
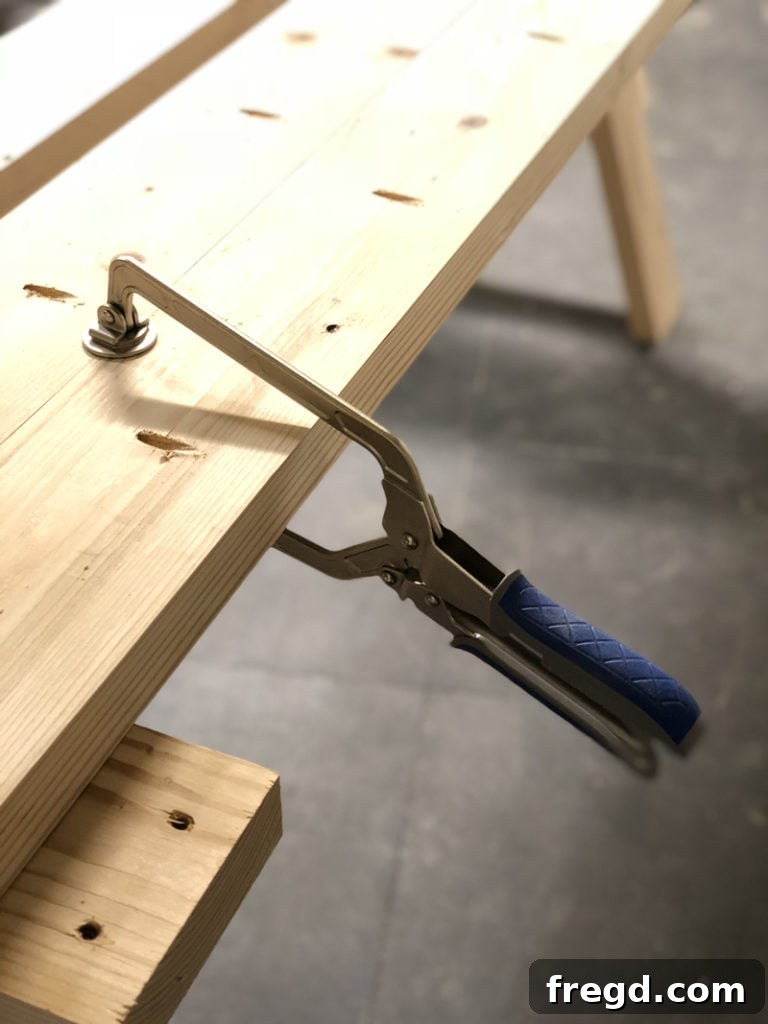
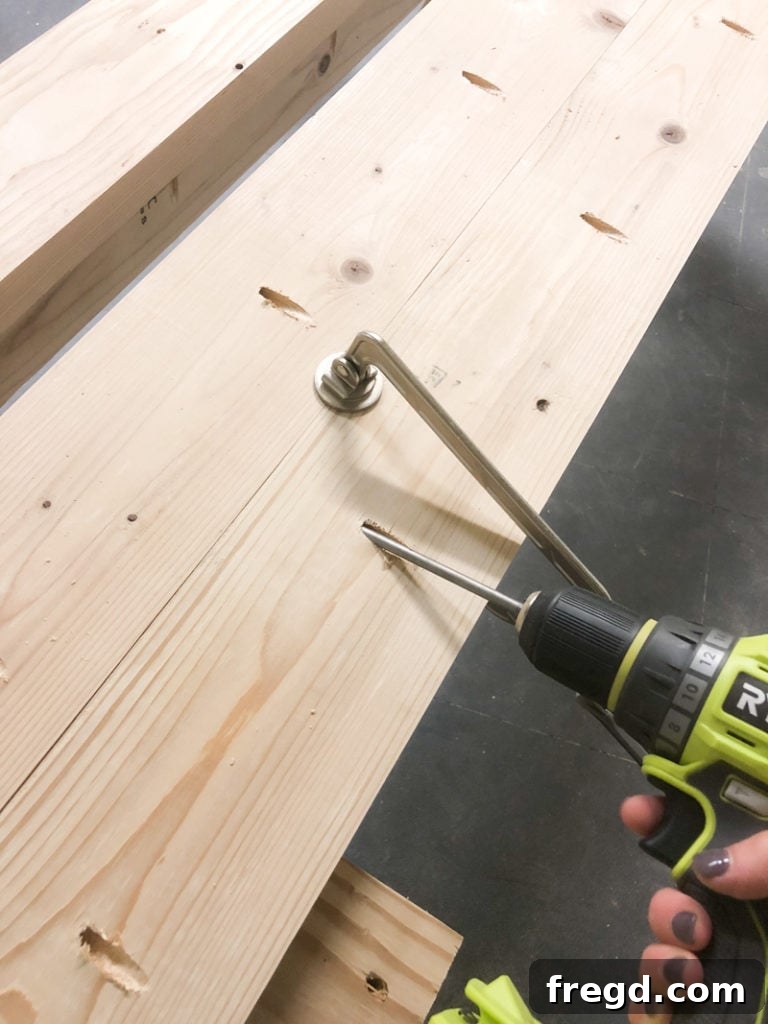
Pro Tip: Achieve a Flatter Surface with a Kreg Face Clamp! As you join the tabletop planks, one tool that proves invaluable is the Kreg Face Clamp. It allows you to easily flatten the boards at the seams as you go, ensuring a smoother, more even tabletop surface. Simply run the clamp along each seam, pulling the boards flush before driving your pocket hole screws. This small step makes a significant difference in the final quality and appearance of your table.
2. Building the Sturdy Leg Assemblies: Structure and Style
The legs of your dining table are not just about support; they significantly contribute to the table’s overall aesthetic and farmhouse appeal. You will construct four identical leg assemblies, each designed for both inherent strength and elegant visual presence.
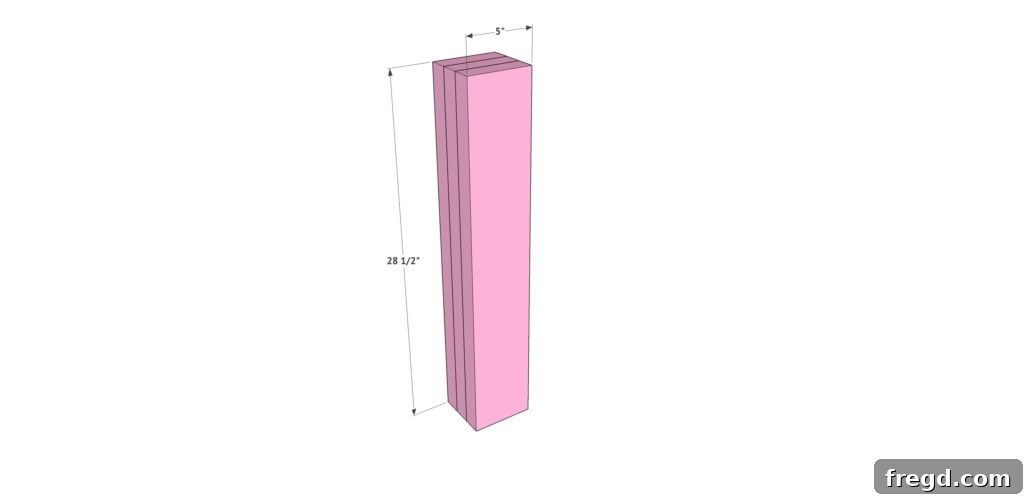
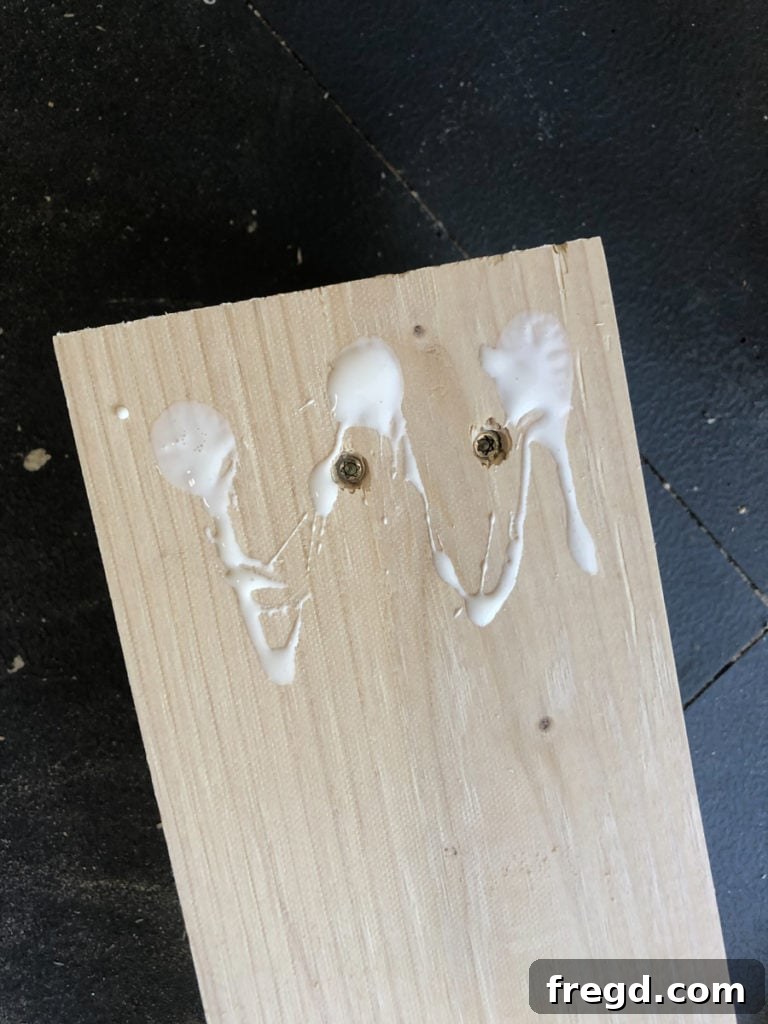
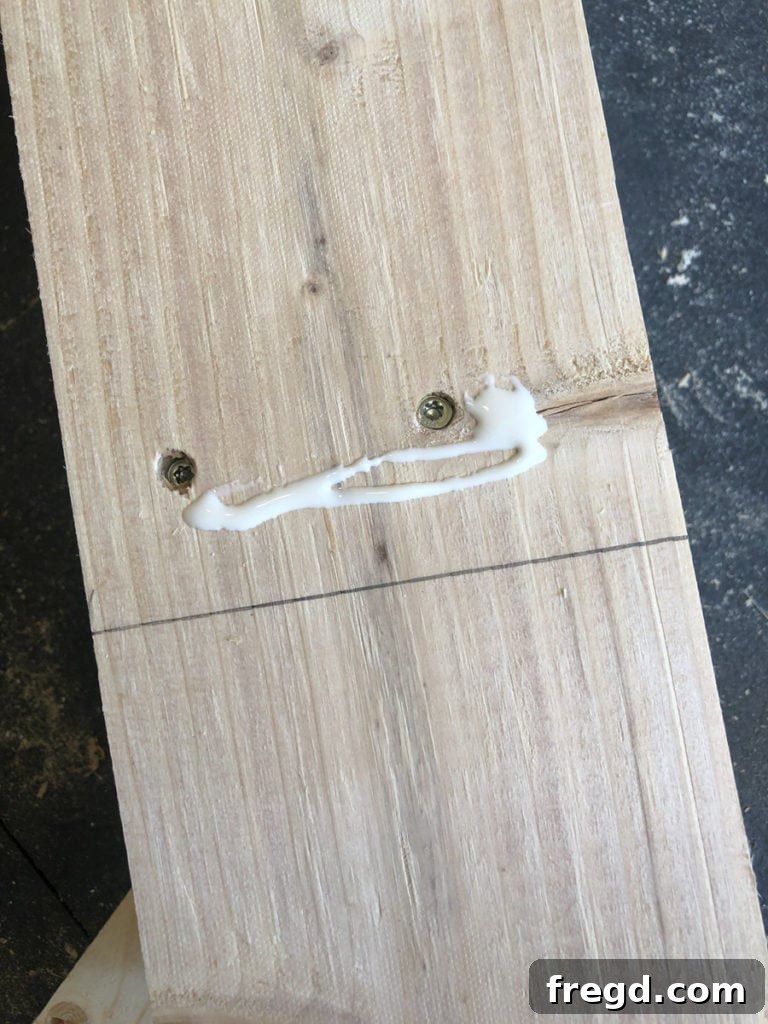
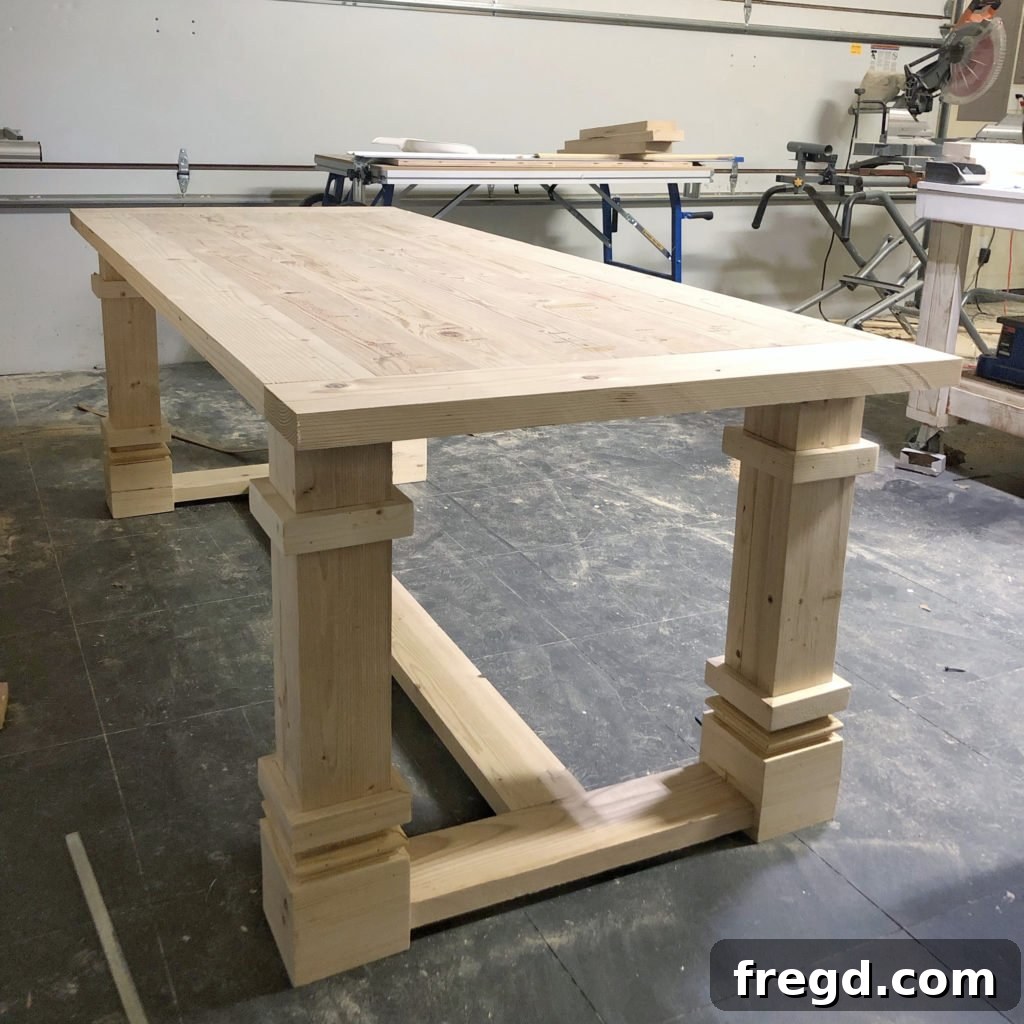
- Laminate the Leg Cores: Each leg assembly starts with laminating three boards together to create a substantial, thick post. Apply a generous and even amount of wood glue between each board. Secure them firmly with 2.5-inch wood screws driven through the outside pieces and into the inner piece. To ensure these screw holes will be discreet, align them approximately 5.5 inches from the top and 3 inches from the bottom; these strategic placements mean the screws will later be concealed by decorative trim. Clamp the laminated pieces together while the glue dries for maximum bond strength.
3. Adding Decorative Trim to the Legs: The Farmhouse Touch
The decorative trim pieces are where the distinct “farmhouse” character truly comes alive, adding depth, visual interest, and a refined finish to your table legs. Precision in cutting and attaching these angled pieces is key for a seamless, professional appearance.
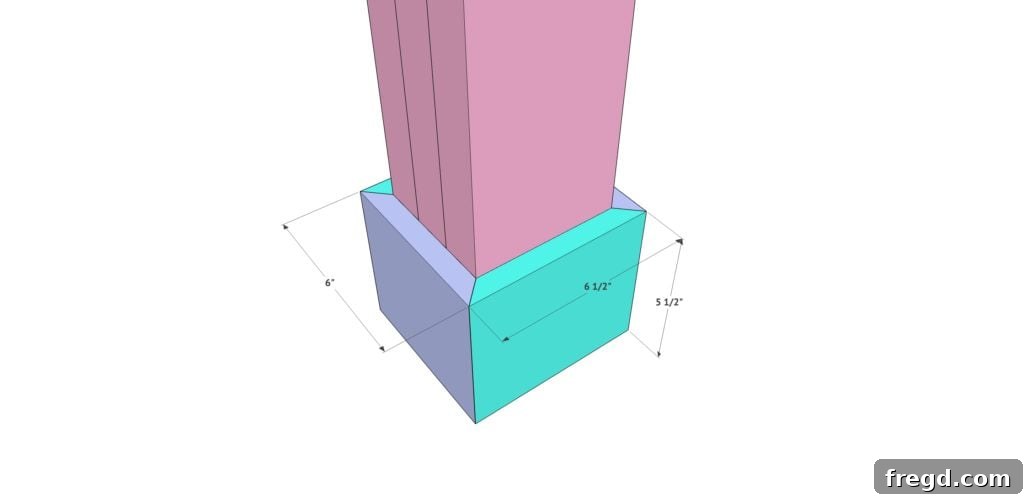
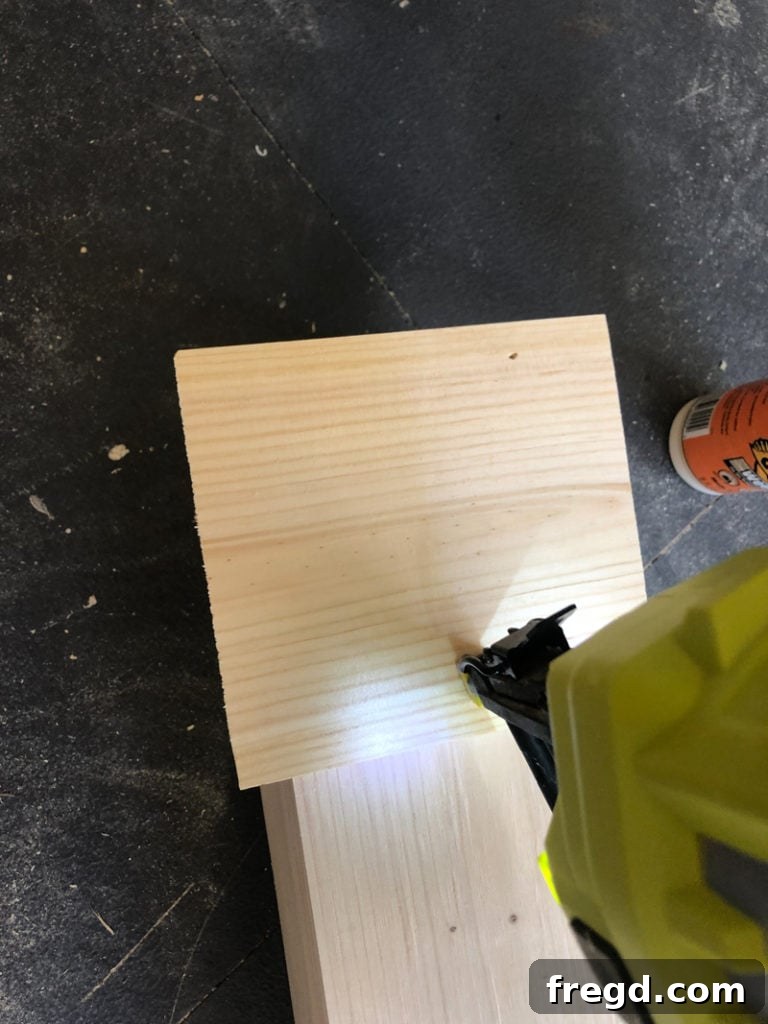
- Attach the Leg Bases: Measure and cut 1×6 boards to form the bottom bases of your legs. For a clean, custom look, each corner of these base pieces should be cut at a precise 45-degree angle to create perfect mitered joints. Attach these base components to the bottom of your laminated leg cores using wood glue and 1.25-inch brad or finish nails.
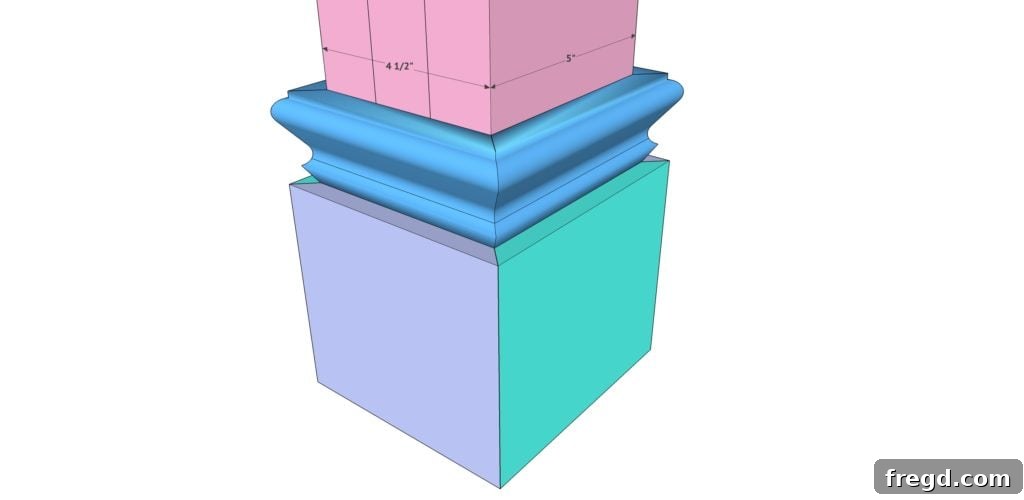
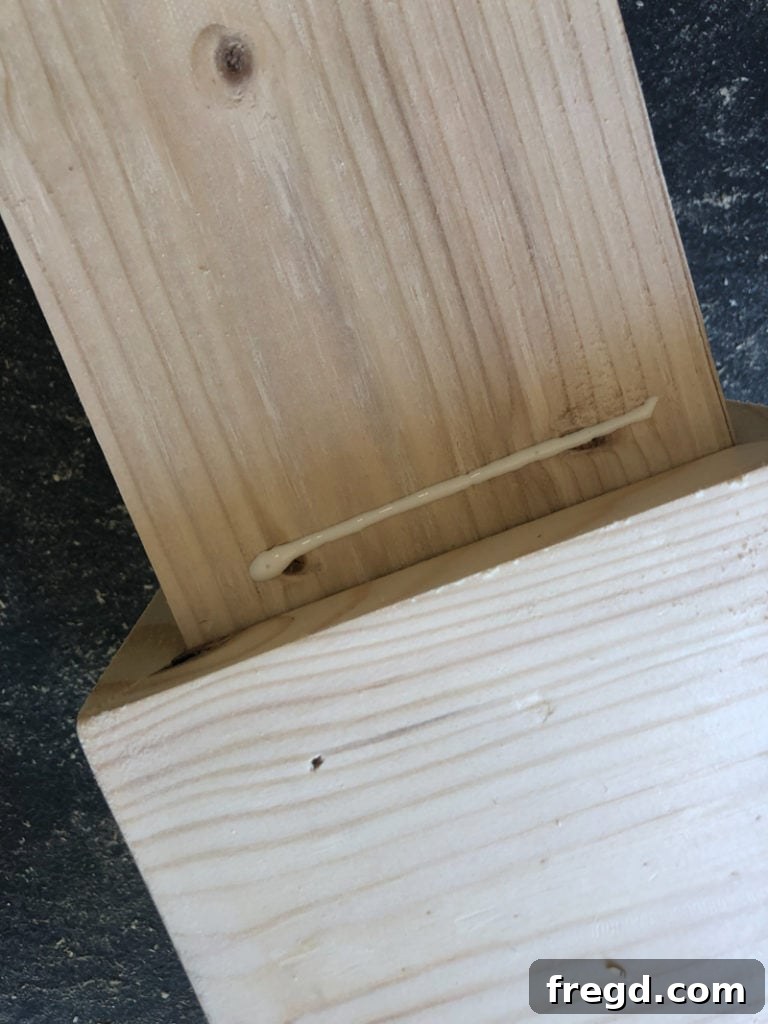
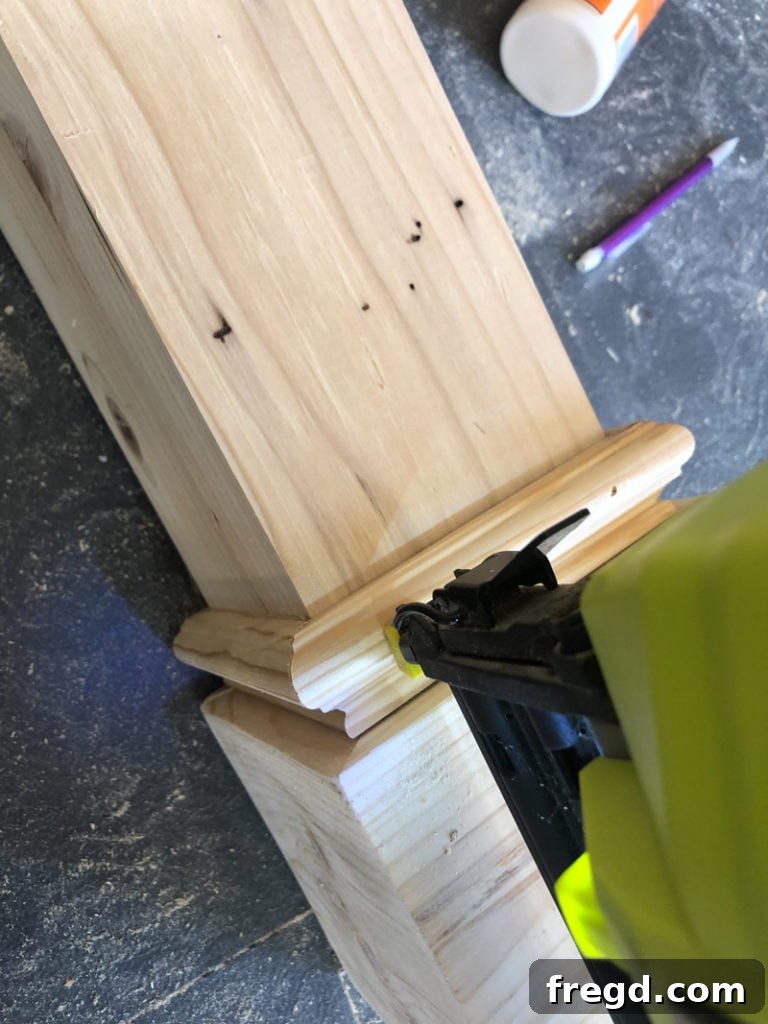
- Apply the Main Casing Trim: Now, it’s time to add the primary trim piece that will elegantly cover the screws from the lamination step. We used a 1.5-inch wide casing for this project, but this is an excellent opportunity to inject your personal style with different trim profiles! Cut each corner at a 45-degree angle to create neat mitered joints. Attach this trim just above the 1×6 base, securing it with wood glue and 1.25-inch brad or finish nails.
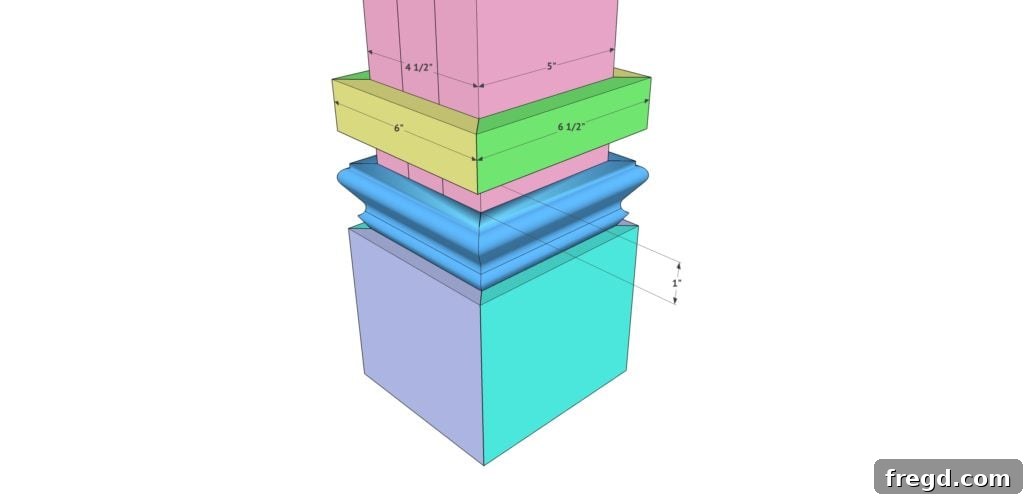
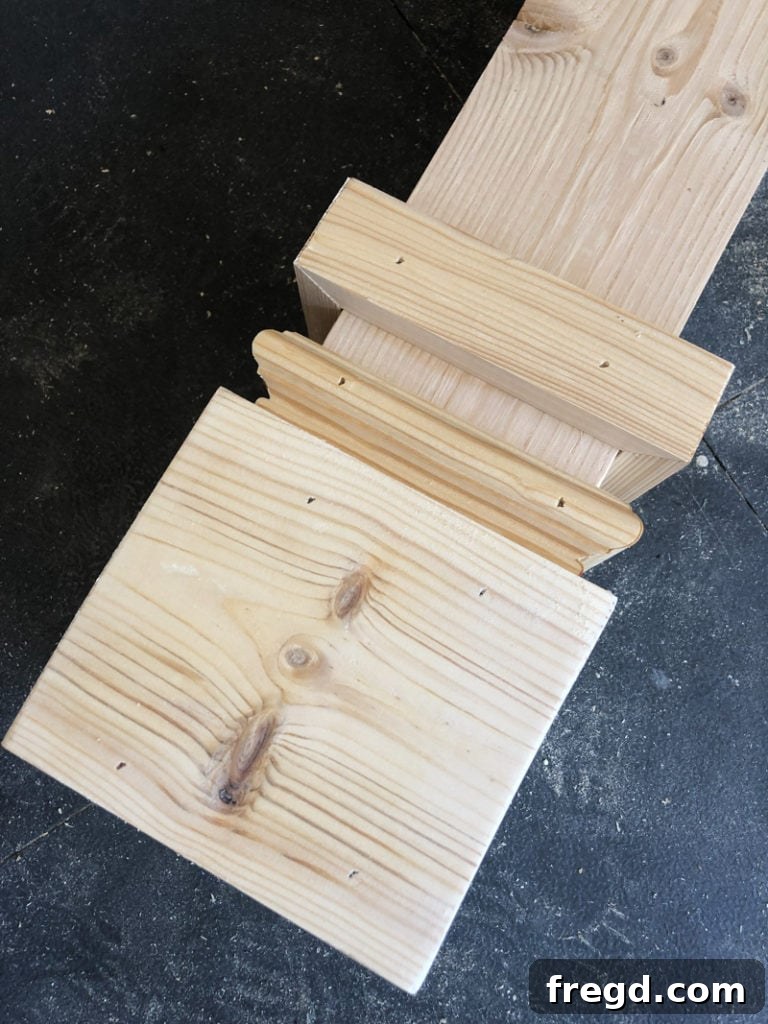
- Install the Lower 1×2 Trim: Next, measure and cut your 1×2 trim pieces, ensuring they also feature 45-degree angles for clean joints. Line these trim pieces up precisely 1 inch from the top edge of the main casing trim piece. Attach them securely using wood glue and 1.25-inch brad or finish nails. This step adds a subtle, layered detail that enhances the overall sophistication of the leg design.
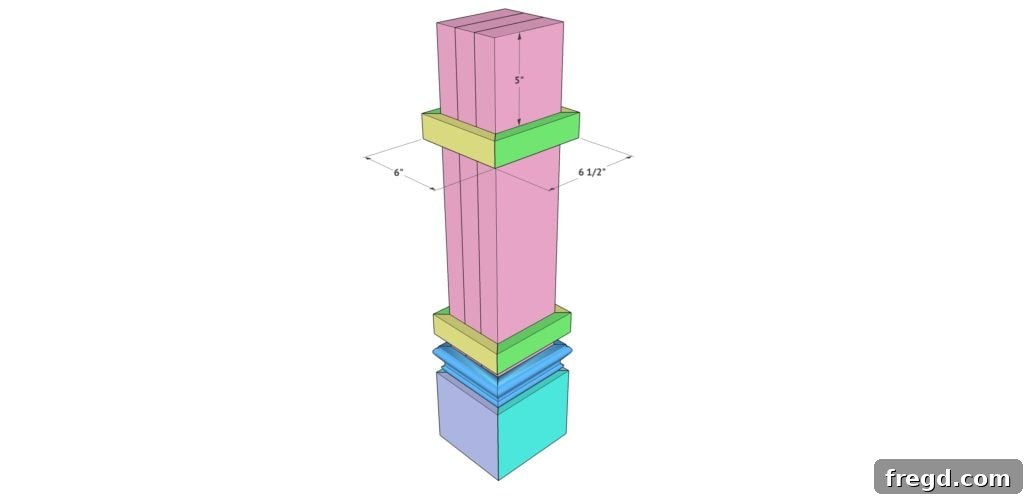
- Add the Top 1×2 Trim: Following a similar method, attach the top 1×2 trim pieces. These should be carefully lined up 5 inches from the very top of each leg assembly, providing a balanced visual element that frames the upper portion of the leg. Secure them with wood glue and 1.25-inch brad or finish nails. With this, your individual leg assemblies are now beautifully complete.
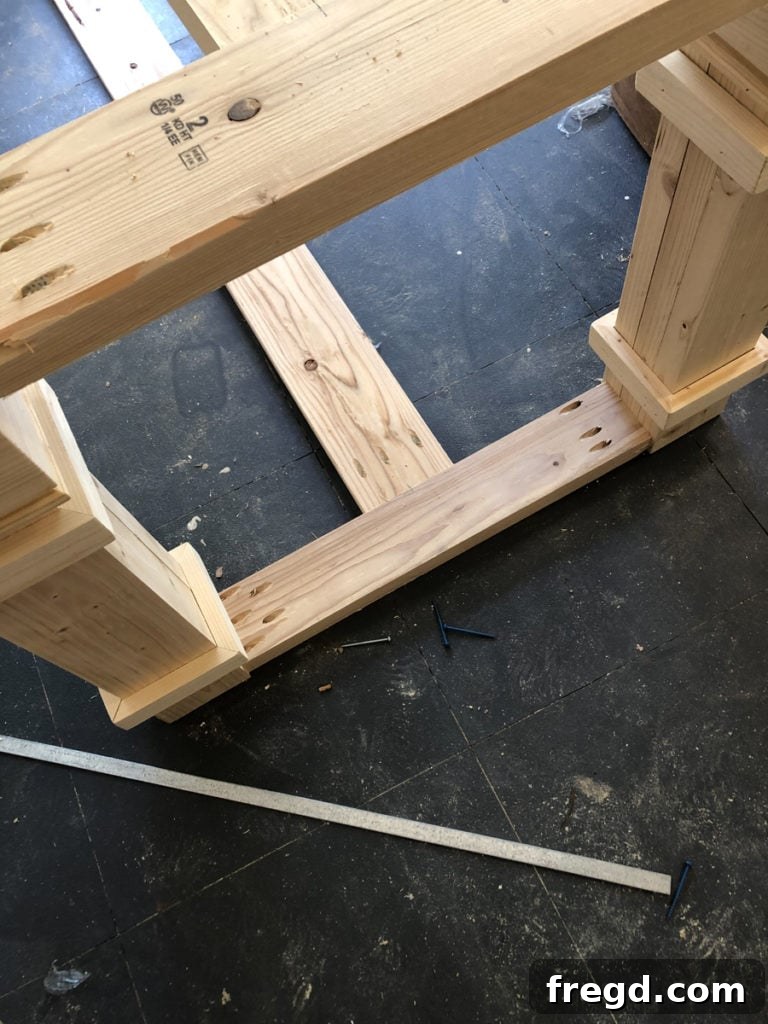
4. Assembling the Table Base: Bringing the Structure Together
With your individual leg assemblies complete, it’s time to connect them to form the robust and stable base that will elegantly support your beautifully crafted tabletop. This stage involves creating two end assemblies and then connecting them with long runners to form the full table frame.
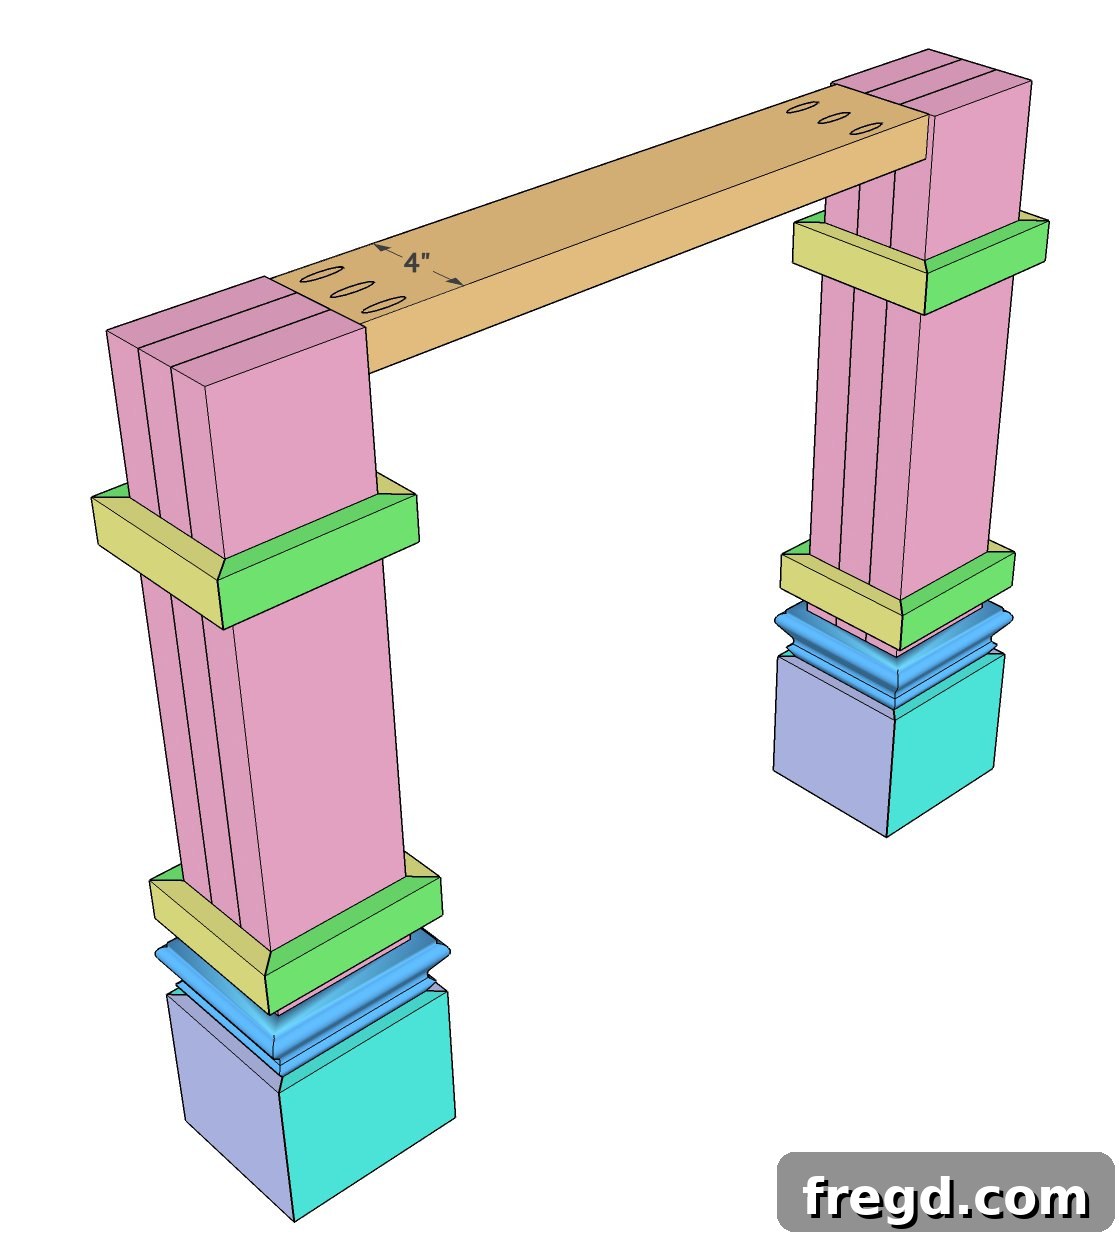
- Connect Two Leg Assemblies (Short Sides): Take two of your completed leg assemblies. Using a 2×6 board (which you should have ripped to 4 inches wide earlier), attach these two legs together. The 2×6 board acts as a stretcher, providing lateral stability. Ensure this board is flush with the top of each leg assembly and perfectly centered between them. Secure this connection using wood glue and 2.5-inch pocket hole screws through pre-drilled 1.5-inch pocket holes. Repeat this exact process for the other two leg assemblies, creating two identical end sections of your table base.
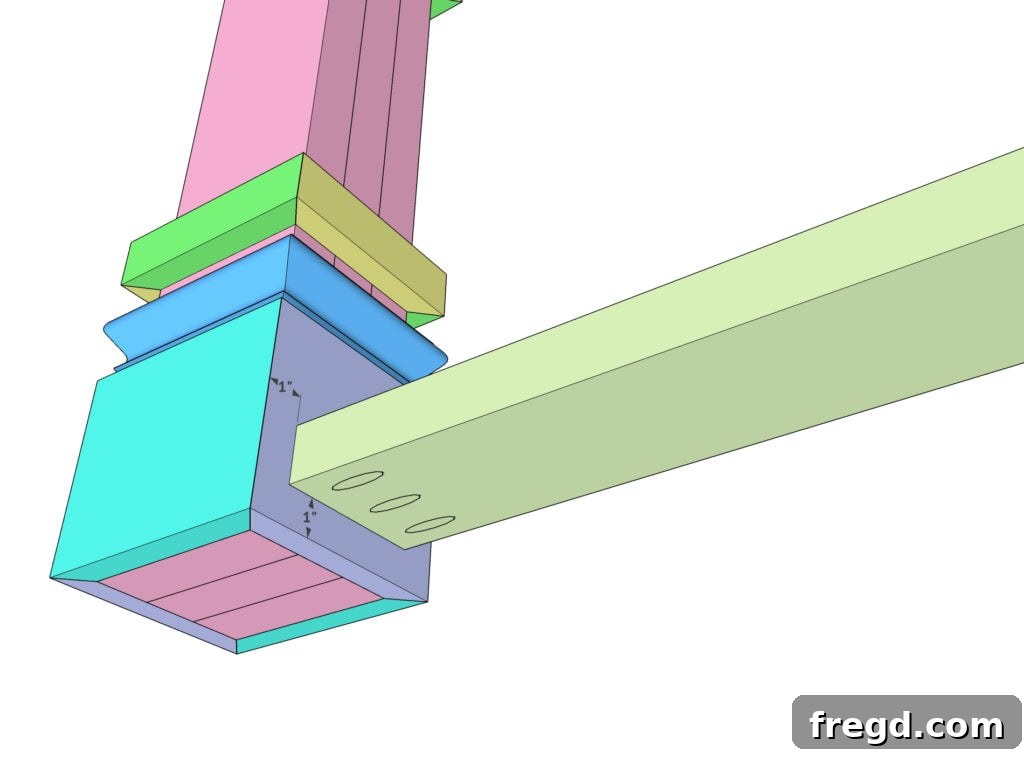
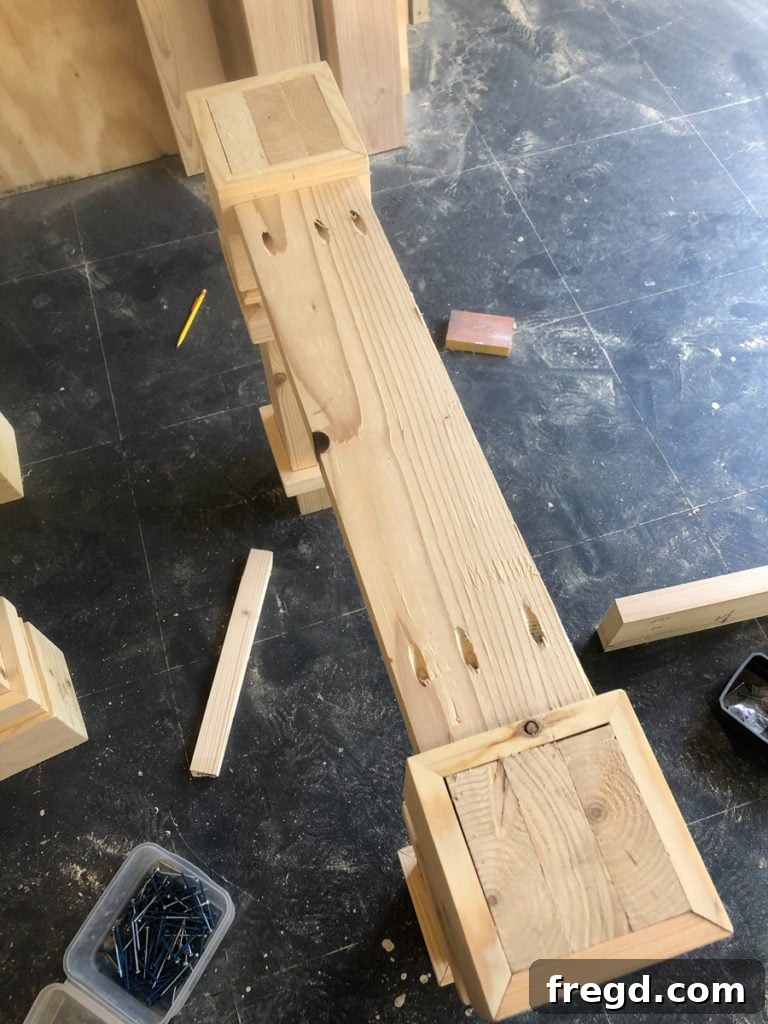
- Attach the Bottom Runner: Now, position the bottom runner board to connect the two leg end assemblies you just created. This crucial runner adds significant stability to the base. It should be centered and placed precisely 1 inch from the very bottom of each leg base. Attach it firmly using wood glue and 2.5-inch pocket hole screws, driven through the pre-drilled 1.5-inch pocket holes. This creates a strong, unified structure.
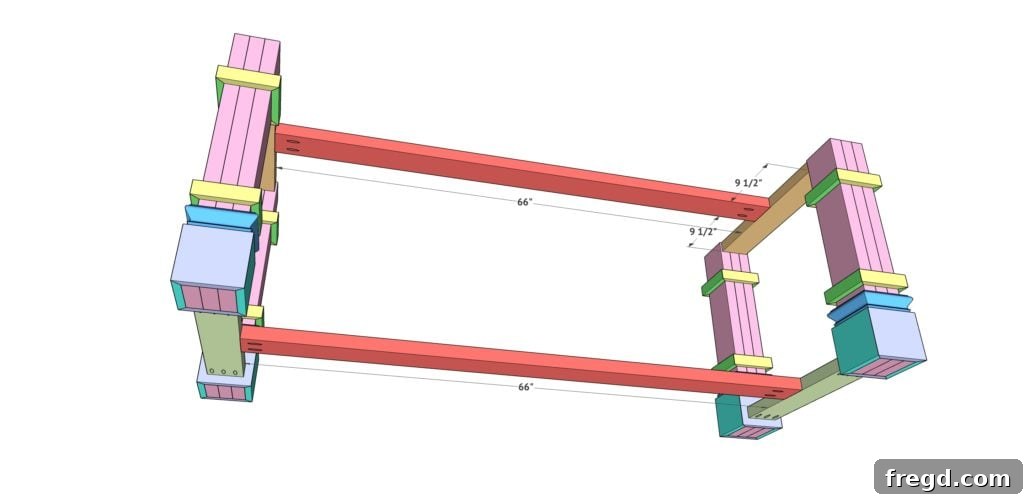
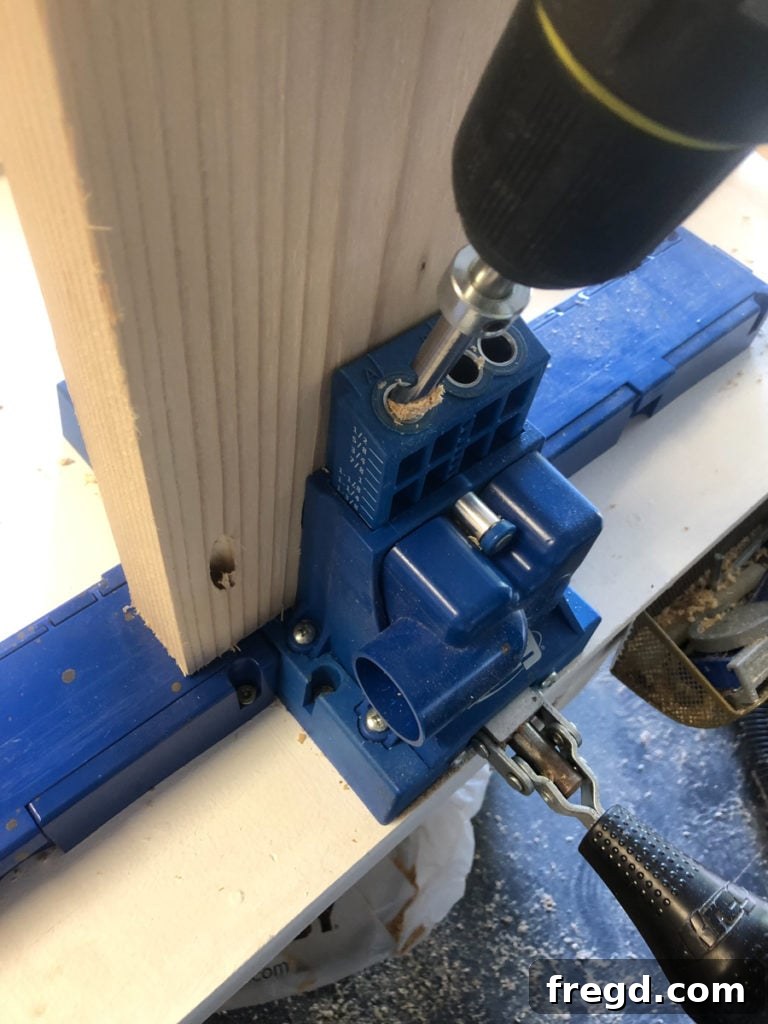
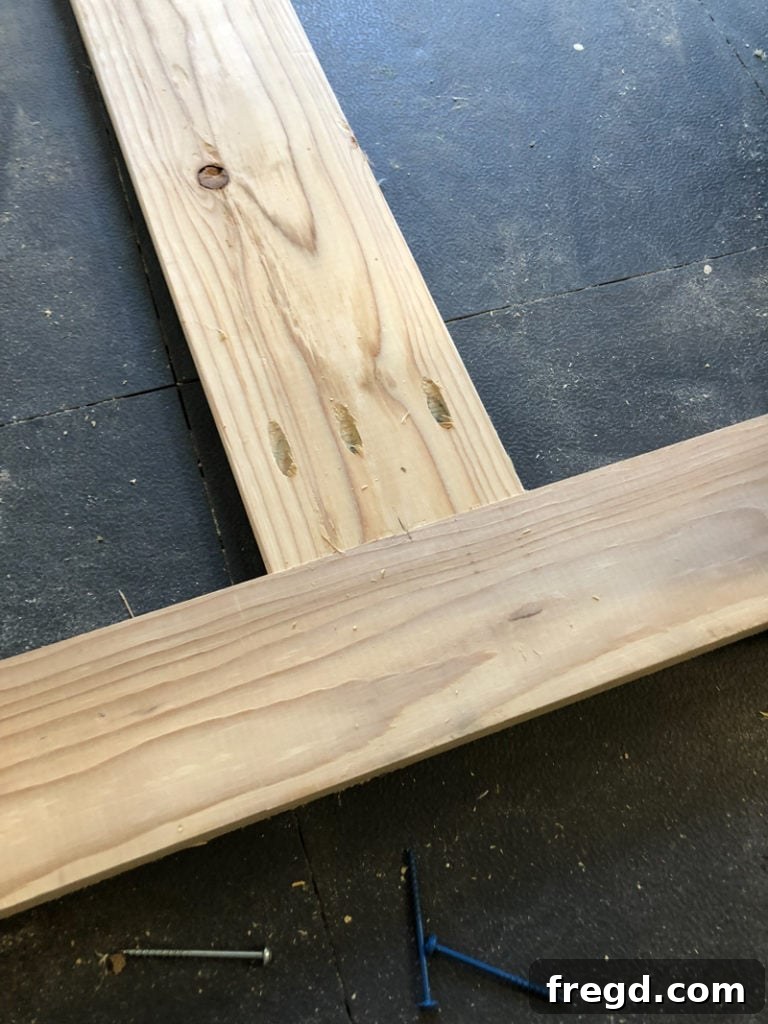
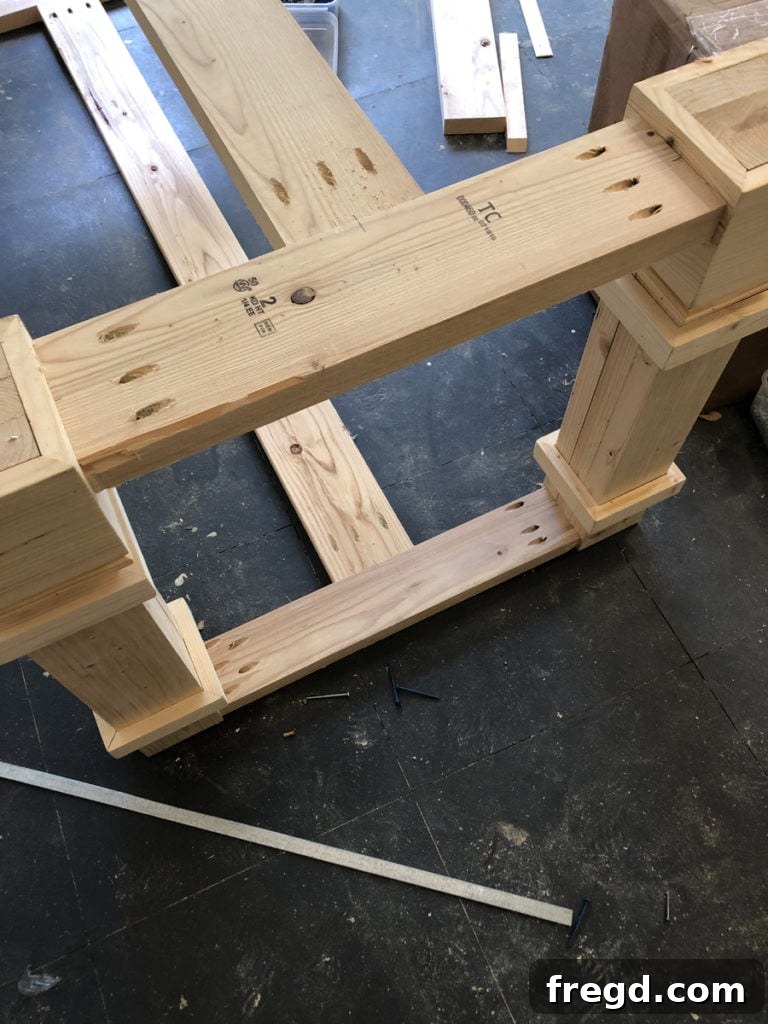
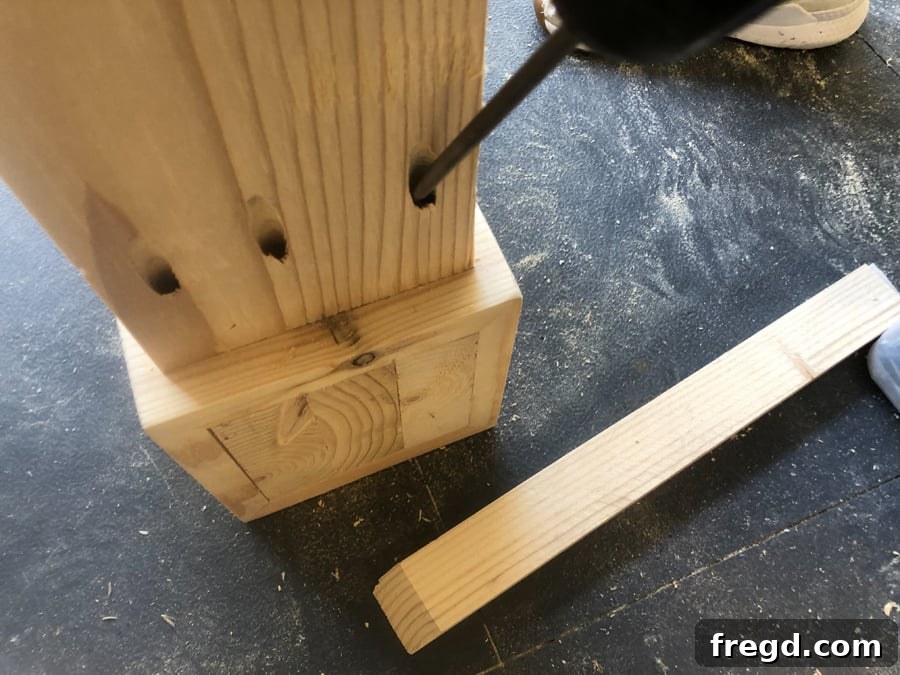
- Attach the Long Runners: The final step in assembling the base is to attach the long runners, which connect the two end leg assemblies, completing the rectangular frame. Apply wood glue and secure these long runners using 2.5-inch pocket hole screws through 1.5-inch pocket holes on each end of the runners. **Important:** For a cleaner, hidden finish, ensure the pocket holes on these long runners are facing downwards, making them invisible from above.
5. Attaching the Tabletop and Finishing Touches
With the table base fully assembled, the final structural step is to unite it with your beautifully crafted tabletop. This connection requires careful alignment and a specific fastening method to allow for wood movement and potential future relocation.
- Secure the Tabletop to the Base: Once you have positioned your table base in its desired room (it’s often easier to move the base and top separately), carefully center the plank tabletop onto the assembled base. Ensure there is an even overhang on all sides. Attach the tabletop to the top runners of the base using 2.5-inch wood screws. It’s crucial **not to use wood glue** in this step. Avoiding glue allows the wood tabletop to expand and contract naturally with changes in humidity, preventing warping and cracking. It also provides the flexibility to easily disassemble and move the table should you ever need to relocate it or transport it to another home.
Finishing Your Farmhouse Dining Table: Stain, Seal, and Style!
Congratulations, your DIY modern farmhouse dining table is structurally complete! Now comes the truly exciting part: bringing out the natural beauty of the wood and protecting it for years to come. The right finish can dramatically elevate your table, transforming it into a cherished centerpiece that reflects your personal style.
Staining for Character:
For our flip house table, we opted for **Varathane Wood Stain in Golden Oak**. This particular stain offers a rich, warm, and inviting hue that perfectly complements the modern farmhouse aesthetic. It beautifully highlights the natural wood grain without being overly dark, providing a classic yet contemporary feel. You can easily find this versatile stain HERE on Amazon!
- Preparation is Key: Before applying any stain, it’s imperative that your table is thoroughly sanded smooth. Start with a coarser grit sandpaper (e.g., 80 or 100) to remove any imperfections, then progressively move to finer grits (e.g., 150 or 220) for a silky-smooth surface. After sanding, meticulously wipe away all dust with a tack cloth or a slightly damp rag and allow the wood to dry completely before staining.
- Application Technique: Apply the wood stain evenly with a high-quality brush or a clean, lint-free cloth, working in the direction of the wood grain. Allow the stain to penetrate the wood for a few minutes (check the product’s specific instructions), then wipe off any excess with a clean rag. For a deeper, richer color, you can apply a second coat after the first has dried completely.
Sealing for Durability:
After staining, a protective topcoat is absolutely essential to shield your table from spills, scratches, dings, and the general wear and tear of daily life. A good quality polyurethane or other wood sealer will ensure your table remains beautiful and resilient for many years to come.
- Layered Protection: Apply several thin, even coats of your chosen sealer. Always allow adequate drying time between each coat, precisely following the product manufacturer’s instructions. For an exceptionally smooth and professional-looking finish, lightly sand the entire surface with a very fine-grit sandpaper (e.g., 320 or 400) between coats. After each sanding, wipe off all dust thoroughly with a tack cloth before applying the next layer of sealer. This process builds up a durable, beautiful finish.
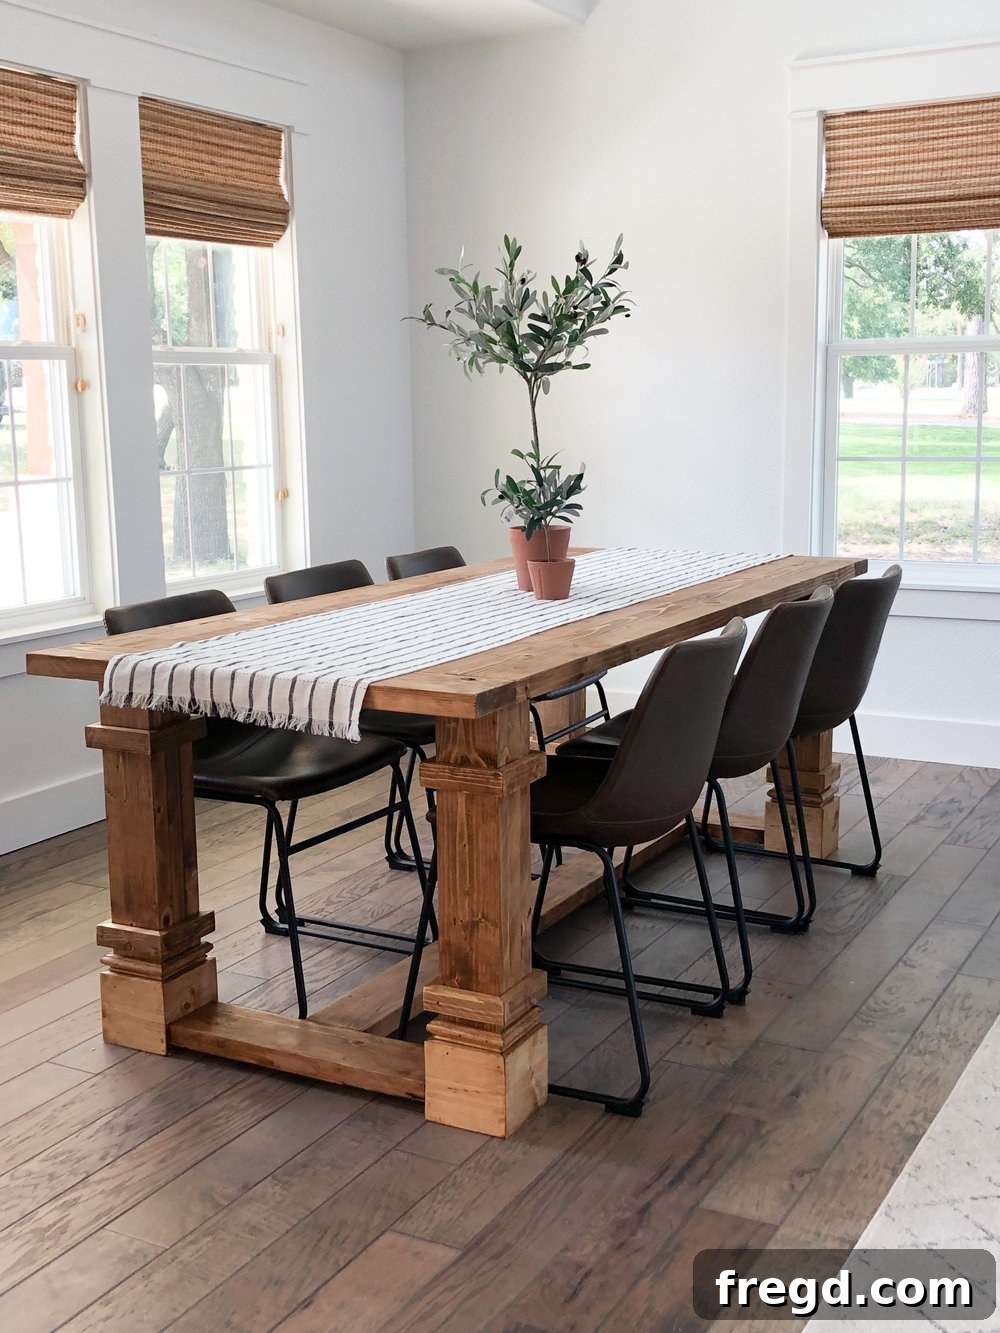
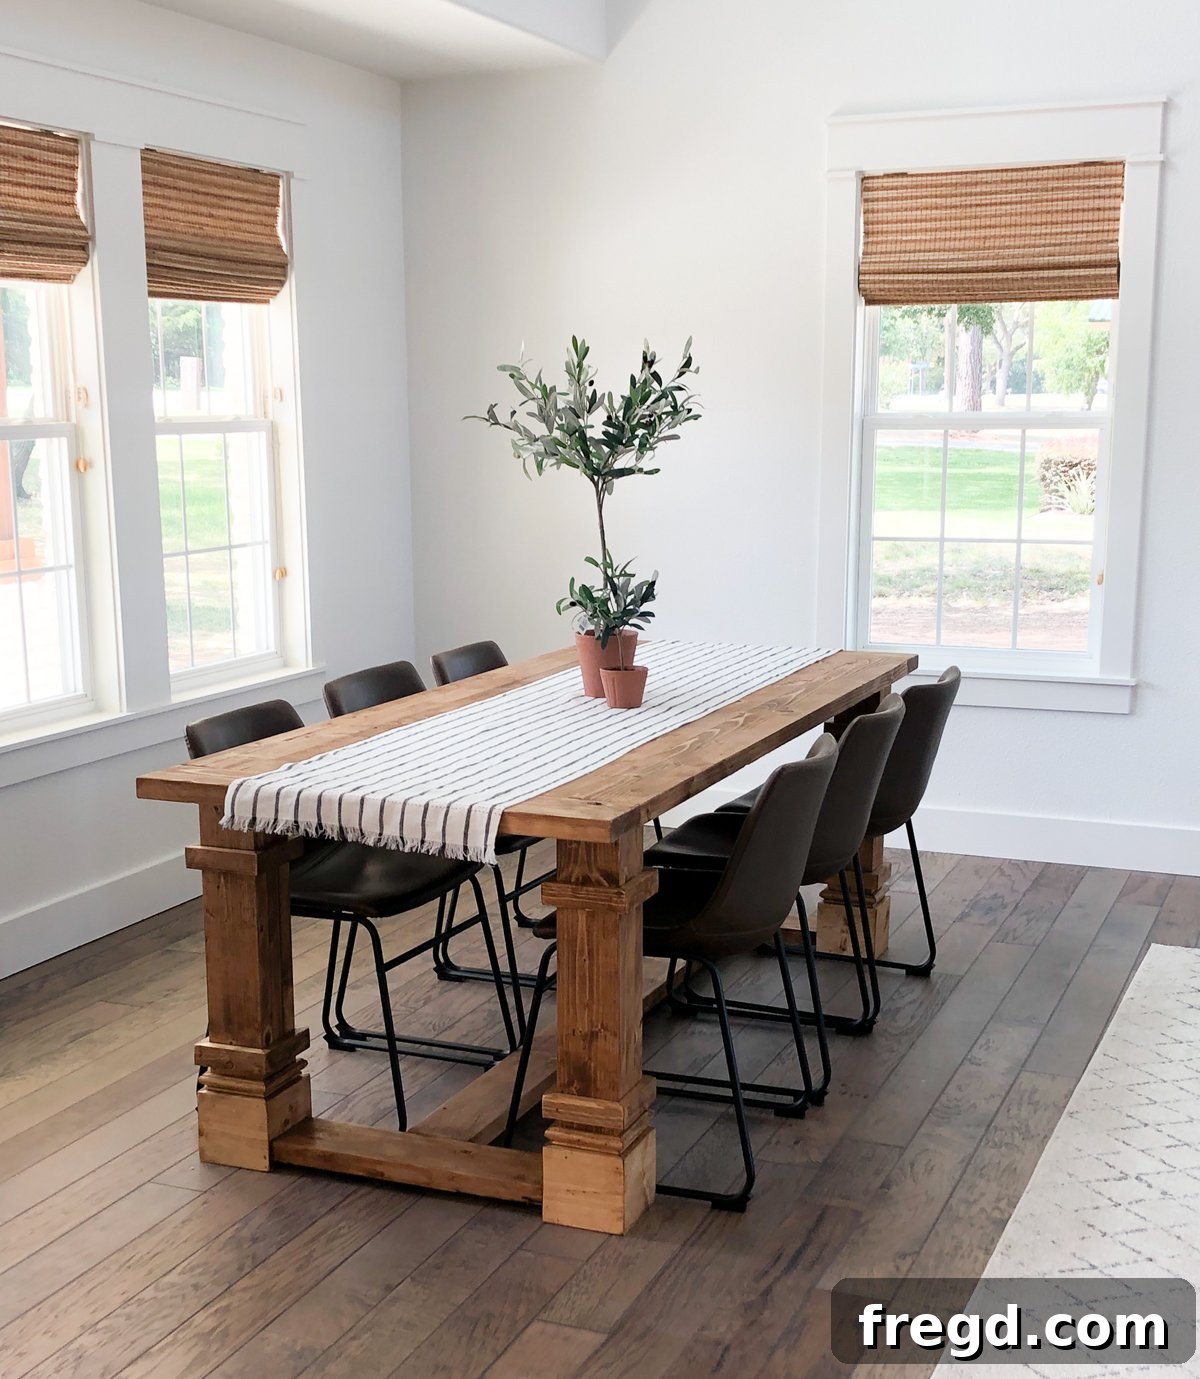
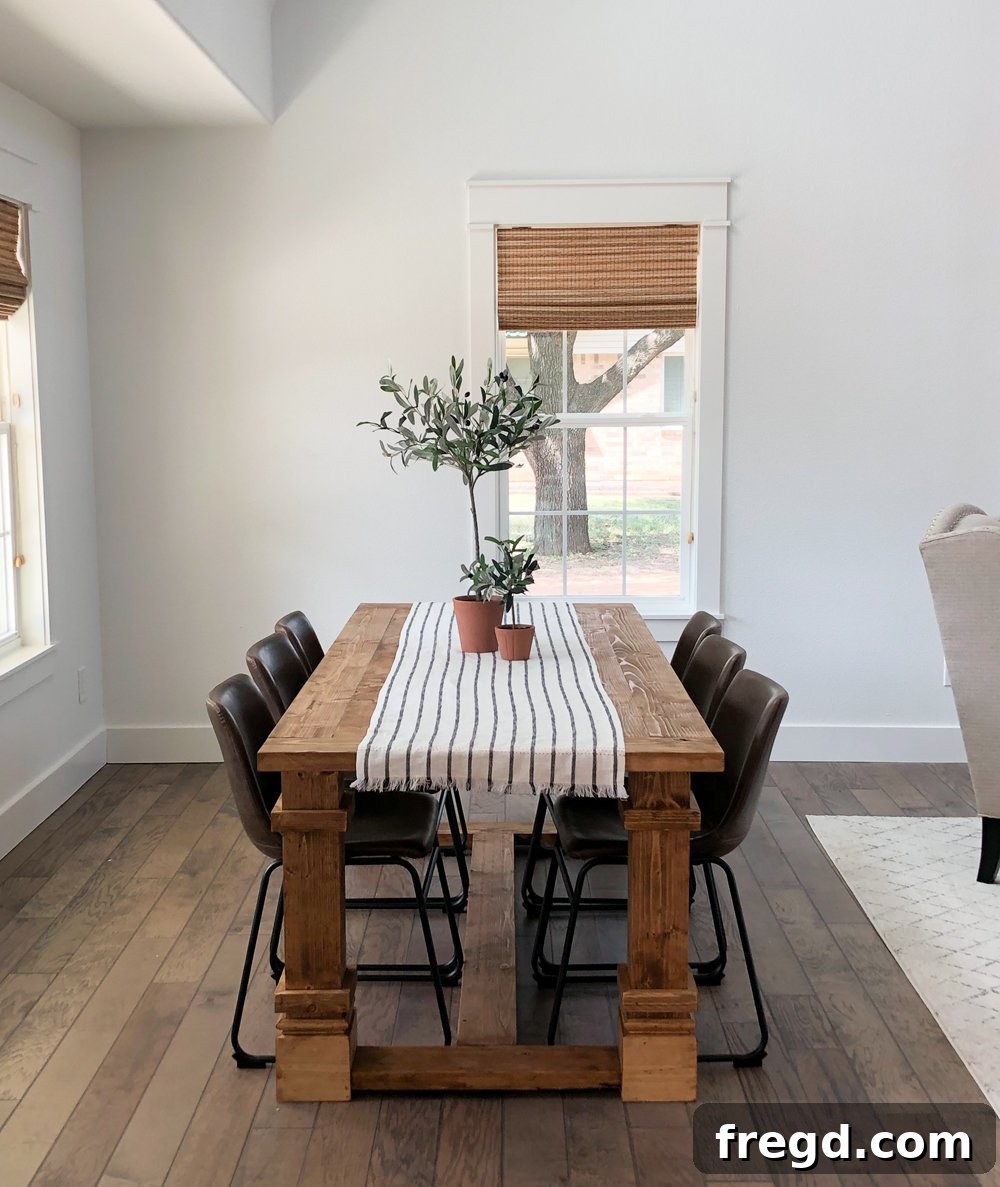
And here she is, all finished up and ready to be enjoyed! The combination of the sturdy construction, the thoughtful trim details, and the warm Golden Oak stain creates a truly remarkable dining table that will serve as a gathering place for countless meals, conversations, and cherished memories for your family and friends.
Decorating Your New Farmhouse Dining Space
Now that your masterpiece is complete, it’s time to bring your dining space to life with complementary decor. The modern farmhouse style is wonderfully versatile, allowing for a harmonious blend of comfort, functionality, and aesthetic appeal. Here are some of the items we’ve expertly paired with our table to complete the inviting look for the flip house:
- Dining Chairs: Choosing the right chairs is paramount, as they not only provide comfortable seating but also significantly define the overall style of your dining area. We found the perfect ones that perfectly match our table’s aesthetic HERE! for a cohesive and truly inviting seating arrangement.
- Table Runner: A carefully selected table runner adds texture, warmth, and a touch of elegance, creating a visual pathway along the center of your table that draws the eye. Discover the one we chose, which beautifully complements the Golden Oak stain, HERE!
- Centerpieces: Simple yet impactful centerpieces can elevate the entire dining setting without overpowering the table itself. We absolutely adore these charming olive tree centerpieces, which add a touch of natural greenery and serene elegance. You can find them HERE!
Printable Plans and Further Resources
Ready to get started on your own DIY Modern Farmhouse Dining Table? We’ve made it even easier for you to build this stunning piece by providing detailed, free printable plans. These plans offer precise measurements, clear cut lists, and helpful diagrams to guide you through each cut and assembly step. Don’t miss out on this valuable resource for your woodworking project!
You can get the FREE printable plans for this DIY Modern Farmhouse Dining Table by clicking HERE!
Looking for even more inspiration or different dining table designs? Be sure to check out our complete collection of DIY Dining Table Plans with over 25 free tutorials to choose from, perfect for beginners and seasoned builders alike!
Conclusion: Enjoy Your Handcrafted Masterpiece!
Building your own furniture, especially a significant and central piece like a dining table, is an incredibly rewarding and empowering experience. Not only do you often save a substantial amount of money compared to purchasing a retail equivalent, but you also gain a truly unique, high-quality item imbued with your own hard work, creativity, and personal touch. This DIY Modern Farmhouse Dining Table will not only serve as a highly functional and durable piece of furniture but also as a beautiful focal point in your home for years to come – a testament to your craftsmanship and a gathering place for countless cherished moments. We hope this comprehensive guide inspires you to pick up your tools, embrace the satisfaction of DIY, and create something truly special for your home. Happy building!