
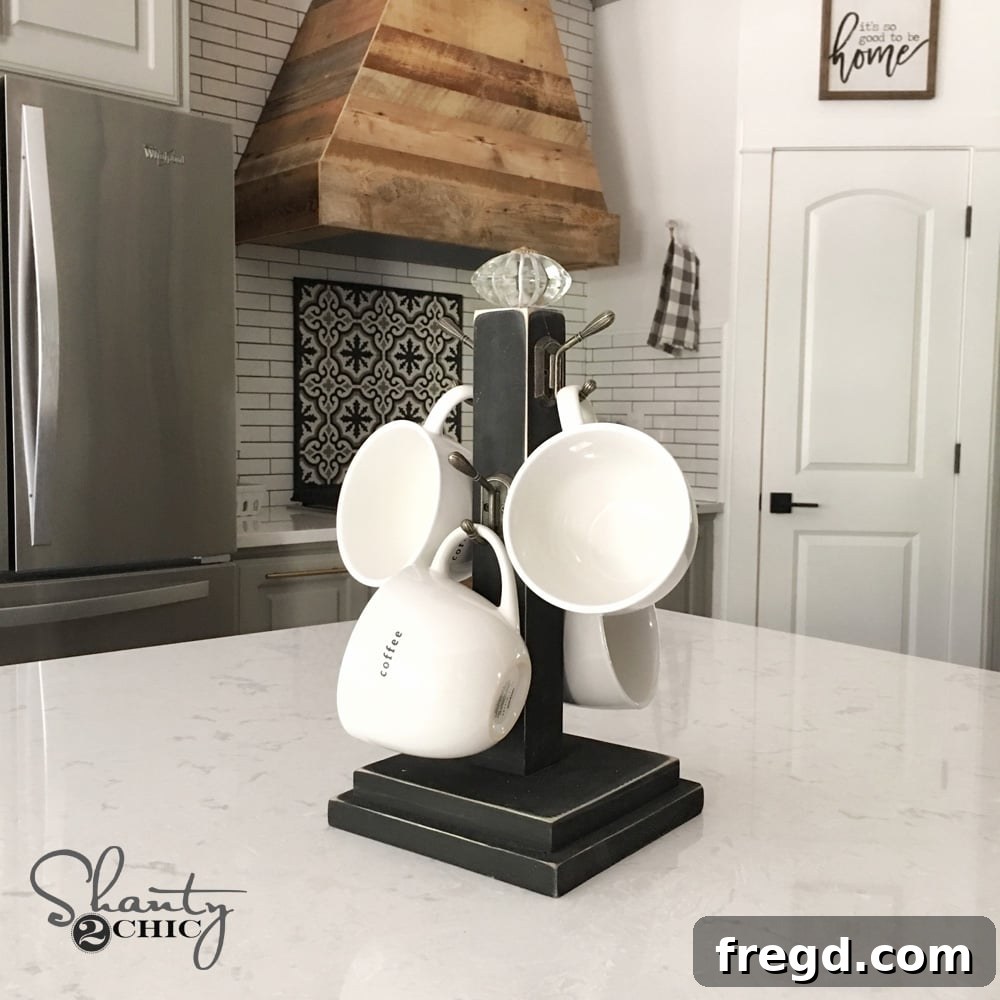
Craft Your Perfect DIY Mug Holder: An Easy Woodworking Project & Thoughtful Gift Idea
Welcome, craft enthusiasts and DIY lovers! We’re thrilled to share our latest woodworking project that promises to bring both charm and functionality to your kitchen, or make a truly heartwarming handmade gift. With the holiday season often prompting a search for unique, budget-friendly presents, this Shanty DIY Mug Holder tutorial is perfectly timed! It’s an incredibly simple project that even beginner woodworkers can tackle, offering a fantastic way to organize your favorite mugs while adding a touch of rustic elegance to any space.
Are you ready to dive into the world of creative crafting? Before we get started, we invite you to connect with our vibrant community! Make sure you’re subscribed to our YouTube channel for all our latest video tutorials, tips, and inspiration. You won’t want to miss a single project! Subscribe to our channel HERE for more amazing DIY content!
Today’s project focuses on creating a beautiful and sturdy mug holder. Imagine sipping your morning coffee, your favorite mug gracefully displayed on your handcrafted stand. Or gifting this thoughtful creation, knowing it will be cherished for years to come. This DIY mug holder is not just practical; it’s a statement piece, a conversation starter, and a testament to the joy of making.
Why Choose a DIY Mug Holder? Functionality, Aesthetics, and Personalization
There are countless reasons why a DIY mug holder makes an excellent project. Firstly, it offers a brilliant solution for kitchen organization. Mugs can take up valuable cabinet space, and a dedicated holder keeps them neatly displayed and easily accessible. Beyond functionality, it adds significant aesthetic appeal to your home. Whether your style is farmhouse chic, minimalist modern, or cozy rustic, a wooden mug holder can be customized to complement any decor. The beauty of a DIY project lies in its ability to be truly personalized. You choose the wood, the stain or paint, and the hardware, making each piece unique and reflective of your taste or the recipient’s.
We’ve made this project incredibly simple, ensuring anyone can achieve fantastic results. To see every step in action and gather some expert tips, be sure to watch our comprehensive video tutorial. It’s a visual guide that walks you through the entire process, making assembly a breeze! You can watch the full instructional YouTube video right HERE by clicking this link or simply use the embedded player below.
For those who love to work from detailed diagrams and measurements, we’ve got you covered! You can download and print the complete, easy-to-follow FREE PLANS by clicking HERE! These plans provide all the precise dimensions you’ll need to make your cuts accurately and ensure a perfect fit for all components.
Get Started: Materials & Tools You’ll Need for Your DIY Mug Holder
One of the best aspects of this DIY mug holder project is how resourceful it can be. Before you rush to the store, take a moment to explore your workshop or garage. This project is a fantastic opportunity to utilize scrap wood, helping you clear out those leftover pieces from previous projects while creating something beautiful and useful.
Essential Materials:
We’re keeping the material list short and sweet for this project. You’ll only need two main pieces of wood:
- Approximately 15 inches of a 1×8 board: This will form the base components of your mug holder. A 1×8 board actually measures about 0.75 inches thick by 7.25 inches wide, which is perfect for a stable and aesthetically pleasing base.
- Approximately 12 inches of a 2×2 board OR a 1.5-inch dowel rod: This piece will serve as the central post from which your mugs will hang. A 2×2 board typically measures 1.5 inches by 1.5 inches, making it a robust choice. If you opt for a dowel, ensure it’s sturdy enough to support the weight of multiple mugs and has a diameter of at least 1.5 inches for a good grip for the hooks.
Tools for the Job:
To bring your mug holder to life, you’ll need a few common woodworking tools:
- Measuring Tape and Pencil: For accurate measurements and markings.
- Saw: A miter saw is ideal for precise, clean cuts, but a circular saw or even a hand saw will work with careful measurement.
- Hot Glue Gun: A wireless hot glue gun offers convenience for temporary assembly, holding pieces in place before permanent fasteners.
- Drill/Driver: Essential for pre-drilling holes and driving screws.
- 2.5-inch Wood Screw (Spax recommended): For securely joining the base components and the central dowel.
- Sandpaper or Sander: To smooth edges and prepare the wood for finishing.
- Stain, Paint, or Sealer: To protect and beautify your finished project.
- Clamps (optional but recommended): To hold pieces steady during gluing and screwing.
Step-by-Step Guide: Building Your Shanty DIY Mug Holder
Let’s roll up our sleeves and start building! This project is designed to be straightforward, allowing you to enjoy the process from start to finish.
Step 1: Precise Cuts for Your Base and Dowel
Accuracy in your initial cuts is key to a professional-looking finish. For the base of your mug holder, you’ll be trimming down your 1×8 board into specific sizes. These pieces will form the stable foundation of your holder. Remember to always measure twice and cut once! Refer to the free plans for exact dimensions, but generally, you’ll be cutting a larger square for the primary base and a smaller square to stack on top, creating a solid platform for the central post.
Next, prepare the dowel or 2×2 piece that will hold your mugs. This needs to be cut to the appropriate height, typically around 12 inches, but you can adjust this based on the size of your mugs and personal preference. A longer dowel can accommodate more hooks or larger mugs.
Step 2: Assembling the Base
With your cuts made, it’s time to assemble the base. Take the two square pieces you cut from the 1×8 board. The smaller square will be attached directly on top of the larger square. This creates a layered, robust foundation for your mug holder. We recommend using a wireless hot glue gun for this initial step. Hot glue provides an instant, temporary hold, allowing you to perfectly align the pieces before securing them permanently. Apply a generous amount of hot glue to the center of the larger base piece, then carefully center the smaller piece on top, pressing firmly.
They stack just like this, creating a multi-layered base:
Once the hot glue has set, the base will look something like this, ready for the next stage of assembly.
Step 3: Attaching the Dowel for Mug Support
Now, take your dowel (or 2×2) and hot glue it to the top and center of the two stacked base pieces. This dowel will serve as the central pillar for hanging your mugs. Ensure it is perfectly centered and stands straight to maintain balance and aesthetics. Hold it in place for a moment to allow the hot glue to form a bond.
The structure should now resemble the foundational shape of your mug holder.
Step 4: Securing Your Structure for Lasting Durability
While hot glue is great for temporary holds, we need a more robust solution for a piece that will bear weight. To ensure everything is held together good and tight, you’ll use a 2.5-inch wood screw. We highly recommend Spax screws for their excellent holding power and ease of driving. Carefully drive one screw through the very bottom of the largest base piece, up through the smaller stacked piece, and deep into the center of the dowel. This single screw creates a strong, lasting bond, securing all three components firmly in place. Be sure to pre-drill a pilot hole to prevent the wood from splitting, especially in the dowel.
Step 5: Finishing Touches – Stain, Paint, and Personalization
Congratulations, the structural assembly of your mug holder is complete! Now comes the fun part: customizing its look. Before applying any finish, give all surfaces a good sanding to smooth out any rough edges or imperfections. Once sanded, you are ready to stain or paint your mug holder. Consider your home decor:
- For a rustic farmhouse look: Choose a dark wood stain like walnut or ebony, or try a distressed chalk paint finish.
- For a modern aesthetic: Opt for a crisp white, black, or a bold accent color.
- For a natural vibe: Simply apply a clear protective sealer to highlight the wood’s inherent beauty.
Allow your chosen finish to dry completely according to the manufacturer’s instructions. Once dry, it’s time for the truly cute and personal touches – adding the decorative hardware!
Choosing Your Hooks & Knobs: Adding Style and Function
The right knobs and hooks can transform your simple mug holder into a decorative masterpiece. This is where your personality truly shines through!
Decorative Knobs:
For the top of the dowel, a decorative knob adds a lovely finished look. I personally love the wide selection available at Hobby Lobby, where you can find knobs in various materials, colors, and designs – from ceramic to metal, ornate to minimalist. Choose one that complements your chosen paint or stain and ties into your overall decor theme.
Functional Hooks:
The hooks are, of course, essential for hanging your mugs. Again, Hobby Lobby is a fantastic resource for a variety of styles and finishes. However, if you’re looking for specific options or prefer online shopping, Amazon also offers a huge array of choices. We’ve used and loved these options for other mug holders we’ve crafted as gifts:
Consider the material and finish of your hooks. Brass hooks can lend a vintage or elegant feel, while black hooks often provide a more contemporary or industrial look. The style of the hook itself also matters – choose simple C-hooks, S-hooks, or more ornate designs depending on your aesthetic.
For a touch of classic elegance, these Brass Hooks are a beautiful choice. They add warmth and a sophisticated gleam to any wooden piece.
If you prefer a more modern, clean, or industrial look, these Black Hooks offer a striking contrast against lighter woods or blend seamlessly with darker finishes.
Space your hooks evenly around the dowel, ensuring there’s enough room for each mug to hang freely without clashing. Pre-drill small pilot holes before twisting in your hooks to prevent cracking the wood.
Showcase Your Creation: Inspiration and Final Thoughts
Once your hooks and knob are in place, your magnificent DIY mug holder is complete! Stand back and admire your handiwork. This functional piece of art is ready to adorn your kitchen counter, coffee bar, or dining area. It’s not just a place to store mugs; it’s a piece of decor that reflects your creativity and dedication to crafting.
Here are a few more inspiring shots of our finished mug holders, showcasing how versatile and charming this project can be in different settings:
This project is not only easy and affordable but also incredibly rewarding. There’s a special satisfaction that comes from creating something beautiful and functional with your own hands. It’s perfect for adding a personal touch to your own home or for crafting a truly unique and heartfelt gift that will be treasured.
Join Our Community & Share Your Creations!
Thank you so much for joining us on this creative journey. We hope this detailed tutorial has inspired you to pick up your tools and create your very own DIY mug holder. Don’t hesitate to reach out if you have any questions at all about the steps, materials, or finishing touches. We’re always here to help our fellow DIYers succeed!
We absolutely love seeing what you create! Once you’ve completed your Shanty DIY Mug Holder, please share photos of your masterpiece with us on social media. Tag us and use the hashtag #ShantyDIYMugHolder so we can admire your work and feature it in our community showcases. Happy crafting!