
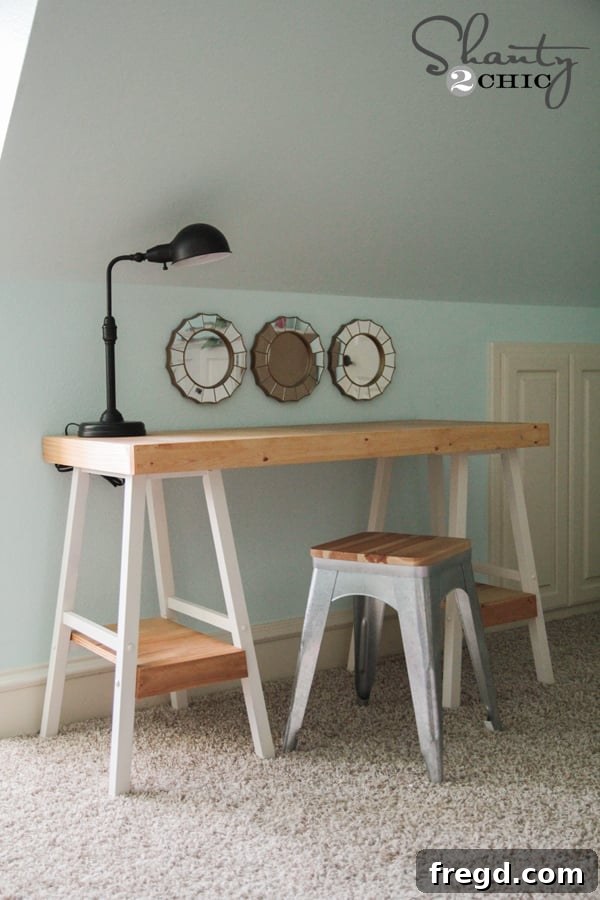
Transforming Barstools into a Stylish DIY Desk: The Ultimate Teen Room Makeover
As many of you know, our home has been a hub of creative projects recently, especially with the recent closure of a loft space to create individual havens for my daughters. Having successfully brought Hayden’s room vision to life, my focus has now shifted to Avery’s space. She’s my eldest, a vibrant 12-year-old on the cusp of 18, navigating that exciting transition into young adulthood. It’s a phase many of you parents can surely relate to! She’s certainly ready for a room that reflects her evolving style and offers functionality for her growing needs. A key piece in this transformation? A chic, functional desk that truly fits her older-girl aesthetic.
Several years ago, I embarked on a creative project to build them a desk using a pair of old barstools that were destined for the discard pile. This desk has served them wonderfully ever since, proving its durability and versatility, and it truly fits the space like a glove. Given its enduring appeal and perfect dimensions, I decided it wasn’t time to replace it, but rather to give it a fresh, updated look – a complete revamp that aligns with Avery’s maturing style. The results, as you’re about to see, are fantastic!
Why a Barstool Desk? The Perfect Blend of Functionality and Style
This DIY barstool desk project offers an incredible balance of simplicity, cost-effectiveness, and customization. It’s truly one of the simplest furniture builds you can undertake, making it ideal for DIY enthusiasts of all skill levels. The beauty of this project lies in its foundation: readily available and often inexpensive barstools. You can frequently find suitable barstools at local thrift stores, garage sales, or even online. For those looking for new options, good quality barstools can be found HERE on Amazon! Choosing barstools with sturdy frames and a design that complements your aesthetic is key. The existing desk served as a perfect template, but this revamp was an opportunity to elevate its design even further. It’s a fantastic solution for creating a dedicated study area or a creative workspace without breaking the bank.
Let’s Dive In: Step-by-Step Desk Transformation!
I’m thrilled to walk you through how incredibly easy this transformation process is. You’ll be amazed at how quickly you can update or build a solid, custom desk for your space.
Step 1: Preparing and Painting the Barstools
My first step was to prepare the foundation: the two barstools. Even though they were previously painted, I wanted a fresh, consistent look to match Avery’s new room decor. After a quick cleaning to ensure a smooth surface, I proceeded with spray painting both barstools. For this, I reached for one of my absolute favorite Rust-Oleum products: Painter’s Touch in the elegant shade of Heirloom White. This specific paint offers excellent coverage and a beautiful, durable finish that is perfect for furniture. You can easily find Rust-Oleum products, including this shade, at your local Home Depot or other major hardware stores. When spray painting, remember to work in a well-ventilated area, use even strokes, and apply several thin coats rather than one thick one to avoid drips and ensure a professional-looking finish. Allowing ample drying time between coats is crucial for adhesion and durability.
Step 2: Crafting the Desk Top – Precision and Material Choice
While the barstools were drying thoroughly, I shifted my attention to preparing the desk’s surface. On my original desk build, I used a standard 20″ x 48″ project panel, which worked perfectly. For this update, however, I decided to utilize some beautiful Purebond Plywood I had leftover from another previous project. I simply adore the rich grain and excellent quality of Purebond Plywood; it takes stain exceptionally well and provides a sturdy, high-end look. I cut the plywood to the same dimensions as the original desk top – approximately 20 inches deep by 48 inches wide. Precision in cutting here is vital for a seamless finish. Once cut, I carefully set it on top of the painted barstools to visualize the fit and prepare for the next step: trimming out the edges.
Step 3: Adding Definition with Pine Trim
To give the desk top a more substantial and finished appearance, I chose to trim it out using 1×3 pine boards. This not only conceals the raw edge of the plywood but also “beefs it up” a bit, giving it a thicker, more custom-built feel that truly elevates the overall design. I started by cutting and attaching the two side pieces first. Each of these 1×3 pieces was cut to 20 inches long, precisely matching the depth of the plywood top. For secure attachment, I applied a generous bead of Gorilla wood glue along the edges of the plywood and then fastened the trim in place using 1.25-inch brad nails with my trusty Ryobi Airstrike brad nailer. This combination of wood glue and brad nails creates an incredibly strong and lasting bond, ensuring the trim remains firmly in place. Once the side pieces were secured, I moved on to the front and back pieces. These two 1×3 boards were cut to 49.5 inches each, providing a slight overhang that contributes to the desk’s robust appearance. I attached them using the same method: wood glue followed by brad nails. The careful alignment of these trim pieces results in crisp, clean corners that enhance the desk’s sophisticated look. This meticulous trimming process is essential for achieving a professional, furniture-grade finish.
Step 4: Staining the Desk Top for a Rich Finish
With the desk top assembled and trimmed, it was time to add the beautiful stained finish. For this particular project, I decided to try a new color that I knew would complement the Heirloom White barstools and Avery’s room decor perfectly. I opted for a Rust-Oleum wood stain called Summer Oak. This stain offers a warm, inviting hue that enhances the natural grain of the Purebond Plywood beautifully. When applying wood stain, it’s important to follow the product instructions, typically applying it with a brush or rag in the direction of the wood grain, allowing it to penetrate for a few minutes, and then wiping off any excess. This method ensures even coverage and prevents a blotchy appearance. The Summer Oak stain truly brought out the character of the wood, adding depth and a touch of rustic elegance to the desk top. This step is where the desk truly starts to come alive and reveal its intended aesthetic.
Step 5: Incorporating Functional Shelves
Beyond just the primary desk surface, I wanted to maximize the functionality of this piece for Avery. I achieved this by adding two additional boards to the bottom bars of each barstool, effectively creating practical shelves. These shelves provide valuable extra storage space for books, stationery, or decorative items, helping to keep the desk area tidy and organized – a must for any busy teen! I highly recommend measuring this section carefully on your own barstools to ensure the best possible custom fit, as dimensions can vary. Before attaching them, I stained these shelf boards with the same Rust-Oleum Summer Oak stain to ensure a cohesive look with the desk top. Once dry, I securely attached them to the barstool frames using a combination of wood glue and brad nails, similar to how the desk top trim was installed. This creates a robust and integrated storage solution that makes the most of the barstool’s existing structure.
Step 6: Final Touches and Assembly
My final step in constructing the desk was to add a small piece of 1×3 trim to the front edge of each newly installed shelf. This served two purposes: it neatly covered the rough, exposed edge of the plywood, providing a much more refined look, and it also matched the visual thickness of the desk top, creating a pleasing sense of symmetry and design continuity throughout the piece. With all the individual components prepared and finished, it was time for final assembly. I carefully carried each painted barstool and the beautifully stained desk top upstairs to Avery’s room. To secure the desk top firmly to the barstool bases, I opted for wood screws driven through the top bars of the stools and into the underside of the desktop. This method creates a very strong and stable connection, ensuring the desk can withstand daily use. The transformation was complete, and the finished top looked absolutely stunning with its rich stain, perfectly complementing the fresh white barstools!
The Finished Product and Budget-Friendly Brilliance
While I still have a ton of additional work and decorating to do in Avery’s room to bring her full vision to life, I am incredibly happy to have this significant piece of her space updated and looking fantastic. For me, this particular revamp was essentially a free project, as I repurposed existing furniture and had leftover materials on hand. This highlights one of the greatest benefits of DIY: utilizing what you already have to create something new and beautiful!
However, even if you were to start from scratch and purchase all the components, this remains an exceptionally budget-friendly project. If you choose to buy new barstools, a project panel or Purebond plywood for the top and shelves, and the necessary lumber for trimming, you could very easily build this solid wood desk for under $100, and potentially even cheaper if you hunt for deals on materials! That is an unbeatable price for a custom-built, sturdy, and stylish desk made from real wood. It’s an investment in a piece of furniture that is both functional and aesthetically pleasing, designed to last for years to come. The sense of accomplishment that comes with creating something so impactful for such a modest cost is truly rewarding.
Explore More Views of the Transformed Barstool Desk!
Here are a few more detailed pictures showcasing the newly revamped barstool desk in all its glory:
Final Thoughts: A Happy Daughter and a Smart DIY
What do you think of this transformation? I’m absolutely thrilled with how it turned out, and more importantly, I have one incredibly happy daughter! Seeing her excited about her updated space makes all the effort worthwhile. And the fact that I didn’t spend a single dime on this particular revamp? Well, that just makes the finished product even cuter, wouldn’t you agree? It’s a testament to the power of repurposing and smart DIY solutions. This project truly shows that with a little creativity and effort, you can achieve stunning results without a hefty price tag. It’s a project that not only provides a functional piece of furniture but also adds a personalized touch to a room, creating a space that is truly unique and cherished.
If you have any questions at all about the materials, the steps involved, or how you might adapt this project for your own needs, please don’t hesitate to ask! I’m always happy to share insights and tips to help you on your DIY journey.
Thanks so much for stopping by and taking the time to explore this exciting DIY barstool desk project!
~Whitney