
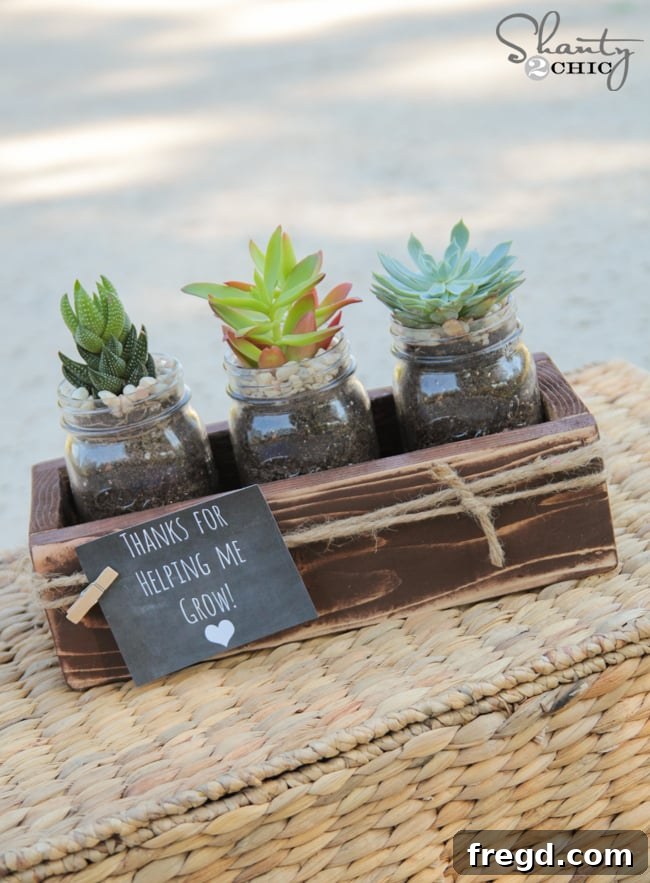
Crafting the Perfect End-of-Year Teacher Gift: DIY Mason Jar Planter Box
As a parent with five wonderful children, the end of the school year always brings with it a delightful challenge: finding the perfect way to thank the amazing teachers who have dedicated so much to my kids. I always aim for gifts that are thoughtful, practical, and truly appreciated, without breaking the bank. This year, I’ve found an incredibly charming and budget-friendly solution that I’m thrilled to share with you: a DIY Mason Jar Planter Box!
Why This DIY Planter Box Makes the Ideal Teacher Appreciation Gift
I absolutely adore this project because it’s not just a gift; it’s a versatile keepsake. Teachers can enjoy the vibrant succulents during the school year or at home, adding a touch of natural beauty to their space. But the beauty of this planter box extends far beyond its initial use. Once the plants have run their course, or if a teacher simply prefers, they can easily remove the plants and repurpose the box. Imagine it holding pens, pencils, rulers, markers, or even small craft supplies on a desk. It’s a gift that keeps on giving, adaptable to any need or decor, and that thoughtful reusability truly makes it stand out.
One of the best parts about this project is that we’re making it incredibly easy for you to replicate. We’ve teamed up with the amazing Jay of Jay’s Custom Creations to bring you FREE, comprehensive plans and a FREE printable for this charming project. Jay has a knack for transforming creative ideas into detailed, easy-to-follow woodworking plans, making DIY accessible for everyone. Seriously, you should check out his site for more incredible projects and plans!
Ready to start building? You can download the free plans for this DIY Mason Jar Planter Box and a special printable tag right now!
Click HERE to download the free plans!
In addition to the plans, I’ll share some valuable tips and tricks below to help you create your planter box with ease and achieve a beautiful, professional finish.
Building Your Budget-Friendly Planter Box: A Simple DIY Guide
This project is designed to be a super simple build, perfect for beginners and seasoned DIYers alike. My favorite feature? It requires only one 4-foot board! For an even more economical option, you can use an 8-foot furring strip, which brings the cost of the wood to under $1 per box. That’s an incredible value for such a thoughtful gift! Plus, the entire assembly process can be completed in about 5 minutes, making it ideal for crafting multiple gifts efficiently.
Step 1: Making Your Cuts
I began by making all my necessary cuts according to the free plans. For my boxes, I chose to use cedar board for its natural beauty and durability, but any 1×4 board will work wonderfully. Common pine or even reclaimed wood are excellent alternatives if you want to further reduce costs or add rustic charm. The plans detail specific measurements, but generally, you’ll need three longer pieces for the sides and bottom, and two shorter pieces for the ends. Always double-check your measurements before cutting to ensure a snug fit.
Step 2: Assembling the Long Sides and Base
With your pieces cut, it’s time for assembly. I started by attaching the two long side boards to the bottom piece. For this crucial step, I relied on Elmer’s Wood Glue Max for its superior bonding strength, ensuring a lasting hold. To further secure the pieces and speed up the process, I used my Ryobi AirStrike Nailer. A few brad nails every few inches provide instant clamping power, allowing the glue to cure properly without needing traditional clamps. If you don’t have a nailer, wood screws or even clamps with strong wood glue can achieve similar results, though it might take a little longer.
At this stage, your partially assembled box should clearly resemble the basic structure of a planter, ready for its end pieces.
Step 3: Attaching the End Pieces
Next, simply add a generous bead of wood glue to the edges of your shorter end pieces. Position them flush with the sides of the box and secure them with more brad nails from your Ryobi AirStrike Nailer. Ensure they are aligned squarely to create a sturdy, attractive finish. The combination of glue and nails provides excellent structural integrity, making your planter box robust enough for years of use.
And just like that, the basic construction of your box is complete! See? I told you it takes roughly 5 minutes for assembly – a truly rapid build that yields fantastic results.
Step 4: Finishing Touches – Staining and Distressing
Now for the fun part: adding character to your planter box! I chose to stain mine with Varathane stain in the beautiful Carrington shade. This rich, warm color instantly elevates the look of the wood, bringing out its natural grain and providing a rustic yet refined appeal. When applying stain, always work in a well-ventilated area, following the product instructions for application and drying times. You can use a brush, rag, or foam applicator, wiping off any excess for a smooth finish.
While the stain was drying, I moved on to preparing the delightful contents. I also love the distressed look on wood, which adds character and a sense of age. I achieved this by using my Ryobi Corner Cat sander, gently sanding down edges and corners after the stain had dried to reveal hints of the raw wood underneath. This technique creates a beautiful, worn aesthetic that truly enhances the rustic charm of the planter box. If distressing isn’t your style, consider a coat of paint in a vibrant color, or a clear sealant to protect the natural wood.
Step 5: Planting Your Succulents
For this project, I chose succulents, and I highly recommend them! They are incredibly low-maintenance, making them perfect for busy teachers who might not have a lot of time for plant care. I found a wonderful selection of succulents at my local Home Depot. To plant them, I used a quick-draining potting mix, which is essential for succulents to prevent root rot. After placing the succulents carefully into the Mason jars, I added a decorative layer of white gravel to the top of each jar. This not only looks fantastic but also helps retain some moisture while providing a clean, finished appearance. The contrast of the green succulents, white gravel, and stained wood is just beautiful!
Step 6: Adding the Printable Gift Tag
No handmade gift is complete without a heartfelt message! I designed these special printable tags just for you. The message “Thanks for helping me grow” perfectly captures the sentiment of teacher appreciation. To accommodate different needs, I created two versions:
-
**Page with 4 tags:** Ideal if you have multiple teachers to thank, like me! You can click HERE to open and print that version!
-
**Page with 1 tag:** This saves ink for those who only need to make a single gift. You can click HERE to open and print it!
Once printed, simply cut out the tags. I then attached mine to some rustic twine with a charming mini clothespin, tying it around the Mason jar or the handle of the planter box. This small detail adds a personal touch and completes the rustic farmhouse aesthetic of the gift. The results are simply lovely!
The Heart Behind the Handmade Gift
What do you think? I am so hopeful that these thoughtful gifts will be cherished by the teachers. While it feels like such a small token of appreciation for the immense love, patience, and dedication they pour into my children all year long, I truly believe they will appreciate the effort, thought, and time invested in creating something special just for them. A handmade gift carries a unique personal touch that often means more than something store-bought.
These DIY Mason Jar Planter Boxes are more than just a craft project; they are a symbol of gratitude, a nod to sustainability, and a versatile piece that can brighten any space. Whether filled with vibrant plants or repurposed as a charming desk organizer, they embody appreciation in a beautiful and lasting way. The combination of affordability, ease of construction, and heartfelt personalization makes this the ultimate end-of-year teacher gift.
Thank you so much for stopping by and checking out this project! I would absolutely LOVE for you to share this gift idea and PIN it with all your friends, fellow parents, and DIY enthusiasts. Let’s spread the joy of handmade appreciation!
Happy crafting!
~Whitney