
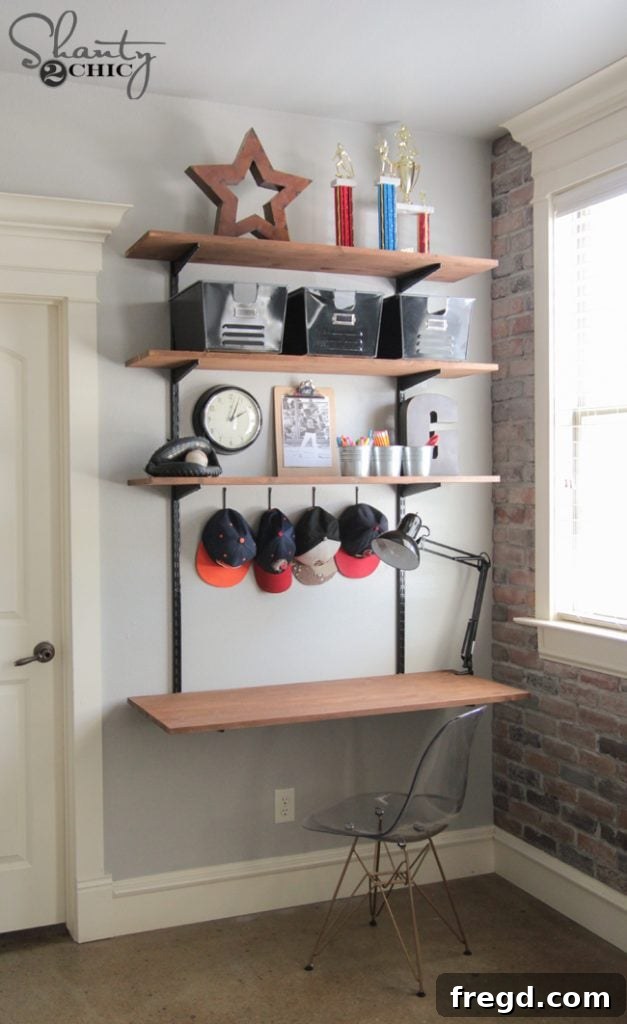
Hey friends! As many of you know, I am knee-deep in the process of redoing my oldest son’s room. A couple weeks ago I shared his new DIY thin brick wall, and today I am thrilled to share another exciting project: his brand new DIY industrial chic wood and metal desk and shelving system! This custom build perfectly blends rustic charm with an edgy industrial vibe, creating a highly functional and stylish workspace. Get ready to be inspired!
Build Your Own Industrial Chic Wood & Metal Desk and Shelving Unit
Doesn’t it look fantastic? Our goal was to achieve a perfect balance between rustic warmth and industrial grit for his room, and I genuinely believe this custom desk and shelving unit hits all the right notes. What’s even better is how incredibly simple this project turned out to be. Seriously, if you have a drill, you’re more than halfway there! I envisioned a system built with robust metal standards to provide sturdy supports for both the desk and the accompanying shelves. After exploring various options online and carefully pricing different sizes to fit our specific needs, I ultimately decided on components from The Container Store. They offer a reliable Elfa system with two distinct finish options: a sleek matte silver and a clean white. While the silver would have been the easier, ready-to-install choice, I was committed to a darker, more dramatic aesthetic, so I opted to paint them black. Let’s dive into the specifics of the pieces I purchased for this custom build, keeping in mind his room boasts impressive 9-foot ceilings, which might influence your own planning.
Gathering Your Materials: The Foundation of Your DIY Desk
One of the most exciting aspects of any DIY project is selecting the materials that will bring your vision to life. For this industrial-style desk and shelving unit, the core components are the metal standards and brackets, paired with beautiful solid wood panels. Sourcing these items thoughtfully ensures both durability and the desired aesthetic, creating a custom home office or bedroom workstation that’s as functional as it is stylish.
Metal Components: Sturdy Elfa System from The Container Store
For the robust vertical metal standards that secure directly to the wall, forming the backbone of this system, I purchased two of these Elfa Classic Ventilated Shelf Standards. I selected the generous 63-inch length to accommodate both the desk surface and multiple shelves above, maximizing vertical storage in the room. Each standard was priced at $15.99, offering excellent value for their strength and versatility, making them an ideal choice for a durable DIY shelving unit.
To support the smaller, upper shelves, I acquired six of these Elfa Solid Shelf Brackets. I chose the 10.5-inch size, as it was perfectly suited for the depth of the project panels I intended to use for the shelves. With three shelves planned, six brackets were necessary (two per shelf). These were very affordable at $4.99 per piece, contributing to the overall cost-effectiveness of this custom desk build.
For the main desk surface, which requires greater depth and support, I purchased two of these same Elfa Solid Shelf Brackets, but in the longer 18.5-inch size. This provided ample support for the desk’s depth, ensuring a stable and comfortable workspace. Each of these larger brackets cost $6.99, demonstrating how you can create an affordable desk solution with quality components.
In total, the investment for all the metal components came to approximately $80. While this might seem like a substantial initial outlay for some, when you consider that you’re getting a complete, integrated desk and a multi-tiered bookcase system for that price, I felt it represented truly excellent value. This modular Elfa system is designed for adaptability, allowing you to reconfigure or expand your setup in the future if your needs change, making it a smart choice for any DIY furniture projects.
Wood Components: Affordable & Beautiful Project Panels from Lowe’s
Moving on to the wooden elements, Lowe’s offers an incredibly convenient and budget-friendly solution: their project panels. These are essentially high-quality strips of pine wood expertly laminated together to create larger, solid pieces. They are not only remarkably affordable but also take stain exceptionally well, producing a rich, appealing finish that enhances the rustic desk aesthetic. A major benefit for DIY enthusiasts, especially beginners, is their availability in various pre-cut sizes. For this project, I made it even easier by selecting sizes that required absolutely no cutting, saving time and effort – truly “easy peasy” and perfect for a simple DIY desk!
You’ll typically find these project panels conveniently wrapped in plastic within the lumber aisle. For the three shelves, I purchased three of these panels, ensuring consistent depth and appearance. You can see the typical size and appearance below, which are ideal for our Elfa shelving hack:
And for the spacious and sturdy desktop, I selected one larger project panel. Its dimensions perfectly matched the requirements for a comfortable and functional workspace, forming the core of our wood and metal desk:
When choosing your wood panels, consider the desired depth for your desk and shelves. These pre-fabricated panels make it incredibly simple to achieve a professional look without needing advanced woodworking skills or tools, making this an accessible project for anyone looking for bedroom desk ideas or a custom office solution.
Preparation is Key: Painting & Staining for a Polished Look
Achieving a professional and durable finish for your DIY desk and shelving unit involves careful preparation of both the metal and wood components. This stage, though seemingly simple, makes all the difference in the final aesthetic and longevity of your project, solidifying its industrial desk appeal.
Transforming Metal: Spray Painting for an Industrial Edge
I began by meticulously spray painting all the metal supports and brackets to achieve that desired black industrial finish. This step is crucial for transforming the standard silver Elfa components into custom pieces that perfectly fit the room’s aesthetic. Here’s a vital tip: if you decide to spray paint your metal components, **always use a high-quality primer specifically designed for metal surfaces first.** The Elfa components have a smooth, almost glossy finish, and without proper priming, regular spray paint will have difficulty adhering and will be prone to chipping or scratching over time. I used Rust-Oleum spray paint for its reliability and durability, a trusted brand for DIY furniture projects. To ensure even coverage and protect my workspace, I laid all the metal pieces out neatly on brown paper before beginning to paint.
The paint I chose for this project was a specific Rust-Oleum variety known for its excellent adhesion and finish on metal. It’s essential to allow your painted pieces to dry completely and cure according to the manufacturer’s instructions before handling or installing them. Rushing this step can lead to immediate chipping and frustration. Even with careful handling, I did experience minor chipping in a few places during installation. This is common in DIY, but it’s an easy fix! I simply purchased a small, inexpensive bottle of black acrylic paint and used a fine-tipped artist’s brush to touch up any imperfections. The results were seamless – you absolutely cannot tell where the chips were, maintaining the sleek look of our wood and metal desk!
Enhancing Wood: Staining for a Rustic Appeal
Once the metal pieces were drying, I turned my attention to the wood project panels. To achieve a warm, rustic aesthetic that would complement the industrial metal, I stained each board with Varathane Wood Stain in the “Early American” shade. This particular stain provides a beautiful, classic brown tone that highlights the natural grain of the pine without being too dark or overpowering, perfectly contributing to the rustic desk feel.
Before staining, ensure your wood panels are clean and free of dust. You might consider a light sanding with fine-grit sandpaper (around 220-grit) to open up the wood grain, allowing for better stain absorption and a smoother finish. Apply the stain generously with a brush or rag, working in the direction of the wood grain. After a few minutes, wipe off any excess stain with a clean cloth. The longer the stain sits, the deeper the color will be. Always test on an inconspicuous area first to ensure you achieve your desired hue. Allow the stained wood to dry completely according to the product instructions – this can take several hours. For added protection and durability, especially for a desk surface, applying a clear topcoat like polyurethane is highly recommended. This will guard against scratches, spills, and general wear and tear, ensuring your DIY desk remains beautiful for years to come and is ready for heavy use in a home office setup.
Installation: Building Your Custom Industrial Desk & Shelves
With all your components prepped and looking their best, it’s time for the exciting part: installation! This step brings your vision to life, transforming raw materials into a functional and stylish piece of furniture. Proper installation ensures stability, safety, and a professional finish for your new DIY desk.
Mounting the Metal Wall Standards: The Backbone of Your System
Once my painted metal pieces were thoroughly dry and cured, I began the installation process. The most critical aspect of mounting the wall standards is securing them firmly. Ideally, you want to attach these into wall studs for maximum stability and weight-bearing capacity. I was fortunate enough to align my metal supports directly into the studs, providing an incredibly secure anchor for this DIY shelving unit. If you’re unable to hit studs in your desired location, don’t worry! The Container Store, which sells the Elfa system, also offers specialized heavy-duty wall anchors designed specifically for this system, ensuring a robust installation even without stud access. Always use a stud finder to locate and mark your studs accurately before drilling.
I started by installing the first support. For this task, I highly recommend using an impact driver rather than a standard drill. An impact driver provides significantly more torque and power, making the job of driving long screws into dense wall studs a breeze and preventing stripped screw heads. I opted for 2.5-inch Spax screws, known for their strong grip and easy driving, to securely attach the standards to the wall for this custom desk build.
After marking the position and eyeballing the initial level, I attached the first standard with just one screw to hold it loosely in place. This allows for adjustments. The next crucial step was to use a long spirit level to ensure the standard was perfectly vertical and aligned before driving in the remaining screws. Achieving perfect level at this stage is paramount for the entire desk and shelving unit to look professional and function correctly. Once confirmed, I proceeded to secure the rest of the screws, typically five screws per standard, ensuring a rock-solid attachment to the wall.
Here you can see the first support confidently hung and perfectly ready for the next stage of the build, forming the initial frame for our wood and metal desk!
To accurately position and hang the second wall support at the exact same height and parallel to the first, I employed a clever trick. I inserted two shelf brackets into the first mounted standard, placed one of my wooden shelf pieces on them, and then positioned the second standard (with its brackets attached) at the desired distance. By laying a long level across the top of the wooden shelf and extending it to the second standard, I could ensure they were perfectly aligned horizontally. With the second standard held firmly in place, I drove in an initial screw. Then, I re-checked the level and made any minor adjustments before securing the remaining screws. This method guarantees a flawless, level installation across the entire span of your industrial desk and shelves.
Securing Brackets and Wood Panels: Customizing Your Space
The final step in the structural build is inserting the chosen brackets into the wall standards and adding your stained wood shelf and desk pieces. One of the greatest advantages of the Elfa system is its incredible adjustability. You can easily reposition the brackets to customize the height of your desk and shelves, allowing for a perfectly ergonomic workspace and optimized storage, ideal for any home office setup or bedroom desk ideas. Once you’ve determined the ideal positions for your desk and shelves, the brackets themselves have small openings on their underside. I utilized a small screw through each of these openings, driving it directly into the wooden panels. This crucial step secures the wood to the brackets, preventing any movement or sliding and ensuring a completely stable and safe surface for your custom desk build.
To achieve a truly polished and seamless look, I took one last aesthetic step. The small screws used to secure the wood to the brackets were a standard gold finish, which stood out against the black metal and stained wood. To seamlessly blend them, I used the same black acrylic paint and a small artist’s brush to carefully dab over each screw head. The result was remarkable – they became virtually invisible, contributing to the overall clean and industrial design of our wood and metal desk!
The Finished Masterpiece: Your Custom Industrial Desk & Shelving!
And there you have it – the entire DIY industrial wood and metal desk and shelving unit, all finished up and ready to be enjoyed! The transformation is truly incredible, showcasing how simple materials and a bit of effort can create a high-impact, custom furniture piece that looks professionally designed and provides a fantastic home office setup.
What do you think of the final result? My son absolutely adores his new workspace, and I couldn’t be happier with the incredible functionality and customized aesthetic of the entire setup. It truly maximizes the space in his room while providing a dedicated area for studying, hobbies, and organization. This custom DIY desk proves that you don’t need to sacrifice style for practicality or spend a fortune to get the perfect home office or bedroom workstation. It’s an affordable desk solution that delivers on both form and function.
Styling Your Industrial Workspace: The Perfect Finishing Touches
Beyond the build itself, the accessories and decor you choose can truly elevate the industrial chic aesthetic of your new desk. Thoughtful styling can tie the whole room together, making your DIY industrial desk an even more captivating focal point. Here are some of the key pieces that complete my son’s stylish and functional setup:
- The Desk Chair: We found his fantastic desk chair online at Industry West. It’s called the Lucia Chair, and I opted for a clear seat paired with a sleek metallic base. This choice provides a modern contrast to the rustic wood and industrial metal, adding a touch of contemporary design while maintaining a light and airy feel that prevents the space from feeling too heavy.
- The Clamp Lamp: To keep the desktop clear and maximize workspace, a really cool clamp lamp was the perfect solution. I discovered this gem on Amazon for just $19. You can see it HERE. Its ability to attach directly to the desk edge is not only space-saving but also contributes to the industrial aesthetic with its functional design, making it an excellent choice for a small space desk setup.
- The Wall Color: The backdrop for this striking desk is a serene yet sophisticated shade of gray. His wall color is a Sherwin-Williams classic called Mindful Gray (SW 7016). This color is truly a perfect gray – it masterfully avoids being too beige (which can feel dull) or too blue (which can feel cold), offering a versatile and calming neutral that complements both the warm wood and cool metal tones beautifully, making it an ideal choice for any bedroom desk ideas.
- The Hat Hooks: For an additional touch of functional style and to keep accessories organized, I found these great hat hooks on Amazon! I absolutely LOVE them. They come 2 in a pack, and you can find them HERE. They are a simple yet effective way to add storage and display items without cluttering the desk or shelves, maintaining a clean and organized custom workspace.
That should cover just about everything you need to know to embark on your own DIY industrial wood and metal desk project! I hope this comprehensive guide inspires you to create a functional and beautiful space in your home, whether you’re tackling a full room makeover or just looking for clever DIY furniture projects. Remember, the beauty of DIY is the ability to customize every detail to suit your personal style and needs, making your workspace uniquely yours. If you have any questions at all, whether about materials, techniques, or styling, please don’t hesitate to ask in the comments below! I’m always happy to help fellow DIY enthusiasts bring their visions to life. Thanks so much for joining me on this creative journey!
Whitney
.