
Welcome, fellow DIY enthusiasts and craft lovers!
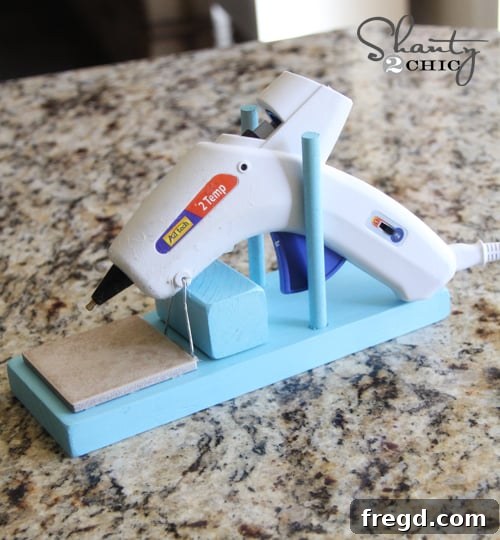
I’m thrilled to share a project today that I believe every crafter, hobbyist, and maker needs in their arsenal: my DIY Hot Glue Gun Holder! This simple yet incredibly effective craft room essential will revolutionize the way you work with your hot glue gun, bringing order, safety, and efficiency to your creative space. Say goodbye to messy drips, precarious placements, and constant fumbling for your glue gun. This ingenious little stand is a game-changer!
Years ago, my Meme (that’s grandma for some!) gifted me a glue gun holder. While I cherished the thought and appreciated the core idea, I quickly realized there were some aspects of its design that didn’t quite hit the mark for practical, everyday use. It often felt unstable, and cleaning up glue drips was still a hassle. So, being the DIY enthusiast I am, I decided to put my own “Shanty” spin on it, creating a version that is not only highly functional but also incredibly easy for anyone to make at home. This is a project truly designed for crafters, by a crafter!
Why Every Crafter Needs a DIY Hot Glue Gun Holder
If you’ve spent any amount of time crafting, you know the hot glue gun is an indispensable tool. It’s perfect for quick fixes, intricate embellishments, and sturdy bonds on a myriad of materials. However, it also comes with its own set of challenges: the scorching hot nozzle, the annoying glue drips, and the constant dilemma of where to safely rest it between uses. This DIY hot glue gun holder addresses all these common pain points, transforming your crafting experience.
- Enhanced Safety: A hot glue gun, especially its metal nozzle, can reach dangerously high temperatures. Resting it directly on your craft surface can melt plastics, scorch wood, or even start small fires. A dedicated holder keeps the hot tip elevated and safely contained, significantly reducing the risk of accidents and burns.
- Mess-Free Workspace: Glue guns are notorious for dripping, even when not actively in use. These drips can accumulate on your table, project, or even your clothes, creating a sticky mess that’s hard to clean. Our DIY holder features a tile surface specifically designed to catch these drips. Once the glue dries, it peels off effortlessly, leaving your workspace pristine.
- Improved Organization & Efficiency: No more searching for a stable spot or worrying about your glue gun rolling off the table. A dedicated holder provides a consistent, easily accessible spot for your tool, allowing you to focus on your project rather than managing your equipment. This seamless organization boosts your crafting efficiency.
- Protects Your Surfaces: By keeping the hot nozzle off your work surface, you’re actively protecting your tables, mats, and unfinished projects from accidental damage. This small investment in a holder can save you from costly repairs or ruined materials in the long run.
- Extends Tool Life: Proper storage helps protect your glue gun from accidental falls or knocks, which can damage its internal components or nozzle. Keeping it upright and secure in a custom holder can contribute to the longevity of your beloved crafting tool.
This project is incredibly straightforward and makes for a fantastic “make & take” activity for a craft night with friends. Imagine everyone leaving with their own practical and pretty glue gun stand – what a great souvenir! So, gather your materials, and let’s dive into making this essential DIY craft accessory!
Let’s Get Started: Building Your Hot Glue Gun Holder!
One of the best aspects of this project is its accessibility. For those of you who might not own a comprehensive collection of power tools, or perhaps feel intimidated by them, this project is absolutely perfect for you! You won’t need anything fancy here. I started my DIY journey with a simple hand saw, much like the one pictured. In fact, I still frequently use it even after upgrading to larger, more powerful saws for bigger projects. It’s incredibly user-friendly – just mark your cut line with a pencil, guide the saw along the line, and you’re good to go! It’s easy, empowering, and absolutely nothing to be scared of. I promise!
Materials You’ll Need:
Gathering your materials is the first step towards a successful DIY project. For this hot glue gun holder, you’ll need just a few common and affordable items:
- Wood Board: A piece of scrap wood, perhaps a 1×4 or 1×6 (approximately 1 inch thick by 4 or 6 inches wide), will be perfect. The length will depend on how many holders you want to make, but a small piece around 1-2 feet long will yield several.
- Ceramic Tile: One small ceramic or porcelain tile. Look for something around 4×4 inches or 6×6 inches. The smooth, non-porous surface of the tile is crucial for easy glue removal.
- Wood Glue: Any strong wood adhesive will work to join your wooden pieces.
- Heavy Duty Adhesive or Construction Adhesive: For attaching the tile securely to the wood base.
- Wood Filler (Optional): If you want a perfectly smooth finish or need to fill any small gaps.
- Sandpaper: Various grits (e.g., 120-grit and 220-grit) for smoothing the wood.
- Paint or Stain (Optional): To customize the look of your holder. I often use Rust-Oleum for a vibrant finish.
- Clear Sealant (Optional): To protect your paint or stain and add durability.
Tools You’ll Need:
This project is wonderfully low-tech, making it ideal for beginners or those without a fully stocked workshop.
- Hand Saw: A simple hand saw or miter box with a hand saw is all you need for cutting the wood.
- Pencil & Ruler/Tape Measure: For accurate marking and measuring.
- Clamps (Optional but Recommended): To hold pieces securely while glue dries.
- Paintbrush (if painting): For applying paint or stain.
- Rag or Paper Towels: For cleanup.
Step-by-Step Instructions for Your DIY Hot Glue Gun Holder:
Step 1: Measure and Cut Your Wood Pieces
The beauty of this design lies in its simplicity. You’ll need just two main pieces of wood: a base and a back support. For the base, measure and cut a piece of your wood board to approximately 6-8 inches in length. This will provide a stable foundation. For the back support, you’ll cut another piece, roughly 4-6 inches in length, depending on the size of your glue gun and how high you want it to sit. Remember, you can always adjust these dimensions to suit your specific glue gun or aesthetic preferences. Use your pencil and ruler to mark your cut lines clearly. If you’re using a hand saw, take your time, keep the saw straight, and let the saw do the work. Don’t force it. Once cut, give all edges a good sanding with 120-grit sandpaper to remove any splinters or rough spots, then follow with 220-grit for a smooth finish.
Step 2: Attach the Back Support to the Base
Now it’s time to assemble the wooden structure. Apply a generous bead of wood glue along one edge of the smaller back support piece. Position this piece onto the center of the larger base piece, ensuring it stands upright. You want to create an ‘L’ shape. Press firmly. If you have clamps, now is the time to use them to hold the pieces tightly together while the glue dries. This ensures a strong, durable bond. If you don’t have clamps, you can use heavy books or other weights, or simply hold the pieces together for a few minutes before allowing them to cure for at least a couple of hours, or as per your glue’s instructions.
Step 3: Secure the Ceramic Tile
Once your wood glue has fully cured and the wooden structure is solid, it’s time for the crucial element: the tile. Apply a strong, heavy-duty adhesive (like a construction adhesive or a robust epoxy) to the top surface of the wooden base where your glue gun’s tip will rest. Center your chosen ceramic tile on this area and press down firmly. The tile acts as the perfect catch-all for drips and provides a heat-resistant surface. Again, you can use clamps or weights to ensure good contact while the adhesive cures. Allow this to dry completely according to the adhesive manufacturer’s instructions, which might take longer than wood glue.
Step 4: Finishing Touches – Paint and Personalization
With the structure complete, this is where you can truly make your hot glue gun holder your own! You can choose to leave the wood natural for a rustic look, apply a wood stain to highlight the grain, or paint it a vibrant color to match your craft room decor. I opted for a beautiful aqua shade from Rust-Oleum, which adds a lovely pop of color and makes the holder feel cheerful and inviting. If painting, apply thin, even coats, allowing each coat to dry thoroughly before applying the next. Once your paint or stain is dry, consider adding a clear sealant for extra durability and protection against wear and tear. This will also make it easier to wipe clean.
See? I told you this was simple! And the results are incredibly rewarding. I absolutely love mine! It has become an indispensable part of my crafting routine. Every single time I pull out my hot glue gun, this holder is right there, ready to keep it standing upright and secure. The ceramic tile surface is pure genius – when the glue inevitably piles up, you can simply peel it off easily once it dries. It’s absolutely brilliant, truly the bomb!
Your New Craft Room Essential in Action!
Here are a few more shots of my DIY hot glue gun holder performing its duty flawlessly. You can see how perfectly it cradles the glue gun, keeping it stable and ready for action, all while preventing any unwanted drips from reaching my precious workspace.
Tips for Success & Customization Ideas:
- Batch Produce: If you purchase your materials strategically, you can easily make about 8 or so of these holders for right around $1 a piece. Woohoo! That makes them perfect for gifting to fellow crafters, selling at craft fairs, or using as party favors for a crafting event.
- Experiment with Design: Don’t feel limited by my design. You can modify the height of the back support, the size of the base, or even add small side compartments for glue sticks or other tiny tools.
- Decorative Touches: Beyond paint, consider adding stencils, decals, or even some decorative trim to your holder. Make it truly reflect your personal style!
- Alternative Materials: While wood and tile are excellent, you could experiment with other heat-resistant materials for the base if you have them on hand, though tile is highly recommended for its non-stick properties.
I truly hope you like this DIY hot glue gun holder as much as I do! It’s a project that delivers immense practical value for minimal effort and cost. It’s an easy win for any craft space seeking better organization and enhanced safety. Give it a try, and you’ll wonder how you ever crafted without it!
Thanks SO much for stopping by and taking the time to explore this project! Your support means the world. I would absolutely LOVE for you to PIN this project on Pinterest and share it with your crafting community on social media. Let’s help more crafters get organized and safe!
Have an awesome day, and happy crafting!
~Whitney