
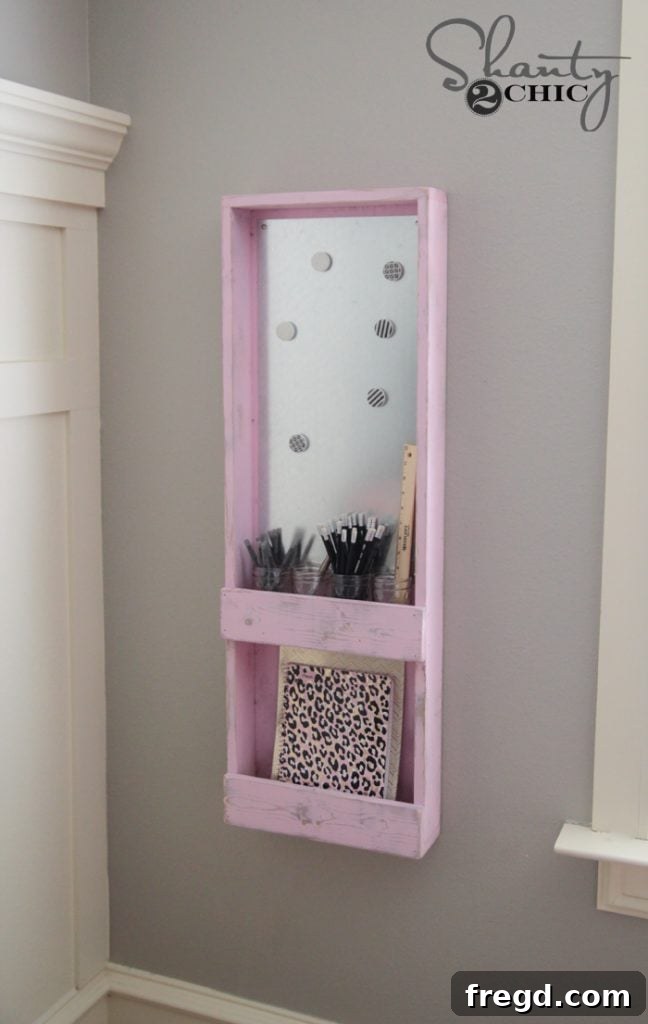
Welcome, DIY enthusiasts and organization lovers! The season of fresh starts and new beginnings is just around the corner, especially with back-to-school approaching. For many, this time sparks a joyous anticipation for new supplies and the promise of a well-organized space. If you, like us, get a little giddy walking down the aisles of office supply stores, you understand the thrill. Today, we’re diving into a project born from the need for creative storage in a small space: an incredibly versatile and chic DIY Magnetic Supply Organizer and Memo Board.
My eldest daughter, like many students, is passionate about her school supplies. As we embarked on updating her room, a dedicated area for her essentials, along with a functional memo board, became a top priority. Given her compact room, a smart, space-saving solution was essential. The result is this fantastic Magnetic Supply Organizer, designed to keep everything neatly in its place while providing a creative outlet for notes and reminders. It’s not just for school kids; this project is perfect for crafters, home office warriors, or anyone looking to declutter and add a personalized touch to their space.
Isn’t it charming? The soft pink hue perfectly complements her room, a color choice I couldn’t resist for this particular project! This organizer blends seamlessly with her decor while offering immense functionality. It’s a testament to how practical storage can also be beautiful. This DIY venture is surprisingly straightforward, even for those new to woodworking. With just a few basic tools and materials, you can create a custom organization system that perfectly fits your style and needs. Let’s gather our materials and get started on building this invaluable piece for your home or office.
Building Your Ultimate Magnetic Supply Organizer: A Step-by-Step Guide
Creating this magnetic organizer is a rewarding project that combines utility with personal style. Follow these simple steps to construct a robust and attractive storage solution. Remember to always prioritize safety when working with power tools.
Materials You’ll Need:
- Hardwood Plywood Panel (for the main back and shelf)
- 1×4 Boards (for the frame and front supports)
- Wood Glue
- 1.25″ Finish Nails
- Metal Sheet (to create the magnetic memo board)
- Epoxy or Strong Multi-Purpose Glue (for attaching the metal sheet)
- Furniture Tacks (optional, for decorative accents)
- Paint or Wood Stain (your preferred finish)
Tools Required:
- Table Saw
- Miter Saw
- Finish Nailer
- Measuring Tape
- Pencil
- Safety Glasses and Hearing Protection
Step 1: Preparing Your Plywood Panel
Begin by dimensioning your hardwood plywood panel. Using a table saw, carefully rip your main plywood sheet to a consistent width of 13 inches. This will form the core back panel of your organizer. Once the sheet is ripped, switch to your miter saw to make two precise cuts: one at 42 inches in length, and another smaller piece at 2.75 inches. The 42-inch piece will be the main backboard, while the 2.75-inch piece will serve as a sturdy shelf for your supplies.
Step 2: Cutting the Side Frame Pieces
Next, take one of your 1×4 boards and use your miter saw to cut it into two identical pieces, each measuring 42 inches long. These two pieces will form the vertical side rails of your organizer, providing structural integrity and a framed look around your plywood back panel. Ensure these cuts are clean and precise for a professional finish.
Step 3: Applying Wood Glue for a Strong Bond
Before attaching your side pieces, apply a generous and even line of wood glue along the edges of your main 42-inch plywood panel where the 1×4 boards will be attached. Wood glue provides an incredibly strong bond, enhancing the durability and longevity of your magnetic organizer. Don’t be shy with the glue, but avoid excessive squeeze-out.
Step 4: Attaching the Side Rails
Now, carefully position one of the 42-inch 1×4 boards along each long side of the plywood back panel, aligning the edges perfectly. Use your finish nailer with 1.25-inch finish nails to securely fasten these boards in place. Drive nails approximately every 6-8 inches, ensuring a firm attachment that will hold up to daily use. The combination of wood glue and finish nails creates a robust and lasting joint.
Step 5: Inspecting the Basic Frame
At this stage, your DIY magnetic organizer should begin to take shape, resembling a long, shallow box without a top or bottom. Take a moment to inspect your work, ensuring all connections are secure and the frame is square. This foundational step is critical for the overall stability and appearance of your finished project.
Step 6: Creating the Top and Bottom Frame Pieces
Next, we’ll complete the outer frame. Using your miter saw, cut two more pieces from a 1×4 board, both measuring 14.5 inches long. These will serve as the top and bottom horizontal pieces of your organizer’s frame. Apply wood glue to the ends of the side rails and the edges of the plywood where these pieces will sit. Then, use your finish nailer to attach these 14.5-inch boards to the top and bottom ends of the assembled structure, completing the sturdy outer frame.
Step 7: Installing the Internal Shelf
Now, it’s time to add the internal shelf for your supplies. Take the smaller plywood piece (2.75 inches wide) you cut in Step 1. Carefully measure and line this piece up 13 inches from the bottom 1×4 frame piece. This placement creates a perfect compartment for taller items below and a convenient shelf above. Apply a line of wood glue around the sides and back edges of this shelf piece. Then, use your finish nailer to drive finish nails from the outside of the vertical 1×4 side rails directly into the edge of the shelf piece, securing it firmly in place.
Step 8: Cutting the Front Support Boards
To create the front lip of your supply compartments, cut two additional pieces of 1×4 board, both measuring 14.5 inches long. These will be strategically placed to form the front retainers for the base compartment and the upper shelf compartment, preventing items from falling out while keeping them easily accessible. These pieces add both structure and functionality to your magnetic organizer.
Step 9: Attaching the Bottom Front Board
Take one of the 14.5-inch 1×4 pieces you just cut. Apply a line of wood glue along the bottom edge of the organizer, where this piece will meet the main plywood panel and the bottom frame piece. Carefully align and attach this board to the very base of the organizer using your finish nailer with 1.25-inch finish nails. This creates a sturdy front lip for the largest storage compartment.
Step 10: Attaching the Shelf Front Board
Finally, take the second 14.5-inch 1×4 board. Apply wood glue to the front edge of your internal shelf and carefully position this board along that edge. Use your finish nailer to secure it in place, driving nails through the front board into the edge of the shelf. This completes the structure of your organizer, providing a defined compartment for the upper section.
Finishing Touches and Customization for Your Magnetic Organizer
Congratulations! Your wooden frame for the DIY Magnetic Supply Organizer is now complete. The bare wood structure provides a blank canvas for you to personalize and transform into a functional and stylish piece. This is where your creativity truly shines, allowing you to match the organizer perfectly to its intended space and user.
Personalizing Your Organizer with Paint or Stain
The first step in finishing is to apply your chosen paint or wood stain. If you opt for paint, consider colors that complement the room’s existing decor – a vibrant pop of color can energize a space, while a neutral tone offers subtle elegance. For a more rustic or natural look, a wood stain will highlight the beautiful grain of the plywood and 1x4s. Apply thin, even coats, sanding lightly between coats if necessary, to achieve a smooth and durable finish. This step not only adds aesthetic appeal but also protects the wood from wear and tear.
Adding the Magnetic Functionality
Once your paint or stain has fully dried and cured, it’s time to add the crucial magnetic element. Carefully adhere a metal sheet to the flat plywood back panel of your organizer. For the strongest and most reliable bond, use a high-quality epoxy or another strong multi-purpose adhesive. Apply the glue evenly across the back of the metal sheet, then press it firmly onto the plywood. Allow ample time for the adhesive to set completely, ensuring the metal sheet is securely attached and won’t budge. This metal surface transforms your organizer into a functional magnetic memo board, perfect for notes, photos, or small magnetic containers.
Decorative Accents
To add a touch of charm and polish, consider adding furniture tacks to each corner of the organizer. These small details can elevate the overall look, giving it a more finished and custom feel. They are easy to install and come in various finishes, allowing you to match them to your hardware or desired aesthetic. This seemingly minor addition can significantly enhance the visual appeal of your DIY project.
Unlock Endless Organization Possibilities
With the finishing touches complete, your DIY Magnetic Supply Organizer and Memo Board is now ready for action! Imagine the possibilities for decluttering and beautifying any space. For students heading back to school, it provides a dedicated spot for pens, pencils, rulers, and sticky notes, all within easy reach. The magnetic board is ideal for displaying assignment reminders, class schedules, or even inspiring quotes.
Beyond school supplies, this versatile organizer is a fantastic addition to any craft room, providing accessible storage for glues, scissors, brushes, and small notions. In a home office, it becomes a streamlined hub for stationery, important memos, and business cards. Its compact yet efficient design makes it perfect for small spaces where every inch of storage counts. You can hang it above a desk, beside a crafting table, or even in an entryway to manage mail and keys.
This project has brought immense joy to my middle schooler, who now has a beautifully organized and personalized space for all her academic and creative endeavors. It truly is a project that delivers on both form and function. We encourage you to embark on this DIY journey and create your own custom magnetic supply organizer. Share your creations with us – we’d love to see how you adapt this design to fit your unique style and organizational needs!